Question
It seems that scribing is one of the tougher concepts to teach rookies. I thought I'd describe how I scribe loose end panels (this particular example was for a high-end installation). Hopefully, this post will shed some light on the general scribing process as well as a "loose panel" scenario.
First, I clamp the loose end panel in place, and check the reveal at both the top and bottom. The cabinet is typically hung plumb, but in the event that it's a tad out of plumb, relying on the reveal will ensure that the fit matches the cabinet. I clamp the panel just loose enough so I can bump the panel to adjust the reveal. When the reveal is equal top and bottom, I tighten the clamp.
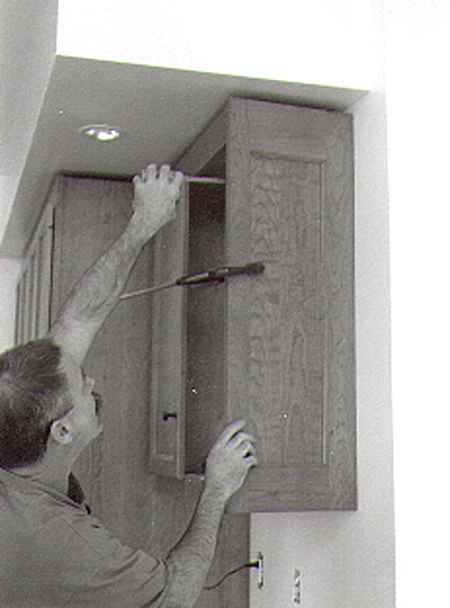
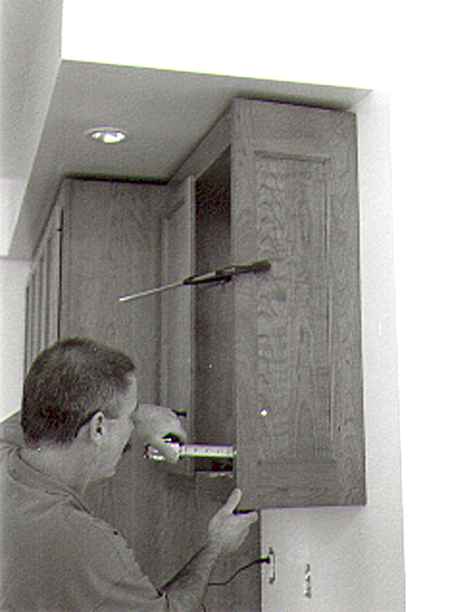
Next, I set my scribe to the distance shown in the sketch below:
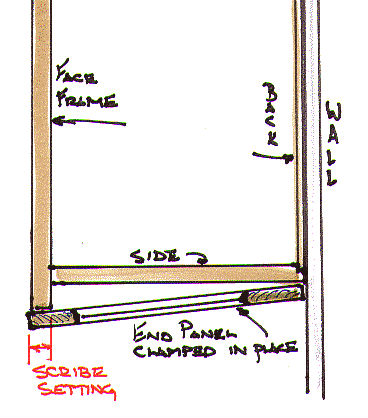
Then I mark the cut line on the end panel.
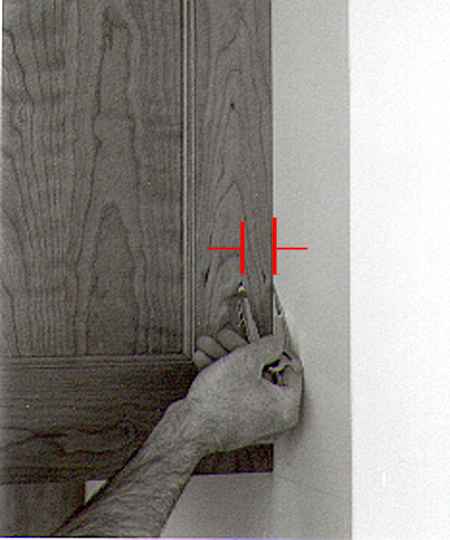
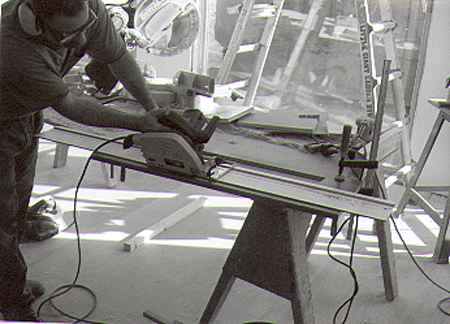
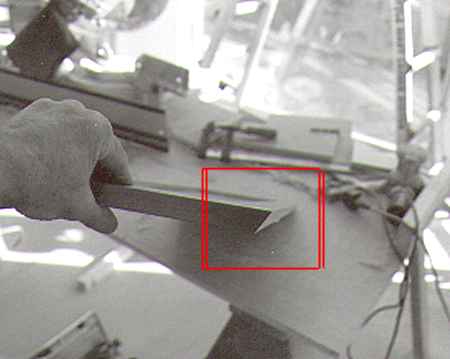
Next, I cut as close to the line as practical, with the saw set at a 30 degree bevel.
The bevel (shown below) allows me to fine-tune the cut using a block plane. If I had made a square cut, I'd be removing the full 3/4" as I adjusted the cut to match the line. This bevel also allows me to cut the panel 1/16th or so heavy, and I loosen the cabinet a bit, install the panel, and then draw the cabinet tight to the wall. The sharp beveled edge will actually "cut" itself into the drywall for a fit that can't be beat.
Forum Responses
From contributor L:
I don't use a belt sander to scribe (used to several years ago). If it's a loose panel, I will rip it within 1/8 of where it needs to be, then by holding or clamping it in place (depending), I scribe it and sand it with a grinder and finish it with a file.
This system works well for me as I have mastered the art of using a grinder. I even use it on p-lam top deck seams. Most carpenters use a belt sander to scribe and are reluctant to try using a grinder. I was one of them, but now I would never go back to using a belt sander for scribe work. Sanding disks are less expensive and grinders are small - easy to stuff into your bat box. Ergonomics is an important factor as well as increased speed and overall flexibility.
It cuts a clean line that fits like a glove. And you can usually do two adjacent walls in a corner or wall and ceiling at the same time. I also do plunge cuts with it where I need to get around outlets or whatever. Just hold the wheel against the wall and rock it in or out.
Solid stock tends to want to split along the grain, so I make a shallow cut with the router and jigsaw off the rest.
This is faster, easier and does a better job than anything I have seen, be it sanders or saws or grinders or planes. You can throw away your compass, too, since it makes the cut, not just a line to cut to. The only thing is you need to be able to pull the piece away from the wall 1" to make it work.
2. When your back scribe is complete, do you flush up the extended edge of the face frame with the outer face of the front stile of the loose panel?
3. Do you V-groove this butt joint formed by the extended edge of face frame and the loose panel?
4. In your next to last photo you seem to be cutting along a straight edge. Usually a scribe is less than straight. Are you rough cutting a straight line and then planing to your scribe line?
Contributor B, what type of offset router are you talking about? Type and size of bit? I don't see how your method could work for the end panel scribe that the questioner is showing in the photos. Could you describe a little more about how you would do it?
2. The face frame extends an inch beyond the plywood cabinet side, resulting in a 1/4" reveal after the panel is installed. The 1/4" reveal is very forgiving in the field (as opposed to trying to flush this spot up). Here's a sketch of this detail:
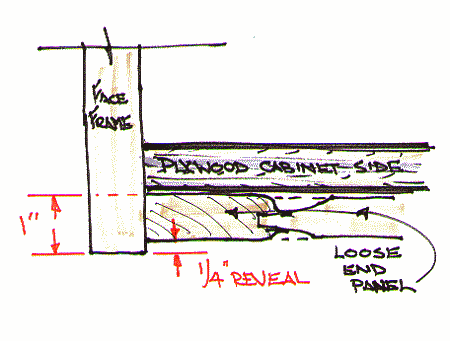
3. The panel edge is slightly eased when it's made, which again makes this spot much more forgiving during the install. The easing isn't a must, but a nice touch.
4. You got it - I cut as close to the scribe line as possible with the straightedge, and then shave the remainder with a *sharp* block plane. There's been a lot of mention about using a grinder or belt sander, and while they may make sense for laminate backsplash scribes and other "heavy" scribes, a block plane is my tool of choice in this situation. It fits in my pouch, doesn't require safety glasses, is quiet, and most importantly, allows me to fine tune the scribe with one hand while I support the panel with my other hand (which all adds up to *faster*, in case you think I'm sounding like a purist). It's also a lot harder to ruin a panel with a block plane then a grinder or sander... I think most installers don't consider using a block plane 'cause they haven't broken the learning curve of sharpening one. When they're razor sharp (literally), they're awesome tools. When they're not razor sharp, they might as well stay home.
I use a sharp 1/4" straight carbide cutter projecting 1/4" to 3/8" out from the router base. It will cut more, but I rabbet cabinet ends, etc. so I don't have so much to cut. It is also easier on the tool that way. I don't like to abuse my tools, although the price of a router is still cheap when I consider the time (money) I save.
To scribe the end the questioner is doing, I would screw a 1" spacer to the cabinet end 2" out from the wall to get it parallel with the cabinet end, then use 2 clamps to secure the end to the cabinet with the outside edge 1" out from the back of the face frame. Assuming the face frame is 3/4" thick, the panel edge would be out 1/4" from the face of the cabinet. It is 1" from the wall to where the router cuts.
Next I would run the router up the panel, holding the wheel against the wall, making a 1/4" or so deep cut. Solid wood tends to split if I try to cut all the way through with the router. If I were to go the other direction, the router might pull into the panel and cut too much.
Unclamp the panel and finish the cut with a jigsaw, using the cut made with the router as your line. I bevel that cut a little except at the bottom where you would see it. This cut doesn't have to be neat because you don't see it. Remove the spacer and put the panel in place.
It might work without the 1" filler, but the edge of the wheel may leave a mark on the wall because of the angle created by the face frame being out 1" from the end. The wheel has a chamfer on the edges, but it is probably best to use the flat part of the wheel against the wall.
I agree on the sharp block plane for times when the router won't work. I have much more control over what I am taking off than with a belt sander, plus it is faster than having to clamp the panel down someplace to use a sander or grinder. I really like my Bosch jigsaw for rough cutting before using the block plane.
The Quickscribe is a new tool I got that cuts my scribing time way down. An average 8' plastic laminate top takes less than 5 minutes to scribe and the fit is unbelievable. The more I use it, the more uses I find for it.
My experience, for all practical matters, is solely face frame. Using a block plane with laminate/composite panels doesn't seem to make much sense. Both styles have their merits. I still think the reason the block plane has fallen out of favor (for all you face frame installers) is because no one knows how to sharpen the things anymore.