Question
Most advice on scribing deals with one edge, but a lot of installs require two or more edges. By my count, there were six edges on this single piece that needed scribing:
The legs on the mantel I just installed came down the wall on the left side, extended out from the wall 5" along the non-level floor, turned and traveled 2" toward the hearth, went up the 3" crooked side of the tiled hearth, turned back toward the wall 2" and then went up the tile-faced surround. Then I had to do the second leg while keeping the heights of the two legs identical.
After a few hours of fussing, I decided that molding was the only way to make it work. Some of the gaps were just plain ugly. If I scribed them away, new gaps would appear somewhere else.
So how do you fit such an object without a ton of molding? How would you scribe a desk to fit in a niche (3 edges need to be scribed).
Forum Resposnes
(Cabinet and Millwork Installation Forum)
From contributor D:
Put your cleat on the wall and make a template out of 1/4 ply. Screw ply together using 1/2 pan head screws. Remember to screw ply from bottom up if at all possible, so when you place template on desk the screws don't scratch through desk or countertop. Always use a template when scribing, as it saves so much time and no need for moulding to hide bad workmanship. One other tip - whenever you scribe anything to sheetrock, such as desks or countertops, hold the cleat that goes on the wall 1/8 away with some 1/8 shims, then make your template tight, cut your top and install it, screw the top in place up through the cleat, then take the 1/8 shims out and screw the cleats back tight to the wall. No mouldings, no caulk - just walk away.
I installed commercial millwork, PL and pre-finished wood for a few years. Believe me, I can scribe with the very best of them. Pro installers rarely use templates. It is a fact. And we use compasses from the hardware store, which most do modify slightly.
The oversized top won't fit into the niche. An undersized top would fit into - but never fill up - the space. So without making a template, how do you solve this problem?
>So without making a template, how do you solve this problem?
There is a way, but damned if I can remember where my reference to it is - I'll keep looking. In the mean time, I've dealt with this by using two pieces of cardboard - one to handle a little over half the back and one side, the other piece to handle the other half and the other side. When I've got them fitting, I hot melt the two pieces together where they overlap.
Not sure why you don't want to use a template - it really doesn't take very long using the method above.
With a template I can do it twice as fast. If there is a faster way without a template, I would love to know it.
It gets easier with time, just like everything else. The mistake I made when starting out was to not undercut enough. If you put a hefty angle on the jigsaw, and make your cut just large enough to keep your line, then it's easy to sand to your finished scribe line with a light touch on the belt sander. If you don't undercut enough, you are sanding the whole thickness of the edge, and putting too much pressure on the sander, losing the delicate touch necessary to sand exactly to the line.
Another tip when scribing: the slower and easier you cut and sand, the faster the job will be done. Hurry the cutting and the sanding, and it will take forever.
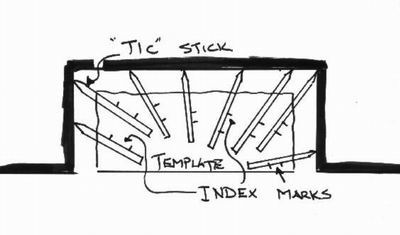
Here's the first sketch where I'm trying to illustrate how you lay the smaller template piece within the 3 sided area, and then use the tic stick to make reference marks:
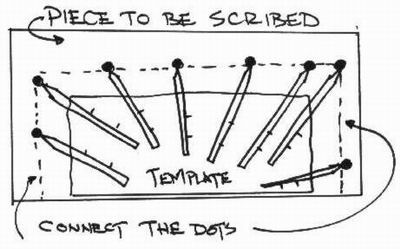
And here's the second illustration, showing how the template is placed on top of the piece to be cut, and the "tic stick" is positioned on the index marks (that were marked on the template piece), and the point marks (from the point of the tic stick) are transferred to the piece to be cut. The "connect the dots" line below is the cut line.
My memory tells me that the accuracy is dependant on the number of marks you make. You really can *easily* scribe the most bizarre configurations using this method.
One more thing is that it is a lot simpler if the back end of the tick stick is square. Then you just draw along one edge and across the back edge, and maybe back up the other edge a bit, thereby eliminating the potentially confusing array of hieroglyphics.
As to the efficiency of this method... if I had a very expensive piece of material that I had to fit in a very difficult spot, a few more minutes spent making sure of a dead-on scribe is, to me, highly efficient.
Maybe it's an issue of production work versus custom work. Fussing with fits often cannot be justified in production work, where in custom work, it's part of the package (where the "fit" expectations are often much higher).
Maybe it's worth including some qualifiers... such as a piece that's being dropped in a 3 sided nook with "squirrelly" walls (finished walls that can't be scraped up), no molding to cover the gaps, and you only get one try. I'd be very interested in hearing how you'd scribe such a piece in a faster and more accurate way.
There's seldom one method that works best in all situations... in really tricky fits, I do think the tic stick approach has a lot going for it.
Also - there was an earlier comment regarding how such a piece would shrink/expand and throw any precision fit out the window. There's some real merit to this comment if the piece in question is solid wood. On the other hand, if the piece is plywood, then a precision fit would remain consistent through humidity swings.
I do not know what you mean by production work, and I am not sure what anyone means by custom, but in commercial work, everything has to fit tight. And it does. No gaps allowed big enough to push a credit card into. That is WIC standard.
Contributor D is right. Anyone using a template for all but the most unusual scribing conditions would be fired on the spot. A three sided nook with squirrelly walls is not an "unusual" condition.
And someone has got to say it - installers cut scribes that fit with a skilsaw. Fussing and jigsaws are for hobbyists. Any Joe hobbyist can do a task well if he has unlimited time. Doing it well and quickly, that is the hallmark of a real craftsman.
Situation - 3 sided captive scribe with really bad walls. Can't scratch the walls during installation, and fit must be credit card tight.
If the scribe can be done using the "slightly oversize tilt" method, by all means go for it. When the profile of the scribed piece is so wacky that the above won't work, tic stick it.
I think one area where the tilt and scribe method won't work is when the shape of the wall varies significantly between where the tilted piece touches the wall, and where the finished piece touches the wall. I've done many installations in 100-200 year old houses where this would be the case.
I think contributor J is on track when he says "...nobody's recommending this way for typical stuff but it does work as fast and more accurately than anything else when out of the ordinary scribing is required." Key phrase: "when out of the ordinary scribing is required"
I found the comment: "And someone has got to say it - installers cut scribes that fit with a skilsaw. Fussing and jigsaws are for hobbyists." interesting ... I agree that when a skilsaw can be used, it's the quickest way to make the cut (I cut at a 30 degree bevel and then fine tune), but when there's any jogs or inside radiuses, I'm not sure how the scribe can be cut using a skilsaw.
I think we're all on the same page in this thread, just focused on different levels of difficulty.
Certainly it can't slide in, nor can it tilt in without damage to the walls. I'd gander there are many times when a credit card fit just isn't possible.
Hot melt and 2" rips of 1/8" door skin work quite well for fits that are difficult allowing all cutting to be done one time in a different location.
As for jigsaws, they are great for inside corner cuts, and nice for jobs where you want to keep the flying dust down, like occupied suites.
We use a system that makes this type of job quick and easy. There is a link somewhere on WOODWEB for Quickscribe. Check it out.
Also, how about scribing the face frames and then attaching on-site?
Look at the approach they present at www.thescribingtool.com and tell me it can't work.
The limitation on using an offset router against stone is how flat the stone is. The offset part of the router, which holds the bit, is only 1/4" or so away from a flat wall up about 3 inches. If the stone is fairly flat then you can get the router into all the nooks; if the stone projects out too far in that 3 inch height, the router won't work here. You can also tilt the router out of a cut, then plunge it back into the work on the other side of the obstruction and work only the part the router didn't cut, such as when a light switch or an outlet is in the way or if the stone is flat enough except in a few spots. For flat stone, tile, brick, or curved walls, I use the offset router for making templates to follow with the other router. If scribing to the outside of a wall with a 48 inch radius, the quickscribe will follow it exactly, but will cut a 49" radius because it cuts 1 inch from the wall. You need to put that inch back on to have a good fit. Thus the need for still another tool. What we really need is the woodworker's Vegomatic (it slices, it dices, it does everything) so we don't need boxes of heavy tools to lug around.
1) If one is scribing to a surface such as field stone, the variations in the amount of material cut is from 0 to 6". This would require cutting with the Quickscribe 1/2" to 1" of material away, then resetting the template, cutting another 1/2 to 1" of material away, then resetting the template, cutting� and so on. With the tick sticking method, one would set, mark, cut - a lot faster, less tools.
2) Inside corners where two stones meet to form a sharp point in the wood would leave a minimum of a 1" radius using the Scribemate. With the tick sticking and a jigsaw, the cut could come to a point and exactly fit the stone.
3) The lighter tool box is appealing to me. However, an extension cord, the Quickscribe, the router, the Scribemate, jigsaw, could all be eliminated in lieu of a stick and a coping saw. However, I would still use a jigsaw for time concerns.
4) It seems to me that the Quickscribe depends on a high degree of skill to keep the tool perpendicular to a radically changing surface. For example, a 4 1/2" wall which needs a top notched on three sides of that wall. To make the transition from 0 degrees to 90 degrees to 180 degrees is not impossible, but more difficult than the tick sticking which leaves no room for error.
5) Of course, the cost. The tools I already have will do everything I want to with excellent quality in the least amount of time. With the addition of the Tick Sticking (or scrap wood) I can do more, better, and faster with what I already have. For me, I don't see the value.
Comment from contributor A:
The next time you're at the store buying those 29 cent compasses, buy a few different sizes of flat washers. When you need to scribe, just stick a sharp pencil in the hole and roll it down the wall. While this won't work to scribe a floor to field stone 6 inches away, it does a pretty good job on countertops that are within 3/4".
What a great trick... I'm thinking with the right fender washer, you could extend the "reach" to nearly 1-1/2 inches. I plan to try it out.
I carry a roll of butcher paper in the truck, and most the time it just sits there. But once in a great I get some really weird shape I have to scribe to. I can cut with a pair of scissors, arcs, angles, brick faces, stone, whatever faster than I can on the wood. Also, I don't screw up good materials this way. Once I get the look I want, I tape it on the piece and cut close but not quite, then do a final in place last fit.
I just wanted to pipe up in defense of my jigsaw, which is my primary tool for cutting scribes. A Skilsaw would never get within ten feet of my countertops. I scribe with a sharp pencil in a compass, or simply cut a small piece of wood to use that is the exact thickness I need. I use my Bosch jigsaw with a sharp 101BF blade and cut right to the line, with some blue tape protecting the countertop surface. I will use a bevel except where the front edge of the counter needs to be square. One scribe and one cut that does not need repeating or sanding will always be the fastest way. Making a long cut with a jigsaw can be time consuming, but it eliminates the need for additional steps. Templates are absolutely necessary for certain conditions if you want a perfect fit with a minimum number of steps. The tick stick method shown seems to be way too time consuming for me, although I have used the principle in a different application.
From contributor S:
That Bosch jigsaw is the only jigsaw I ever had that was a good jigsaw. I said above that I'd hate to cut a long line with a jigsaw, but I'd do it with that Bosch. I have a top handle one, but I wish I had the barrel one instead. I really like those Dewalt blades that have those wavy looking nubs instead of pointy teeth, too.
The comments below were added after this Forum discussion was archived as a Knowledge Base article (add your comment).
A couple of things 1) jigsaws do have value as scribing tools - especially with a good downcut blade - not yet available on a skilsaw. 2) In a 3-sided captive scribe, I've found the best method is to use Quik-Grip spreader clamps to stretch the walls out. You'd be surprised at how far they can move. When you put the piece in place and release the clamps it looks like your cabinet was born there. (Warning: use a large piece of scrap plywood as a base for your clamps or you might have a sheetrock repair bill.)