Setting and Leveling Base Cabinets
A discussion of various methods for setting base cabs, including using a separate ladder base, using leg levelers, or using a wall cleat at the back and leg levelers in the front. March 26, 2009
Question
I've been having some trouble getting my cabinets plumb and level. I work alone and the frustration of shimming the cabinets level and then trying to scribe a toe kick with the cabinets in place really makes for a long day. I've been thinking about that loose toe method where you build your bases as a box without the toe kick notch and install over a pre-installed level framework. It seems it would eliminate some frustration. I could use those screw type levelers, scribe a toe board much easier, get more cuts out of a sheet of plywood, save time by not having to notch for the toe. If this method is easier, why doesn't everybody do it? And then the question about the ends of a cabinet run... Normally I don't see a toe kick there, but with a loose toe, there would have to be, right?
Forum Responses
(Cabinetmaking Forum)
From contributor J:
We have used the toekick frame method for over ten years and there is no way we will do it any other way! You can cut off fall into 3.25" x 19.5" for the "studs" and cut 3/4" ply to length for the front, back and top rails. Total height 4", depth 21", length determined by cabinet run less cabinet overhang at ends (preferences). After shimming you can glue, screw blocking to deck. Saw a guy installing schools this way and the efficiency was incredible!
From contributor D:
We use cabinet legs. Makes installation of lower cabinets a breeze and you get better yield from a 4x8 sheet because the cabinet sides are 30"or 30.5" H.
From contributor W:
Use leg levelers. Once you use them a couple of times, you'll never look back. Thousands of other shops use them all the time.
From contributor J:
I will confess I have never used them, and I might just check them out! Here in the south I just have yet to see them used by anyone. My supplier says I am the only shop using the
Blum undermount solo as our base slide and if most of these guys tried them, they would probably use them as well.
From contributor E:
I've been using ladder frames for my bases for several years now and truly can't see any better way to do them. I'm sure the leg levelers work fine, I just like to overbuild rather than rely on something that looks a wee bit flimsy to me. As far as the ends, that's pretty simple, you just use an end panel. I can't imagine leaving an unfinished end on any custom kitchen anyway, regardless of how you make your bases.
From contributor A:
There is still another method. Screw a level cleat on the wall. Land the back of the cabinet on it. Level the front of the cabinet with leg levelers. Snap on the toe kick and you are outta there.
From contributor K:
We use 3/4 acx plywood to make loose kicks, then we glue/nail 3/4 facing to the kicks that matches cabinets. Get to the job, set the kicks level, shim from below, set the cabs and you're done. I helped a friend set some Home Depot cabinets recently with integral kicks... What a pain in the butt!
From the original questioner:
Wow, I guess I'm on the right track. I expected to hear some negatives on this method but it sounds good. Sounds like if I level the toe framework, attach to wall and floor, set bases on top, attach together, then slide against wall and shim/screw to wall, it would be foolproof.
I suppose one could pocket screw the whole ladder frame to the floor after it's level. Screw the back to the wall. Using a leg leveler on the front side of the toe framework might be overkill perhaps, but might be easier than sliding several shims 1/8" at a time.
Do you guys try to hide your screws inside the cabinet that fastens to the kick framework? Also, what are your preferences for screws adjoining cases together? Do you try to hide those as well? I tried some 2.25" trim screws but they didn't seem to hold very well.
From contributor O:
I use the leg levelers. My customers particularly like the fact that they can have access under their cabinets anytime they need for things like wiring and plumbing. And if their dishwasher hose or a water pipe happens to pop, the flood is only going to damage the toe-kick strips, which are easy to replace.
From contributor T:
I use ladder bases, standardized by dadoing a slot in 3" wide scrap. Triangular pieces with T nuts brace the corners (set in pre-cut slot). The above are made from cut-offs, between the normal rush hours of cabinet building. Carriage bolts in the T-nuts are the adjusters.
It is not efficient to make these parts for every job! Rip your waste to 3" wide when cutting out jobs, set the 3" pieces aside until you have enough to dado them efficiently. Same with the triangular braces. Cut and drill a hundred or so at a time. Then all you have to do for each job is cut the 3" pieces to length, and assemble with braces. Very fast.
To install, a laser level helps. Level with carriage bolts, screw the back to the wall. Then clamp the finished skin (3-1/2 to 4-1/2") to front of base, level, scribe bottom. Screw onto base from inside the base. It is much easier to scribe skin before the cabinets are in place.
Set cabinets on base, screw to wall. Not necessary to screw base to floor (unless on carpet). Also not necessary to screw cabinets to base. (Both are screwed to the wall, so they are not going to move). I usually hide the screws that attach the cabinets to each other with the hinge plates, but that's just me... Where there is a finished end on a cabinet run, I inset the base a little from the end, or run a finished end panel to the floor (depending on the design).
From contributor R:
Another vote here for legs. Other than the advantages of setting the cabinets, there are a few not so obvious advantages. The open area under the cabinets makes running pipes and wires much easier, especially if you make the toe kicks removable. I've used this method on built in media centers, allowing the homeowner to re-run his wires and cables as needed. The other advantage is that if there is minor flooding, only the toe kick needs to be replaced, which can be done without removing the cabinets.
From the original questioner:
I may give levelers a try sometime, maybe when I get frustrated with something else and start looking for better methods. Or maybe in conjunction with framework if I get lazy and don't want to use shims. But I do like the ladder framework - seems easy enough for my situation. I don't have to fuss with a toe board. Lay it up against the frame work, scribe it, cut it, and nail on or screw on from behind. Set the cabinets on top and done!
From contributor F:
I use the ladder method with shims. Try 1/4" plywood to face the ladder where it shows. It's a lot easier to scribe to the floor, easy to pin nail to the ladder, and I always have scrap from the cabinet backs. Build the ladder a little short to allow for crooked walls, corners, etc. The ladder can be built in the shop and the 1/4" can run past it a little at the wall. When I have an exposed end I usually inset the kick a couple inches and use a raised panel on the cabinet end.
An unrelated comment: Solo runners are 3/4 extension...
From contributor U:
I tried the ladder frame then used adjustable legs for years. Now I toe notch. It's easier and faster than the ladder frame and eliminates issues the legs had. It's all in your machinery level and approach.
From contributor Y:
I use the loose toe assembly. Real simple, especially when working alone. I level my bases then set my cabs. Usually have a loose toekick made from pre-finished 1/4 inch stock to scribe to the finished floor. I will usually install that after the floor installers are done to avoid damage and ensure a tight fit. End cabinets will either have the toekick recessed or will be a finished end to avoid a seam.
From contributor K:
I use a ladder frame toe kick. Easier to install this way. At the finished ends, recess the kick. Try to keep it under the cabinet side, though. This carries the weight all the way to the floor. If you build with through ends and recess it too far, too much weight on the cabs can cause the box to collapse, particularly when using particleboard. For scribing toe kicks to the floor I use a loose piece of 1\4" applied after the boxes are installed. It's way easier to scribe a 4" rip of 1/4" ply to the floor than a fully assembled box or even a ladder frame.
From contributor S:
I have been using the separate ladder frame method for years and liked how fast and accurate it is when building and setting base cabinets. Recently I tried a variation/combination of leg levelers and kick frame that someone here recommended about a year ago. A horizontal 2x3 is screwed to the back wall at the desired elevation (usually 4" AFF) and will carry the bottom of the base cabinets. Adjustable leg levelers are used at the front. I attach the 3/4" toe kick with 16g gun nails that are shot directly through the plastic leg leveler.
This method adds both speed and dead nuts level accuracy to the job of setting base cabinets. I like not having to reach all the way underneath the cabinet to access the leg levelers because the 2x3 ledger serves this purpose and establishes the elevation before the bases are in position. This method does not work in every application but when the job allows it, it makes quick work of setting bases.
From contributor P:
I read the forums a lot and hear about this install and that and gather that there are pieces to put together, etc. Not unlike the toe kicks mentioned, but... I build as big as I can and I integrate my toe kicks. It's easier to set and level one base and one wall and much quicker as well. More like a piece of furniture. I bring my end stiles down to the floor and whereever else needed so the baseboard butts it square. Here is an example.
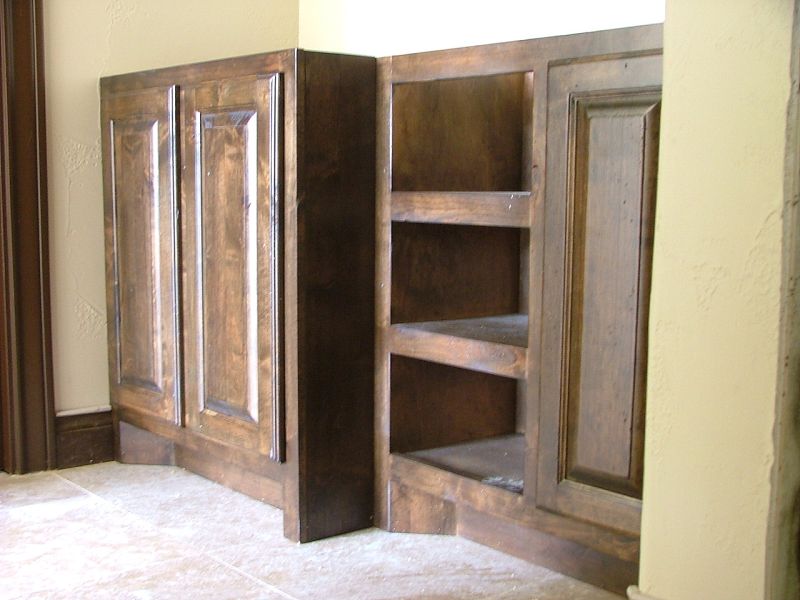
Click here for higher quality, full size image
From the original questioner:
I have done that before, running the stiles to the floor. On mine I didn't 45 the toe kick but I do like the looks of this. Your method allows you to put a finished toe on the cabinet and not have any joints to see or cover.
I had planned on running the rp ends all the way to the floor and giving it a look like yours. I had no idea so many people were doing it this way. I thought I was a little backwards. The terrible floors on the last job just frustrated me to no end. It's a good feeling when you think you have an advantage now.
From contributor Z:
Another vote for the legs.
From contributor C:
I've tried separate bases and leveler feet and now that I work mostly alone, I vote entirely for contributor A's method. It is very easy.
My base cabinets are always of 3/4" sides and bottoms with 1/2" backs (screwed and stapled to their sides) and 3/4" x 4'' spreaders set flush to the tops. I have taken to adding a 4" rip of 1/2" ply flush to the tops on the backs of a ganged up run of cabinetry. I level a cleat on the wall on which this 1/2" rip will rest. If the wall has run out or lots of bumps in it I shim my wall cleat so that my base cabs will be flat to the wall plane and my cabinet cleat will sit on the wall cleat without interference. When my cabinet run is located, I shim behind my cabinet cleat as needed and screw into studs along the length.
Also part of this setup is an L-shaped plywood assembly 3/4" x 3" x length of ganged up boxes. It is screwed to the underside of the run of cabinets in the field, set from the front of the cabinets the toe kick depth plus my finished toe thickness. This L shaped leg is designed to be off the floor 3/8" to 1/2" after I hang my cabinets on the wall cleat. So for a few minutes my cabinets are hanging crooked, but with a simple lever (or a helping hand) and some well placed shims, the front of the cabinet is easily picked up to be plumb and level front to back and along the entire length. My finished toe kick is a separate piece that is scribed to the floor as needed then pinned to my hanging L shaped leg.
Where finished returns are needed, such as at appliances, I provide a separate full height face frame vert with a 6" return panel and that assembly gets scribed to the floor after the bases are all set. I would normally apply the finished toes around the entire room after these filler verts are installed so that I am terminating my finish toe kicks into those ends.
This really is a simple system that accommodates new construction or old cottage floors with 3" of run nout. (We do encounter some of those now and again.) This method requires very little investment by way of using cast off rips of ply and nothing more. And it is easy to manage as a solo installer.
I admit that if I am hanging a single base cabinet that is not part of a kitchen or library group, such as a bathroom vanity, I am more inclined to build that with the finished legs to the floor with the toe kick returning into those � similar to what contributor P has shown. Have fun with it.
The comments below were added after this Forum discussion was archived as a Knowledge Base article (add your comment).
Comment from contributor A:
Yet another method! I don't know if anyone else uses this method I have developed: loose bases. It is great for lighter weight one man installations. 3"deep by 1 1/2" batton rails are fixed to the underside of the carcass sides. The batton rails have insert nuts with carriage bolts in them which have a screwdriver slot or allen recess in the ends. After leveling, appropriate packing on top of the batton rails and the loose bottoms can be dropped on. The loose bottom can be lifted with a suction tool. This method is also great for when a floorboard access is required for plumbing or electrical access, and for future adjustment if the floor sags.