Shop-Built Beaded Face Frame Notching Machine
A Woodweb member displays the machine he invented and built to automate the notch cuts for beaded face-frame joinery. June 15, 2009
Question
Here some pictures of the machine that I just finished.
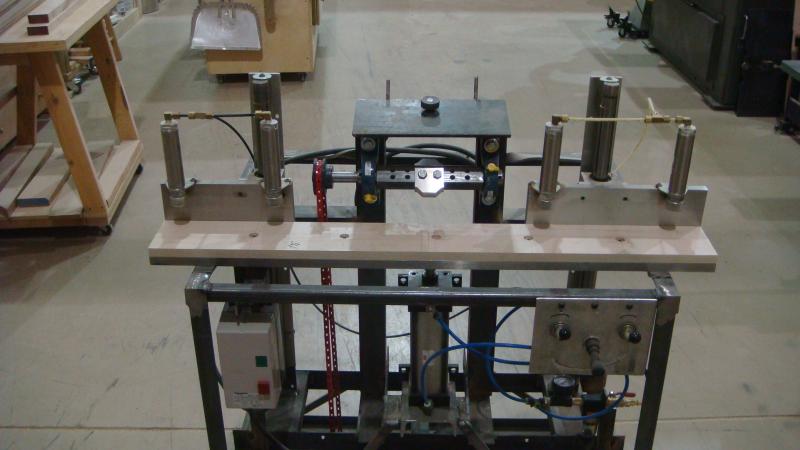
Click here for higher quality, full size image
Click here for higher quality, full size image
Click here for higher quality, full size image
Forum Responses
(Cabinetmaking Forum)
From contributor M:
Can I ask where you purchased your air clamping cylinders? I have been thinking about something like this and I also want to build a faceframe assembly table. They seem awfully expensive considering all there is to them.
From contributor J:
Does the cutterhead lower into the work or does the table rise into the head?
From contributor B:
It looks very cool. Does it only do mid cut-outs, or does it do ends also?
From contributor G:
The machine looks great, hope you do a lot of beaded FF's. Looks to me like the table must rise into the cutterhead. There is no mechanism to adjust the length of the belt if the cutter needed to move.
From contributor K:
Do you get a lot of tear-out on the back side of the frame?
From the original questioner:
Contributor M - I got the clamps from grainger.com and they are very good clamps.
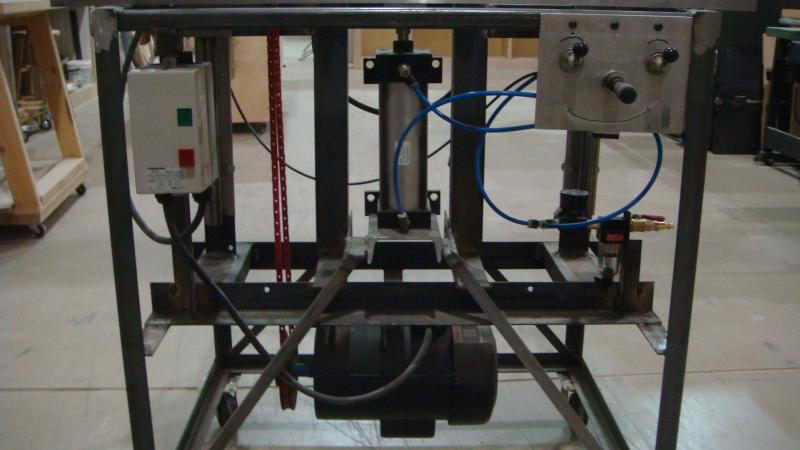
Contributor J - the table raises and lowers on an air cylinder with air speed valves for fast and slow operation.
Contributor B - it does middle and ends also. If you look at picture two you will see three pencil lines. Those are where I place a stop piece for ends and middle hutch. It cuts clean and fast.
Contributor G - 100% of my beaded frames are 1/4'' but if I need to go bigger I can place shims on the cutter head pillow block and move from 1/4'' up to 1/2'' deep of cut.
From the original questioner:
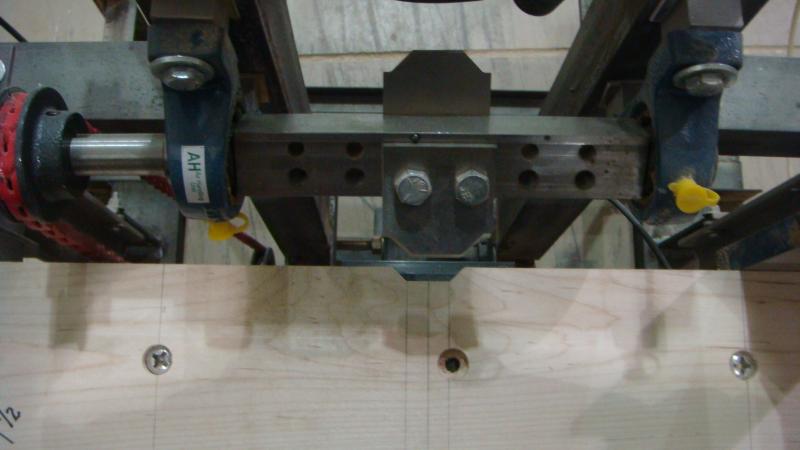
Contributor K - if you look at picture number two there is a piece attached to the table to avoid blowouts just like when you do cope on the shaper. Also for different sizes of frames I have made different size of cutters so I can do the cuts in one shot.
From contributor J:
That is pretty cool. When do you start production of the machines?
From contributor A:
Where's the rest of your Williams and Hussy moulder?
From the original questioner:
Contributor J - it took me about twelve hours.
Contributor A - I still have my Hussey. I order the cutter head, and it�s very fast to replace knives.
From the original questioner:
Sorry contributor J I misunderstood your question. I don�t know about starting a production but I can tell you that the machine cost me 1/2 the price of the manual Hoffman and my is all pneumatic and electric.
From contributor J:
When I first got started and did not have money I built my own verticle panel saw. Seeing this brought back some fun memories!
From the original questioner:
It does have a cover - in picture one you will see. In picture two you can see the cutter head better. About production for sale - it is a totally different world for me but I�m open for suggestions.
From contributor F:
Very clever machine, I like it. I wish more manufacturers would put smiley faces on their controls too. Might just make me feel a little bit happier myself, knowing my machine is in a good mood!
From contributor J:
It is a good piece of work and I would encourage you to sell some even patent it! The single biggest impediment to face frame inlay is the beaded look so desired, the up charge deserves the cost. It is all about the math!
From the original questioner:
Well I really like to put in production with a reasonable price so everybody can afford it. Look and W&H for example - great machine with a great price.
From contributor B:
Nice design � it�s good to see the extra money spent to put a fourth caster on it unlike a W&H.
From contributor K:
So far so good! Now how about an equally creative yet simple repeatable stop/fence system?
From the original questioner:
I have different systems for stop, If you take a look on the control valves you will see two valves - one for the right clamps and one for the left clamps so I can place a stop piece clamp down and just butt my work piece against.
From contributor V:
Very, very cool. This better make it into the archives, but just in case it doesn't, I�m going to create a PDF and save for future reference. One thing that I would do is fabricate much better safety guards for the belt and cutterhead, otherwise I think it looks great.
From contributor A:
Did you grind knives yourself or buy them? I�m wondering how much they charged? I just tried a 1" straight knife on a craftsman molding head cutter, and I didn't know it would cut across grain that well. I bet knives could be made for molding headcutters. I have clearance for an inch and a half. Anyone ever do it this way?
From the original questioner:
I buy my knives from Charles G. G. It cost me about $95.00 a pair because I asked for 5/16'' thick instead 1/4'' and yes it cuts across grain like butter.
From contributor D:
Nice machine! What kind of guide does the table ride on for it's up and down motion? It is hard to see from the pictures. It must have some rail to ride on to prevent movement in and out.
From contributor J:
I saw something that looks like a Thompson type bearing and rail - very accurate for the job.
From the original questioner:
Contributor J is right on. I use Thompson rails and pillow block bearings � they are very strong and accurate.
From contributor B:
I have been following your post, and your machine looks great. For those of us who might like to take a stab at doing the same thing, I have a few questions. Would it be possible for you to send a material list and supplier of the parts needed? For instance, the knives are from Schmidt, but could you give a reference number? I think putting it into production is a good idea. I would gladly pay a reasonable fee for a detailed build sheet and video of the machine in operation. Once again great idea!
From contributor D:
How many pillow block bearings on each side? It is hard to see from the pictures. How about a picture from the side.
From the original questioner:
It looks like you�re going to build one. I use one block on each side 8'' tall by 2.5'' wide. It�s very important otherwise it will move sideways instead of up and down.
From contributor T:
Is the cutterhead purchased or did you make it? If you made it, how'd you get everything centered?
From the original questioner:
The cutterhead is from W&H. The same head was used on the molder machine so everything is well balanced. I just mount the pillow blocks and fit the head in. By the way I just finished a kitchen frame (today), and it took me about a half hour to do all the notching.
From contributor H:
The concern I have with your machine is the degree to which the cutter head is exposed. If you don't have a solid steel guard that stands between the operator and the spinning knives then you should design one into the machine. A broken knife here could be disastrous.
I always thought one weak point on the W&H moulders was the way a broken knife could fly out the dust chute opening (outfeed side of the machine). I had my local welding company build a steel guard that completely encases this area while sending chips and shaving out to the side. Other than a safety guard I think you've done an outstanding job.
From contributor E:
I commend the talent and ingenuity it takes to build a custom machine like that. I also feel compelled to finally respond and say that you can get identical results from a Magic Molder fitted with a custom knife for under $300. We have done over 1,000 beaded faceframes with this setup. It is fast, easy, safe, cheap, and yields perfect results.
From contributor H:
Please give more details. Are you running the Magic Molder on a table saw with a custom sliding table?
From the original questioner:
Yes the magic molder is cheap but not fast because I used the magic molder on the tablesaw and radial arm saw. After I built the machine I put my magic molder in my tool drawers. The max width you can get on the magic molder knives is 1'', mine go up to 6 1/2''.
From contributor F:
To me the cutting of the haunch was the easy part. The fence system, accuracy and repeatability is the hard part, especially when dealing with haunches larger than one pass of the cutter.
From contributor D:
We use it on the tablesaw with a sled, but we do not use any type of stop system. Again, it�s a very impressive tool. I'm sure it works wonderfully and I'm thoroughly impressed that you have the skill and patience to pursue something like that. I for one, do not. And for anyone else that wants something cheap and easy that nets perfect results without having to build your own tool or buying an expensive haunching machine, the Magic Molder is an excellent alternative.
It's true, the max cut width on the MM is 1". This is not a problem however, as the process of making wider haunches is just a matter of a few extra nibbles between the outside lines. We don't use a stop system, opting rather to just cut to our layout lines and using a test piece to fit the joint. Even with a $25,000 S4S planer, there is still variance in the rails that needs to be accounted for. Expecting a rail to match perfectly with the outside width of a knife is not realistic in my opinion. Furthermore, I tend to have many different sizes of rails, and I would not want to stock or change cutterheads for every different size.