Skinning the Bottoms of Frameless Upper Cabinets
Extended discussion of how to treat the underside of an upper cabinet, with a conversation about space-saver corner drawers on the side. March 5, 2007
Question
We build frameless laminated cabinets, and have always just laminated the bottom of the upper cabinets with the same laminate. This is with laminated doors. On an upcoming job, we will be using the same box, but will be using raised panel cherry doors. I can find a PVC that is almost a perfect match to band the case edges with, but how do you handle the bottom of the uppers? Do you still just skin it with a matching laminate, or am I missing something?
Forum Responses
(Cabinetmaking Forum)
From contributor B:
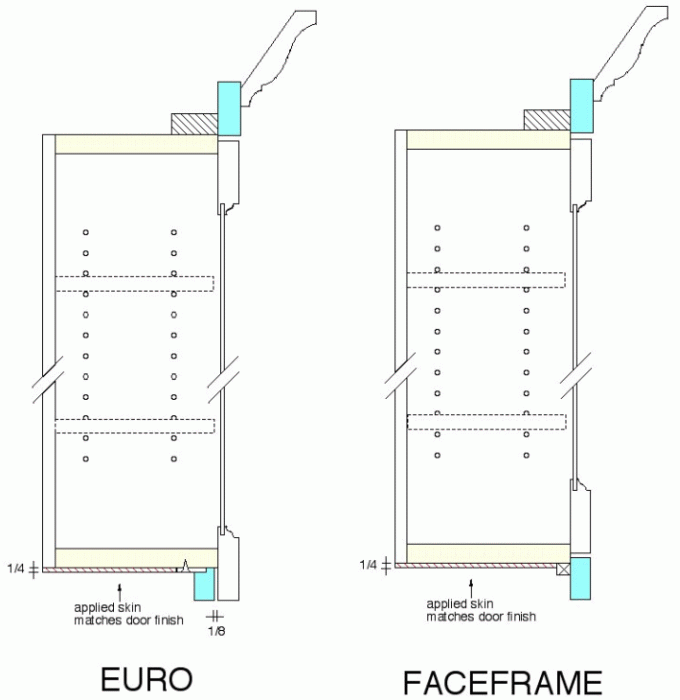
Use light rail. The bottoms of these cabinets are maple melamine, but you can't see the bottoms because of the 70mm light rail, so you do not have to do anything to the bottom of the uppers.
Click here for higher quality, full size image
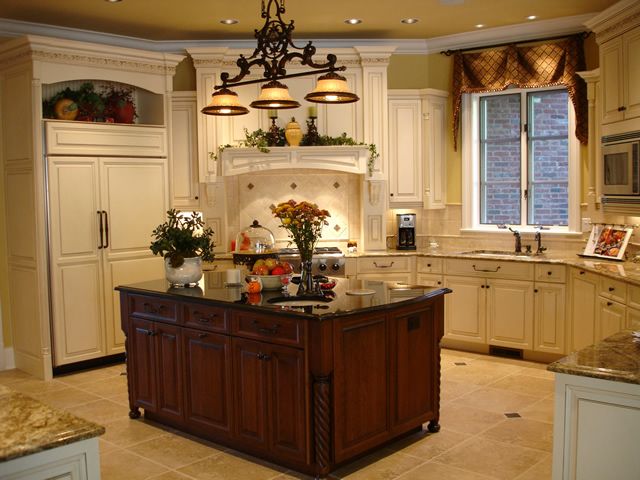
Photo provided by Bob Buckley of True 32 Custom Cabinetry
From contributor O:
You have the right idea. Finding a laminate that will match your edgebanding is all you need. The light rail is a good idea too, but nevertheless, you still have to finish the bottoms of your uppers.
From contributor P:
I've sometimes used a combination product. Almond melamine on one side and oak veneer (or other wood) on the other side.
From contributor T:
"Pear Wood" melamine matches cherry good enough for interiors or bottoms.
From contributor H:
Most of my clients don't care about matching bottoms of uppers and I always use a light rail. If there is no light rail, you can use cherry veneer glued to the bottom or you may be able to find cherry veneer/white melamine and then put the cherry side down. If your side gables show, then you will also have to band the end with cherry veneer.
From contributor E:
I look at a lot of model homes in So Cal, so I get to see what a lot of cabinet shops are doing. None have ever had a finished bottom for the uppers. Most have a light rail or just the bottom rail on face frame cabinets. That said, I have used 1/4" ply or veneered melamine on home offices where the customer does spend some time in a position to see the bottom of the uppers.
From contributor J:
Why not use cherry VC plywood for the bottoms? There's no frameless rule that requires melamine, plus it won't sag in a couple of years.
From contributor T:
We also use a light rail under our cabinets, but do not band the bottom edge of the wall cabinet sides. In lieu of this, we furnish a 1/4 inch thick plywood skin that is finished to match the
cabinet doors.
This allows us to bring our material in with the edgebanding already on the board. We use pre-finished maple plywood on all of our boxes and the edgebanding is simulated maple PVC.
To have the board already ripped and banded adds $3 per 8 foot length. I don't think we could do it for that cost and this is time we now spend doing something else. We have a Brandt bander, but it just doesn't get turned on much anymore.
By the way, contributor B, that's a real nice looking kitchen! I especially like how you did the hood fan area.
Click here for higher quality, full size image
From contributor R:
I band all the edges of my uppers and make sure they are assembled clean. We take extra care not to scratch or mar the bottoms. Then we hang them. Just well built blind dado cabs with nothing to hide, and clean lines. Most people love 'em. Now if they want a laminate or covered bottom, we match the doors and edgebanding with an appropriate bottom.
From the original questioner:
Thanks to all for your suggestions. Contributor R, you said that if they want a laminate or covered bottom, you match the doors and edgebanding with an appropriate bottom. What is the finish on the bottom if they don't want a laminate or covered bottom?
From contributor R:
Melamine makes it easiest... same finish both sides and that is what we use principally, anyway. With the plywood boxes, I color and topcoat the bottom just like any other cab part. Even when we use a light bar I still finish the edges of all upper cabinets. Don't know if that it is the most cost effective or the best way - that's why I read WOODWEB, to hear what other people do.

Click here for higher quality, full size image
From contributor F:
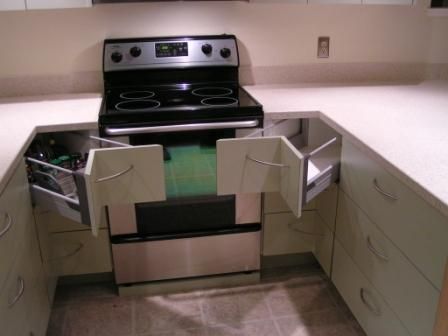
How long is it taking you to build those space corner tandembox cabinets?
Blum sent me the specs a while ago but they looked fairly complicated! How popular have they been with your customers thus far?
From contributor R:
Good eye, contributor F. It is actually not that difficult. What you are doing is making two partitions mitered in opposite directions and placed on the leading edge of the cab. Bore your hardware holes first and install the hardware, then put your cabinet together. I have used pocket screws and dadoes to secure it to the top and bottom of the corner. So assembly and cut time is increased on the corner cabinet by about 1 1/2 hours (if you go straight to the target). The first one took about 4 hours to do.
For the drawer fronts I made stock and then cut my miters from that. For the drawer bottoms I cut one out with a Festool saw and then used it as a template. It was not nearly as difficult as the Blum rep made it sound. I would imagine on CNC it could be greatly reduced (it is on my list of things to do with e-cabs).
The tricky part was boring the drawer fronts because the specs on the Tandembox sheet did not work. We ended up building a mockup bottom and measuring from our reveal point to the hardware fixture. We wrote the measurements down on our assembly table (I hope I put them somewhere else). We never found anything close to our measurements in the assembly guide. People love them, and most want them. I'm working on designs right now for two kitchens that will have them. If anything, it shows people what we can do. I don't really know the value of that.
Click here for higher quality, full size image
From contributor R:
Thanks for the response and the extra pic! They looked funny to me in the beginning but are starting to grow on me. They definitely set you apart from the stock cabinet! One other question: do you ever use the tandembox metal box sides or do you stick to the gallery rails as you did in the picture?
From contributor J:
I've seen some done by a shop in town using Baltic birch and Tandem undermount slides. They look great! Being all wood, they look a lot easier to do. They cut all their parts on a new CNC, once programmed in its repeat, build, repeat, build, deposit checks. I'm going to look into these - could be a money maker (or maybe not!).
From contributor R:
We use the metal box sides on deep pantry drawers. If I had CNC, pretty sure we would be doing them out of wood. The best feature about metal boxes is nobody ever asks about care and cleaning - it's obvious.
This client went to Target and used off-the-shelf wire bins as dividers. The only Blum drawer divider component was the spice rack. All in all, it is the better choice for corners... especially for aging in place, etc. And it also showcases your woodworking/fabrication skills. Doing those drawer fronts with a profiled wooden drawer is a definite plus. We miterfolded HPL on this kitchen.