Splicing Pre-Finished Crown Molding
Other Versions
Spanish
Tips for getting a tight joint on pre-finished crown molding splices.
Question
Since factory finished crown seems to only come in 8' lengths, a lot of splicing must be done. I have always tried to match up shade and grain patterns, and even cut the long compound cuts to follow grain, if possible. As time passes, though, I've seen these glued and nailed splices open up or overlap many times. Some suggest butting splices with some spring in the fit so they can't open up, and it looks no worse. What are you doing to splice? If you insist on compound cuts, is there some standard as far as the angles used? Hope someone out there can help me with this messy deal. If you use only full length sections custom made on your moulders, sit on your hands� that is not a luxury we all have.
Forum Responses
(Cabinet and Millwork Installation Forum)
Add a biscuit and plenty of glue and you will be hard pressed to see the joint open up.
I agree. Biscuits or dowels are a great way to make that butt joint. You need that snap fit for the pressure to clamp the joint. We have been suggesting that type of joint when using the Copemaster. It allows you to pressure fit your coped joints. It is easier on paint grade but if you can line it up on the pre-finished, it will never open. Hot water, a toothbrush and compressed air makes the glue cleanup quick.
A quick note on clamping... Two small screws into the back of the molding can be rubber banded across to provide clamping pressure while the glue dries. Just make sure to locate the screws in the thicker part of the molding. Remove prior to installing.
We've been pre-assembling all our field splices for years. I've never found a better method, especially for long runs down hotel and condo corridors, and for stain-grade stuff, like alder, that only comes in 10 ft. lengths, or even for mahogany on walls over 16 ft.
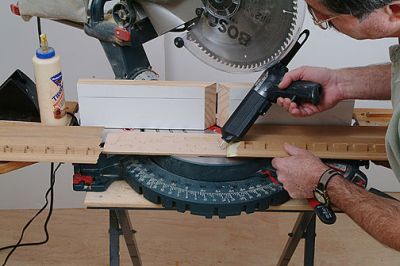
Before hot-glue, we assembled the joints from the back of the molding, but now we hot glue a piece of 3/8 or 1/4" plywood (about 2 ft. long and ripped just narrower than the back of the crown) to the back of the inside corner cut (we make all our splices compound miters so there's more glue joint and the angled cut hides better than a vertical joint). Then turn the molding right-side up, spread Titebond on the miter joint, hot glue the plywood, and press the other piece of molding into the hot glue on the plywood backing and line up the miter at the same time. I like to do this with the material on my miter saw, so I can hold the splice against the fence and keep both pieces in a straight line. If you're still worried about the backing, you can shoot some 5/8" staples through the plywood into the crown, then let the spliced-length sit for a little while before cutting it to length. We usually grain-match the material for splices before doing anything else, make up all the splices, then start cutting. By then, the first pieces are pretty dry.
I use a butt joint and assemble with pocket hole screws from the back. Faster and more durable than any method described here (in my opinion).
I've never been able to position the two pieces perfectly so the joint is perfectly flush once the screws go in. My clamps just don't hold well on the profiles. And besides, a lot of the crown I install isn't thick enough for pocket screws, especially the MDF stuff. And butt joints... they sure show up more than compound-miter splices. I know that
polyurethane molding manufacturers recommend butt joints, but I think I'll stick to my method for wood moldings.
We are all talking about pre-finished crown, right? I take into consideration where the joint would best be placed and which direction the 45 should angle. I cut my crown upside down against the fence and cut both pieces at 45's. I try and color/grain match as best I can and put one piece up. I then cut the other piece a little long and dry fit it and make any adjustments if needed. I then glue the snot out of it and put it up, having a damp rag handy to wipe off the excess glue. Surface nail if necessary, micro pin if painted. Use touch-up pencil as necessary (I have a broad selection), but try and get as close as possible so as not to have to use it. Another thing I sometimes do is use a matching magic marker touchup pen to color edges before I put them together. Sometimes that helps a little. Don't know if it's the best way, but that's how I've been doing it for a long time and I can't remember ever having a joint open up.