Hi - I'm contemplating steam-bending for an upcoming project and am wondering if the following seems reasonable. (This would be my first time steam bending.) The design would call for bending roughly 2" x 2" (in cross section) air dried walnut legs to a 12.5" radius at the tightest spot. Three of these legs would be bent this way and joined by an extended triangular prism (?) where they meet in the middle. I would cut a flat surface on each leg where they meet. (Long grain-to-long grain gluing plus a few dowels at each contact area). Attached drawing hopefully lays the design out more clearly than my words...
My question is whether or not that is too much of a bend for 2" thick walnut. ?? I would use a bending strap and follow the usual guidelines for bending as far as steam time, drying on a pattern, etc.
Thanks for any advice.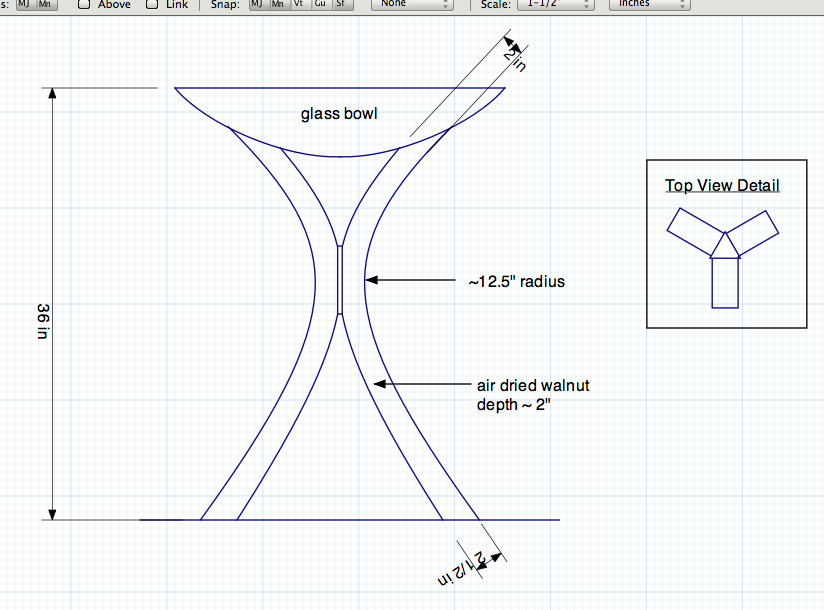
From contributor Da
That's a tough bend. If I were doing it, I believe I would do a bent lamination.
From contributor Ke
I have bent 8/4" Walnut much tighter than that, so yes it is possible.
You should go to Lee Valley, and get their free pamphlet on steam bending, then Follow everything as closely as possible. There is a lot to steam bending that intuition won't help you with.
Just having steam going into a chamber isn't enough. As a general rule, one hour per inch is the standard suggestion, but in reality, that alone is no guarantee, with a small stream of steam, a poorly insulated chamber, bad grain runout, too much time or cooling before completing the bend act.
I recently added a thick meat thermometer that I can fit into a closely drill hole, so I know when it reaches 210� in the middle of thickest part.
As was suggested above, it is much easier to do a laminated bend, than go through all the setup for steam bending, then waiting for the wood to dry after the bend is done.
From contributor ch
and then there is compressed wood. google it
From contributor Jo
Thank you all for your suggestions.
It's funny, I actually was looking to steam because I thought that going the bent lamination route would too much of a pain in the arse! I do believe that for the approx. 2" thickness I'm looking for, that I would need something like 14-18 plies, right? Seems like a glue-up nightmare of epic proportions. Or would it not be as tricky as I'm making it out to be?
As for steam, I have the Lee Valley booklet and it does seem very helpful and thorough. Plus several Michael Fortune articles, but I can't remember ever coming across a guideline about how thick you can bend for a given radius range, etc. Anyone aware of anything like that? Perhaps, like many things, one just has to do it to learn it!
From contributor Ri
Selection of your walnut stock will really be important. Only stock that has the grain running the entire length of the boards. Not the easiest project to start with, make sure you have plenty of stock to practice with. Preferably from the same tree so you can judge steaming time.
From contributor ma
Green lumber is better than air dried for steam bending. It is also helpful to have a live edge to work from: grain run-out is not your friend.
From contributor La
I wasted a considerable amount of walnut learning to steam bend. Bent lamination is way easier. There are rules for lamination thickness but for that radius about 3/16 would be max with 1/8 being easier. A simple male/ female mold and plenty of clamps. Make one side of the mold very ridged, the other side some what flexy. Use a hard setting glue and leave the parts in the clamps as long as you can. Do a dry run first. Don't use wood with much run-out. Put a V mark on your boards to keep the order. Pretty easy.
From contributor Jo
Aside from the steam learning curve and building the steam box etc., I just don't see how bent lamination would be easier (for this design)? What I mean by that is, like any skill, I'm sure I'll have a few wasted legs while I'm learning the intricacies of the technique, but once I get some proficiency with it, comparing the two techniques -- again, for this given design -- I just can't imagine bent lamination being the more efficient method.
To get my 2.5 in. thickness at the base of the legs, I would need about 20 laminations per leg. To be safe (as I'm sure a few would get chewed up in my planer) I'd probably mill up 22 lams per leg - that's 66 laminations to mill, keep track of and then glue up! (not 66 at once, of course.) Plus, even with a pretty decent bandsaw set up, that would be a lot of sawdust created to get all those laminations. I've done a few bent laminations and it is great technique, but I think much better for when the number of laminations is more manageable.
Also, the drying time is not really an issue as I have other projects for this same customer that I could work on while the legs are drying.
When I get to this project -- I have a couple projects to finish before then -- I've decided to give steam bending a try. I will readily acknowledge, however, that I have been warned! :-)
I'll post a follow up on my experience afterwards. Thanks.
From contributor La
I'll be interested in your experiences in steam bending. I also understand how laminations would be more work for you given your system. Ours would be: cut plank to length, run through the SL rip saw. Adjust steel form to pattern, lay all strips on glue-up table, roll on glue, put in form, tighten bands. Go to Shop Gallery, Listing 209 to view Steel form in use.
From contributor Jo
Larry - Thanks - yeah, I'm curious to see that set-up. I see the Shop Galleries section, but how do I find the one you're referring to? Did a search for listing 209 to no avail.
From contributor La
Click gallery tab @ top of page, click "shop gallery" on drop down list, enter 209 in the search box and select shop gallery in the box to the left that starts with "search entire site."
An alternative is to put "L. K. Schweitzer" into the search box and select shop gallery from the location. The photo you are looking for shows a green rack with white stub arms and two curved blanks being glued @ once. You can see the banding cart next to it. We use 3/4" steel banding to squeeze the laminations tight. We normally put a waste pc. of 1/4" hardboard on both sides of the work. On wider parts more than one band can be used. We reuse the banding multiple times. 3/4" steel banding can put a lot of pressure on! Don't need to take it to extremes.
From contributor Ri
Just an observation Joe. You asked for opinions on something you have never done. You get several replies, and specifically from someone that has done both. He tells you to laminate, but you argue for the steam method with no experience at either method? It seems you are discounting the steam learning curve as simple stuff that anyone can do quickly. How does that work, or should I say, why did you ask for help in the first place? Sorry, just don't understand.
From contributor Jo
Rich - To be blunt, I guess what you don't understand is what my original question was. That is to say: is this design "too much of a [steam] bend for 2" thick walnut?" Yay or nay.
I have done bent laminations before, as I mentioned in one of my replies, and based on those experiences I think it would be a pain in the neck, waste a lot material, possibly not look as good, etc. to get the desired thickness going that route. If the legs were only an inch thick, I only had kiln dried wood, and expectation of a quick turnaround time, then it's no-brainer to do bent lam. But all that is beside the point.
I have wanted to do steam bending for awhile now anyway, so my question pertained to an aspect of that technique. I didn't pose this as a poll question regarding what would be the most preferred method, instead it was if I were to steam bend this, can I reasonably expect to do so. And please don't get me wrong, I welcome and appreciate the bent lamination suggestions and info but I'm trying to get a handle on steam bending so that, aside from the project at hand, perhaps I can come to my own conclusions about steam vs. bent lam.
Also, I'm not sure why you think I'm discounting the steam learning curve as "simple stuff" -- I know enough to know there is a lot involved and that heck, it might even be difficult. Of course, as woodworkers we thought the same before we learned many difficult techniques that we've now mastered, right?
Anyway, blah blah blah. Too many words.
Larry, found the gallery pics -- very cool. Thank you.
From contributor So
My answer - neither is better.
Saw out the curves out of stock laminated for part width. Clean those faces with a template on the router or shaper. Add 1/16" or a bit thicker shop veneer to the sawn faces, then do the same to the two faces and trim flush.
No forms, no bending, no figuring plies, no steam, no brute force, no burned hands, no springback.
It goes to what you know vs what you want to do. Or want to learn.
From contributor Bu
What about a compromise approach of ripping the 8/4 to two 4/4 and laminating two 4/4 steam bent pieces for each leg?
From contributor Je
Joe,
There are a couple issues that have not been mentioned if you try to steam bend this project. As a general guide line, you can steam a radius 10 times thickness of your piece with out compression. You are well beyond that and will need to compress your pieces as you bend them. Not an easy task with 2" hardwood. You will need a stout strong back and probably a com-a-long to get those pieces into position to clamp.
The second issue is that you will need to calculate spring back into your bending jig. This design is nice and simple and relies on the curves of the legs a great deal. If those curves are not the same, it will throw the whole project off. Since no two pieces of wood will bend the same and calculating spring back is a guess at best, this WILL be a problem.
If you are trying to learn a new skill, and don't have a client to disappoint, go for it! Don't listen to the nay say-ers. This project will teach you a lot about steam bending. But reasonable? That is up to you now that you know it will be harder than laminating. Cost more than laminating and give you an inferior product than laminating. Let us know what you decide and post some pictures.
From contributor La
Once upon a long time ago I had a deal to make a series of rocking chairs. Walnut, to someone else's design. It called for steam bend rockers. We built the steam chest, generator, forms etc. and got some air dried walnut. The steel compression straps were fabricated from 1/4" cold roll. Welded end restraints. We had a very large jack to provide the force required. It was a slow aggravating process. We went through a lot of walnut and ultimately failed to get perfectly matching curves. A rocker with slightly varying curves will walk sideways! If you are doing something where exact is not required it might be a fun project. Bent laminate has been my preferred method ever since.
From contributor Jo
Okay, good people, I may be bull-headed but I'm not deaf: the herd has been heard... I'll save the steam bending for another day. The bend radius-to-thickness guideline was helpful -- I had not seen that one before and was exactly what I was looking for.
From contributor ma
Sure, you can do it. Use the heavy strap and an extended handle for leverage. I very much like the Lee Valley design as it lets you easily control the tension. Use straight grained lumber in either grain orientation. Lumber should be 15 - 19%. 17% is ideal. Bend a couple of extra and make your form a bit over tight. However, you may find that using 17% moisture content the bends actually tighten a bit on the drying form.
From contributor Ke
Max, I'm glad you mentioned that it may contract, rather than spring back. On the thicker things which I have done, that is what happened.
Well, for that matter, it may have happened on the thinner ones too, but to a lesser degree, and I just didn't notice.
My assistant and I did a little steaming last night, making a coiled White Oak spring. The coils were very tight against each other when we finished, and there were 9 coils at the time. I was wishing for 10, and it may just make it yet. Due to the cross-grain shrinkage, it has already wound ~120� tighter than it was just last night.
Just to make sure of your statement, "Use straight grained lumber in either grain orientation." I'm sure you mean plain or quarter sawn.
Here is a link to a few pics on my flickr site, along with a few rings that we were playing with too.
From contributor ma
Thank you Keith. I wasn't clear. I certainly didn't mean cross-grained. While I haven't done any direct comparative experiments, in practice I haven't noticed any significant difference between bending square stock in flat or quarter orientation. In spite of the reservations about spreading glue I find it easier to do a bent lam. than to get out all of the steam equipment. I think the results are more predictable and probably a bit stronger. Any springback will still be in the wood when using a rigid glue like epoxy, not the glue joint, so the thinner the laminations, the less springback you should expect. I'm basing these comments upon my own experience, not on technical scientific analysis or knowledge.
From contributor Jo
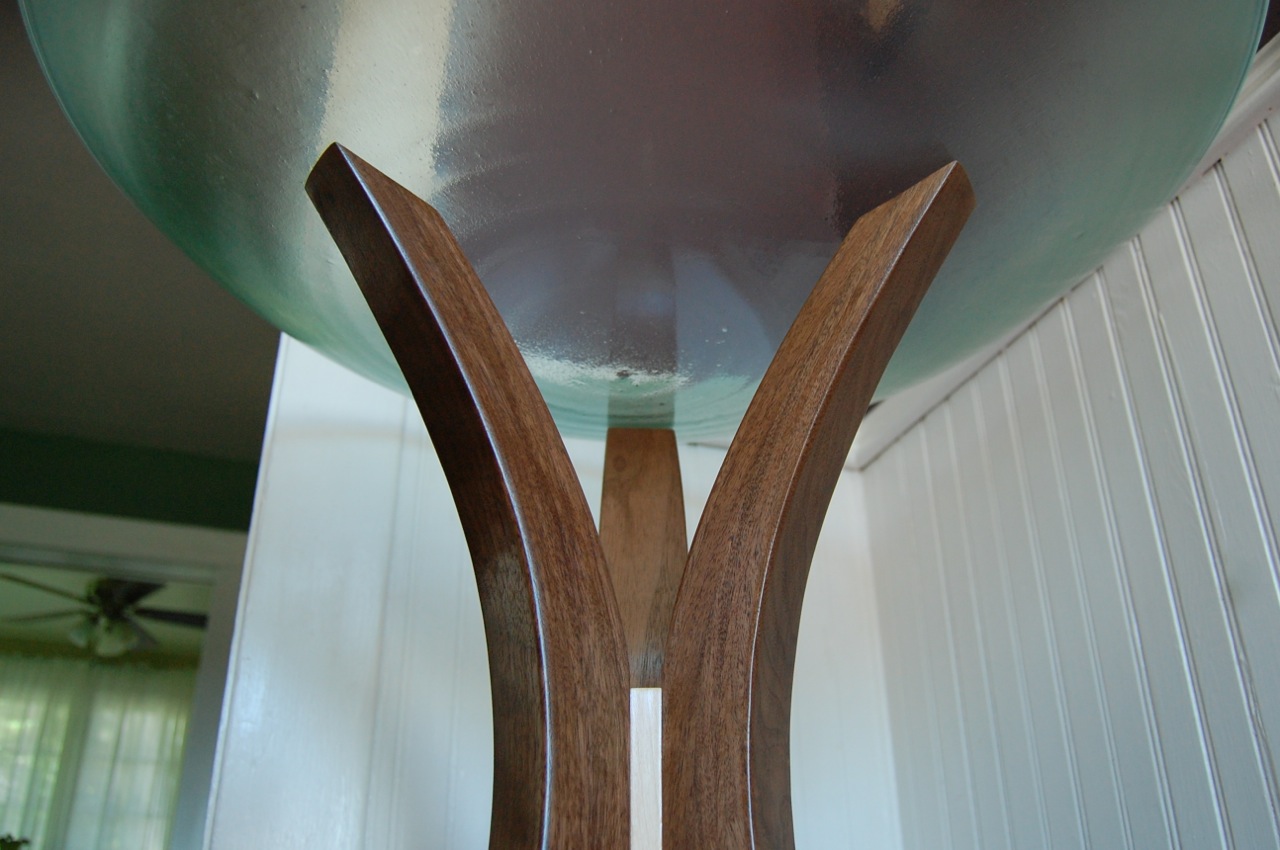
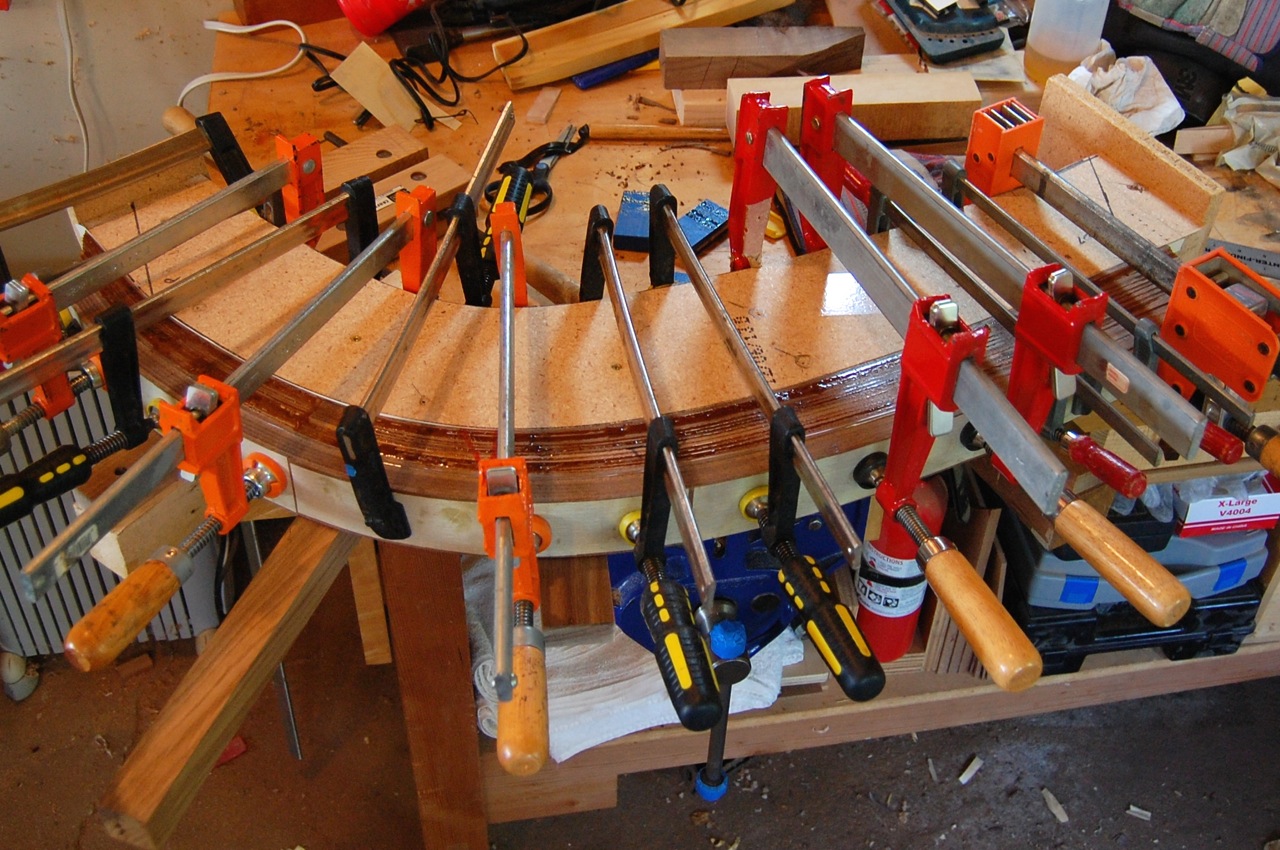
Okay, so I finally got around to this project and here are some pics of the finished result and one of my clamping set-up.
Ended up doing a tapered, bent lamination approach. 13 plies each leg - about 3/16" at the fat ends (leg bottoms) and a little under 1/8" at the tops. In the end it wasn't as difficult or tricky handling that many plies but it certainly wasn't a breeze! One ply was eaten up by the planer and several others were just too thin off the bandsaw due to poor cutting on my part, I guess.
My form and clamping approach were very similar to those used by Michael Fortune in a recent FWW article.
At the base, the legs are about 2 3/8" and at the top ~ 1 3/8" thick. I also tapered the legs a bit in the non-curved plane.
I used Unibond 800 glue (first time) and was very pleased with it. Easy to mix and long open time. Wore a respirator. Had very minimal spring back, maybe 1/16", and the same on all 3 legs.
Anyway, here are some pics. Still curious how steaming approach would compare but I will get to that some other day and will certainly start with an easier project. And as for the tapered, bent lamination, I wouldn't hesitate to use this same approach again.
Cheers, Joe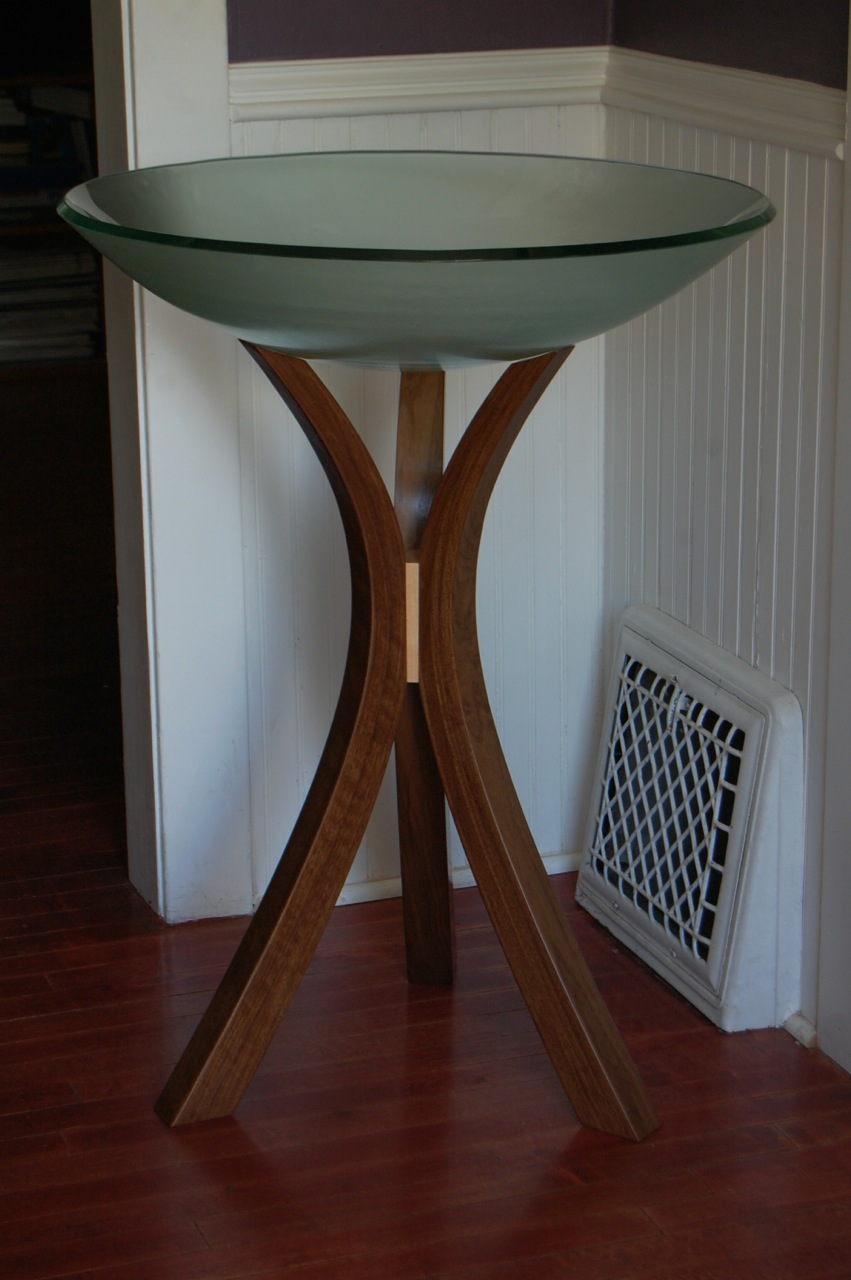
From contributor La
Looks really nice.