Text Labeling on the Dimension Line in CAD
Here are several suggested ways to use text boxes for calling out dimensions in an AutoCAD document, and some cautions on what could go wrong. October 12, 2007
Question
How do I put words or letters in the place of the measurement number when dimensioning my drawings? For example: TBD, EQUAL...
Forum Responses
(CAD Forum)
From contributor Y:
Well, there are a couple ways to do this. The easiest way is to double click the dimension you want to edit - go to properties - scroll down to text, text override box and type TBD. The symbols keep the current dimension number in your drawing and then you can add whatever text you need. If you only want to have the text, then just type whatever you need in the text box. Here is a picture so you can understand better.
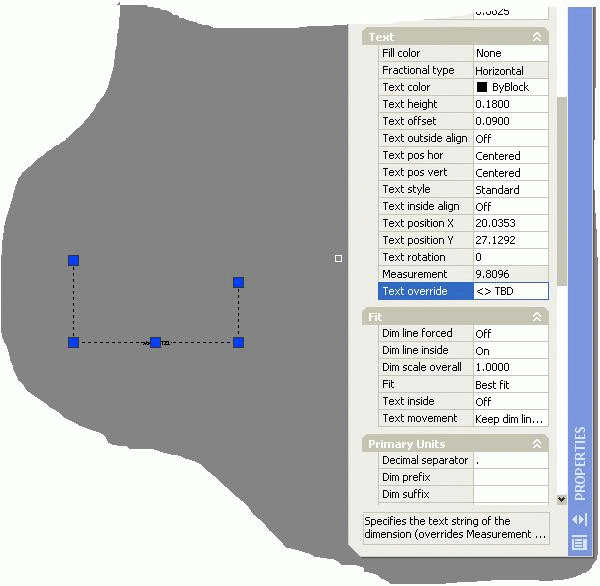
Click here for higher quality, full size image
From contributor C:
You have a few options. As stated above, you can use the properties box, or you can use ddedit, or dimoverride. Remember, if you want both the dim and your text, leave the brackets - they are the placeholder for the measured dimension. We use them followed by various words (like (V.I.F.)) so that the dimension will still update.
We have about 25 custom macros for this in our office, from VIF, VFY to EQ. A, +/-, HOLD, CLEAR and all kinds of other common dimedits. You can convey information a lot more clearly doing this and still have the dimension update as things change.
Just don't get into the habit of removing those brackets and overriding the dimension. This is a very risky practice that in many places will result in automatic termination. We almost have that policy because if you are not aware of an overridden dimension, you can really cause a job to go bad.
From contributor B:
Acad command: Modify, Object, Text, Edit. If you want to remove the brackets, you may replace them later. Just repeat command, type in the brackets, and the correct dimension will reappear.
From contributor T:
I use ddedit. Either pick the icon or type it on the command line. Then pick the dimension you want to modify and a text edit box opens up. It's fast and simple. We use dimensions like (TYP) so we edit the text quite often.
From contributor T:
Amen to contributor C's comment about not overriding the dimension. Make the drawing right! We recently received some countertop drawings from an engineering firm. I guess I should have checked the actual vs. displayed measurements, but I trusted the source. I pulled the geometry off the drawing and sent them to our CNC. When the fabricator got the blanks, he was wondering why they didn't match the drawing. At least most of them were too long. I will always check now.
From contributor A:
Help you, I will... via LISP;
;;;--------------------------------------------------------------
(defun c:VIF ()
(setq newdim (entsel "\nSelect a dimension to add +/- VIF:"))
(setq newdimvalue " %%p VIF")
(command "dimedit" "n" newdimvalue newdim "")
(princ)
)
(Defun c:EQ ()
(setq newdim (entsel "\n Select Dimension to Replace with EQ.:"))
(setq newdimvalue "EQ.")
(command "dimedit" "n" newdimvalue newdim "")
(princ)
)
(Defun c:VER ()
(setq newdim (entsel "\n Select Dimension to Add VERIFY to:"))
(setq newdimvalue " %%p VERIFY")
(command "dimedit" "n" newdimvalue newdim "")
(princ)
)
(Defun c:CLR ()
(setq newdim (entsel "\n Select Dimension Clear:"))
(setq newdimvalue " ")
(command "dimedit" "n" newdimvalue newdim "")
(princ)
)
clr returns the brackets that you seek. There are routines that highlight edited, or overridden dims, but we don't really have much of a problem with that anymore.
From contributor P:
Just goes to show you there are many ways of doing something in AutoCAD. There's one more way of adding text to dimensions (without removing dimensions) if you are using full blown AutoCAD. Search for a lisp routine called Dimnote.lsp and its corollary file dimnote.dcl. This allows you to write in your most used text with dimensions inside the lisp routine and access them from a dialogue box. It's a great old program. See the picture.
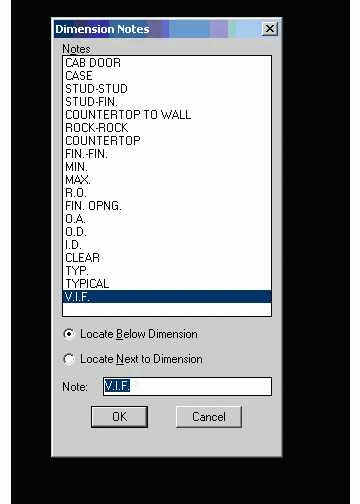
Click here for higher quality, full size image
From the original questioner:
Thank you everybody - this is a great forum!
From contributor C:
Contributor P, great lsp, thanks. One problem, though. The jpg will show what I mean. I am getting a /X instead of it placing below the dimension. This is with AutoCAD 2006. Do you know what the problem is?
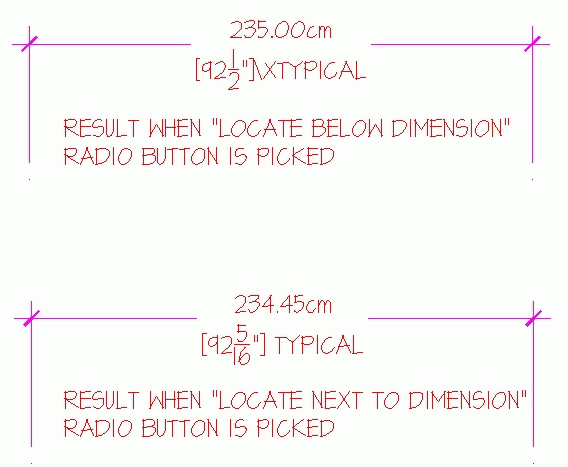
Click here for higher quality, full size image
From contributor C:
This only occurs when I have alternate dimensions on.
From contributor P:
Here's what mine looks like, and I also attached a sample with alternate dimensions. You could post the contents of the lisp routine, and perhaps I or someone else can find the offending part of the lisp routine.
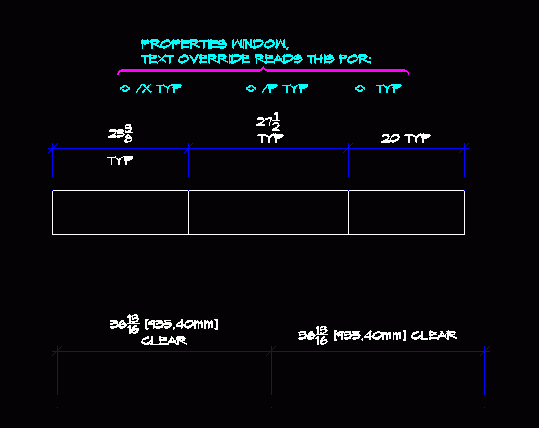
Click here for higher quality, full size image
From contributor P:
Sorry, in the above post \X \P are the correct codes, not what was posted in the jpeg.
From contributor K:
I followed contributor P's advice and found the Dimnote.lsp and dimnote.dcl with an online search. I have been using ACAD for about 15 years, but have never had any experience with lisp routines. I searched the help files in ACAD 2007 and am a bit confused as to what to do with these files that I downloaded. Would someone please be so kind as to walk me through the process of storing, loading, and using a lisp routine?
From contributor A:
The easiest method (but not necessarily the best, in my opinion), is to:
1. Save the .lsp file in a directory somewhere.
2. At the AutoCAD command line type appload.
3. Select the startup suite (suitcase icon).
4. Browse for your lisp file and add it to your "suitcase."
That takes care of storing and loading. Using kind of depends on the specific routine and how it is written.
Generally, you will see in the code somewhere a line like:
defun c: ABC
That means type ABC at the command line to run the program. So with mine, type VIF and it prompts you to select a dimension to append with text. The dimnote.lsp file is invoked by typing dnote at the command line.
I did find that routine and load it and it did not work. Written in '99(?). Something in it errored out/crashed. I did not try to troubleshoot it.
It gets a lot deeper, but that is it in a nutshell. AfraLISP is a great beginning resource. Kenny has some good tutorials there, although he no longer maintains the site. Others here will add, I'm sure.
From contributor K:
Thank you for your response. What is the Dimnote.dcl and what do I do with it?
From contributor A:
dcl is dialog control language. It is just different syntax for defining the dialog box. The dcl file should be in the same directory folder where your dimnote.lsp file is located... I would think... That's where I put it, but it didn't work for me in acad'07. Maybe contributor P knows some tidbits on this routine. The LISP file will call to the DCL file when it is time to make the dialog box.
From contributor A:
Alright, I made a liar out of myself. It does work. Must've been a id-10-t error on my part. :)
From contributor K:
Did you say that you got contributor P's lisp to work? I followed your instructions and received the following message when I tried to run the "DNOTE" command.
"Program ERROR
Resetting environment ; error: An error has occurred inside the *error*
functionbad argument type: consp nil"
Is the location of the .lsp and .dcl files important? I am assuming that they can go wherever I choose, provided I browse to the files location when adding the lisp to the "suitcase." Is there something else I might be missing?
From contributor P:
First of all you need "full blown" AutoCAD. In AutoCAD LT, the Lisp routine functions are disabled. The location of the lisp file is important in that AutoCAD needs a path listed to the files it uses regularly. I have a folder under AutoCAD 2006 called Lisp Routines. I also have that folder listed in the AutoCAD "Support File Search Path". (See the jpeg below.) That you will find under the "Tools Menu" / Options / Files (Tab) / Support File Search Path. Add your folder to this list. To load this file daily you will have to follow contributor A's instructions, with the appload command.
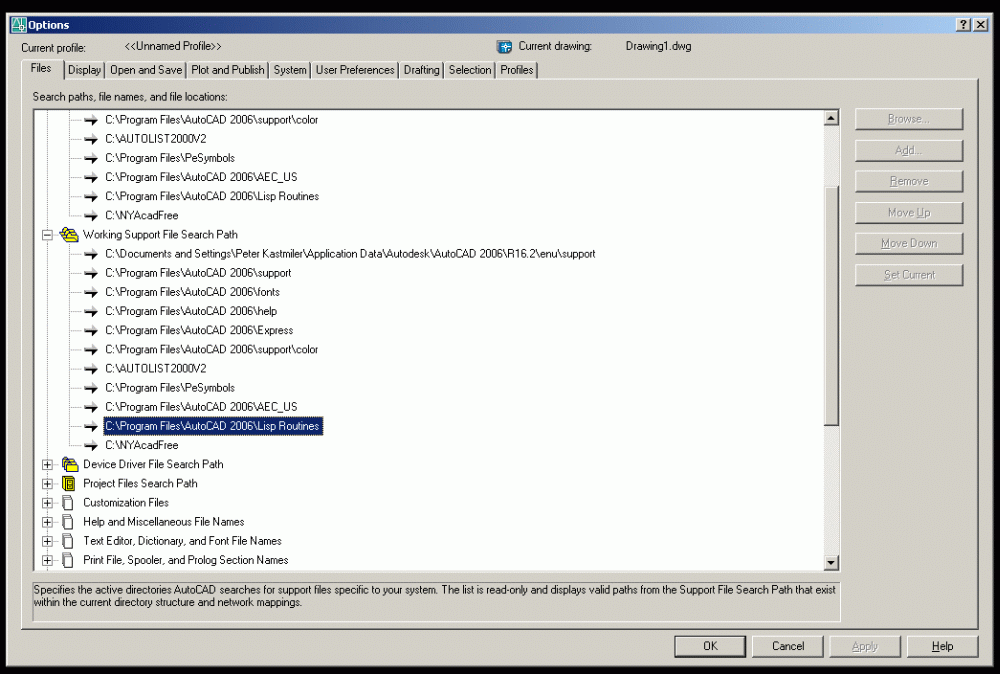
Click here for higher quality, full size image
From contributor K:
Once I moved the files into the ACAD support folder, all is well. I appreciate all the assistance and look forward to expanding my knowledge of lisp routines. From what I've seen so far, they are a wonderful thing!