Question
I have been thinning my conversion lacquer 50% and adding dye to form a toner, and I have been very pleased with the results so far, except for one thing. All sorts of imperfections are showing up and even being magnified because the toner is not getting into these little cracks and voids... cherry mainly. I know this is due to surface tension or whatever, but what can I do about it, after the fact? I am thinking that going back with some matching glaze will do the trick, but I wanted to ask you folks first.
Forum Responses
(Finishing Forum)
From contributor M:
Okay, glaze didn't do a thing... So there may be no fix? What do you do to combat this? Or am I doing something wrong... applying too much toner?
If I were doing a similar finish, these are the steps I'd use:
- Dye bare wood to 80% or more of the final color
- Seal with a washcoat of vinyl sealer
- Sand smooth
- Glaze
- Seal with an unthinned wet coat of vinyl sealer
- Sand smooth
- Toner
- Topcoat
The vinyl sealer before and after the glaze promotes good adhesion. The unthinned coat of vinyl sealer after the glaze also gives you a good base for the toner.
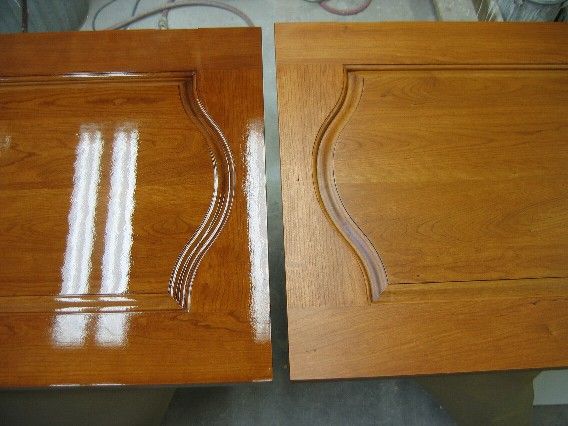
The picture below is an example of this finish. The door on the right has the dye and glaze while the door on the left also has the toner. The toner only adds a small portion of the final color.
Personally, I'd recommend combining dye, stain, and toner for really dark colors on woods that are not already really dark and are prone to blotching. It's easier and produces consistent results. Take a look at the link below.
Combining dye, stain, and toner
1) I apply a dye via spray to achieve the majority of my color.
2) I can apply an oil base stain to the wood after the dye... and that would be plain old staining. But this will probably result in blotching, as usually happens to maple when an oil based stain is applied.
Or I could apply a washcoat before the stain, which would make the color more even, but much lighter. Stain applied after a washcoat could be called "glazing".
3) Seal the stain/glazing coat, sand, and apply a light toner, etc.
Do you ever layer different colors of dye in the initial dye stage?
Some stains will blotch on maple (or any other wood) and some won't. Within any brand of stain, you can find colors that will do a much better job than others. As an example, ML Campbell's Cherry or Traditional Cherry stain will color cherry wood pretty evenly if applied right. But Chemcraft's Cherry stain will cause blotching on solid cherry but not so much on cherry plywood/veneer.
Knowing that, I can use a dye on the wood and follow it with one of the stains that doesn't blotch and get a third color (the combination of dye and stain) that's unique. That approach comes in handy when matching other finishes or making a color that no one else offers. For example, you can dye the wood a golden brown color and then use a cherry stain followed by a cool brown toner to get a walnut color that has warm reddish brown tones to it with golden highlights (from the initial dye). At a glance, the final finish looks like a walnut color but you used a cherry stain in the process because it doesn't blotch on that wood. There are lots of other combinations using other stain colors from different brands that don't cause blotching.
But, staining over a washcoat (or glazing) is also a good approach. You do lose a lot of color intensity since the stain doesn't soak into the wood. That's when you want to do samples and make sure you replace the lost color (and even change it) in the first dye step.
I do not apply dyes to the bare wood in multiple steps in most cases. There are times when it's useful on highly figured hardwoods like curly maple, but generally it's just added work. I prefer to do samples where I work out the color and strength of the dye I use in the first step. I always apply it the same way instead of trying to adjust by spray pattern or fluid flow. That way it always looks uniform.
You can make color corrections by applying one color of dye over another. But I like to find that out during the sample process and just mix the two dyes together in the proportion that produces the look I want.
I like to keep the schedule as simple as I can, though I have made errors over the years and ended up with an extra coat or two of different colored toners to get the result I needed. For example, the first time I used a stain that colored veneer evenly but caused blotching on hardwood caught me by surprise. I had already stained the European cabinets (no face frame) and started in on the doors and trim. Right in the middle of the job, I had to figure out how to use a washcoat on the solid wood and end up with the same color that was already on the cases. From then on, I always did my samples on plywood/veneer and solid wood to avoid the same surprise.
Keep all your samples and label the steps in detail. Do good size samples since little ones can look deceivingly good.
That puts one to bed... thanks.