Question
My client changed her mind after I built a poplar floor to ceiling cabinet. It was originally supposed to be a stain/paint rub through antique style cabinet. Now she has decided she wants it stained. I've tried some stains on some poplar samples and they look terrible. I've tried a 7:1 shellac wash and not much difference. The problem is the white wood versus the green wood. The green stains fine while the white sucks up the stain like no tomorrow. I've given up on stain and want to try a toning lacquer. A few questions. I am using ML Campbell's Magnamax (maybe Krystal instead) and a dye concentrate to mix in with the lacquer. The first couple of tries seemed to be kind of thick. I was using the lacquer with no thinner and adding 1/4 oz of dye concentrate to every 5 oz of lacquer. Can I thin the lacquer by 30%, maybe 50%, and make the toner still using the same proportions (1/4 oz of dye concentrate to every 5 oz of thinned lacquer)? That way I can use a few more coats and get a darker shade without going over the 4 mil dry limit. Any other comments about using a toning lacquer?
Forum Responses
(Finishing Forum)
From contributor B:
You do have a problem. First of all, what stain does she want? You have to have it as dark as the darkest portion of the poplar. I've seen them black to dark green. You could make a toner to color the lighter areas adjacent to the darker ones. But I would talk to her and tell her what she has done. She wanted a paint, stain and rub though, so you used a less expensive grade of wood to give her the best price. Now she has changed her mind, requiring you to be Merlin the Magician. You can't make poplar look like maple or cherry or any other even grain wood because of the type of grain it has. I would explain that first. Then say you can stain it, but the dark portions will stand out. I've stained poplar with a green wiping stain (Woodsong2). Looked beautiful, if you wanted to emphasize the green and black and brown grains that were already there. Just tell her you and her have a problem because she changed her mind after the fact.
1. Seal the pieces with 3 coats of amber shellac. Thin shellac 3:1 with denatured alcohol. 3 parts thinner to 1 part shellac.
2. Scuff sand shellac with 3M maroon Scotch Brite pads.
3. Apply stain and wipe off. The stain should just lightly color the wood.
4. Seal with any lacquer/vinyl sealer you choose.
5. Scuff sand as before.
6. Load gun with stain thinned appropriately. Adjust fluid and air to light mist and start shading. The nice thing about this technique is that you can shade only the areas that require color instead of shading everything evenly.
7. Seal as before.
8. Sand and finish.
The beauty of this is, if the results are unsatisfactory and you need to start over, you can wipe the oil-based stain off without damaging the first color and sealer applications and adjust color or tone.
28 oz of lacquer thinner
4-5 oz of precat lacquer
2-4 oz of stain (depending on the color)
Now I see you're using dyes, so maybe your 1/4oz of dye will work in place of the 2oz of oil base stain. The 4 oz of lacquer that you add is only a binder to hold the stain/dye in place when it dries. Spray it on in very light coats; don't pool it on the wood. The object is not to build too many coats of lacquer, so as to start getting cracks from too much build up. I usually spray about 3 coats to get the shading I want, and immediately after the last coat flashes, I spray my finish coats of lacquer. While spraying, make sure you are constantly shaking your gun to make sure the stain/dye is suspended in the mix or it may settle to the bottom and spurt out in globs of color. Make samples, lots of them, until you feel comfortable with what you're doing.
As for the 7:1 shellac wash, that seems a little thin. I use my precat for a 5% washcoat. Usually 1 coat is all it takes. To get that, you need to know your solids by volume (not weight). My stuff is 20% solids, so I use a 1:4 ratio. You're using Magnamax, which is 25% solids, so you would do a 1:5 ration for a 5% washcoat, i.e. 5 oz of lacquer to 25 oz of thinner. Spray it on wet, let dry completely and sand with 220 or 320 very lightly so as not to take the solids away or you will defeat your purpose.
Here are the basic steps:
* Dye the wood to establish the base color
* Stain over the dye to develop the grain and get 80% of the final color
* Spray a coat of sealer and sand smooth
* Spray toner to get the final color
* Topcoat
The dye starts the coloring process and establishes a base color for the rest of the finish. I usually like to get anywhere from 1/4 - 1/2 of the final color from the dye in a multi-step colored finish. Dye does a nice job of popping any figure in the wood and develops highlights that are visible even after the rest of the coloring steps. Sometimes I'll use a pretty brightly colored dye that compliments the stain color to take advantage of the highlights it produces (e.g., orange dye under a "cherry" color). Once the dye dries, I apply a wiping stain over it to add more color and accentuate the grain in the wood. Usually I spray a light wet coat of the stain and wipe away the excess. After the stain dries, seal it with a coat of sealer or finish, let it dry, sand it smooth, and remove the sanding dust. Next comes a coat of toner. To make a toner, I'll usually mix up 4 ounces finish to 28 ounces of thinner and add 1 1/2 ounces of dye concentrate. Sometimes I'll use the stain instead of dye (as long as it's compatible with the finish) or for some finishes, I'll use 1/4 ounce or less of pigment. Sometimes I'll use two coats of toner, but it's rare. Follow the toner coat(s) with a couple coats of clear.
To get the most even color from dye, spraying a light, even wet coat without any wiping works best for me. The brand of dye isn't that important as long as it's fade resistant (metallized). One of my suppliers has their own label and can mix any color I need or I may use a pre-mixed color from companies like ILVA, Behlen, Mohawk Ultra Penetrating, ML Campbell Microton, Sherwin Williams Dye Concentrates, Homestead Finishing (.com) Transtints, or Wood Finishing Supplies (.com) Color FX . To make life easier, I use whichever brand has the closest color pre-mixed to the color I want most of the time. By intermixing and adjusting how much you thin dye concentrates, you can get an infinite range of colors.
Some problems that come with spraying dye are over-saturation, flooding, bleeding, striping, and poor coloring in corners. Unlike wiping a dye, where the color reaches a limit, with spraying you can over-saturate the wood with color and it gets darker and darker. I usually like to spray the dye in one even wet coat, though some finishers prefer to mist on multiple coats to build the color. The problem I have with multiple coats is maintaining the same color intensity and consistency over numerous surfaces. Applying the dye too heavy, flooding the surface, causes blotching, bleeding, and/or color pooling. A light coat that wets the wood and flashes off quickly keeps the color even. I have to pay close attention when spraying dye to make sure it's heavy enough to wet the wood and overlap the passes enough to avoid spraying stripes. If it's not wet enough, it produces a hungry look where the grain and figure are muted. When you spray into corners and recesses, the turbulence from the air the spray gun uses keeps the dye from wetting the wood evenly. Keeping the air as low as possible and good spray technique will minimize the effect.
After the dye dries, I use a wiping stain (no washcoat). Some wiping stains work a lot better than others. Several good brands of stain include Chemcraft, Valspar, Triclad, ICA, ML Campbell, Behlen, etc. The various brands have different versions of the same color as well. Like dyes, by intermixing colors (stick with the same brand for compatibility) and varying the thinning ratios, you can get a huge range of colors. When you thin these stains, use the stain base instead of the solvent. The stain base has the right blend of solvent, binder, and additives to maintain the stain's working properties. Before you use a wiping stain, make sure to do a large sample to see how that color works. While one color will work well, another color from the same brand can look horrible. If the stain is made with both pigment and dye, it'll usually cause blotching on woods like poplar, maple, cherry, pine, alder, etc.
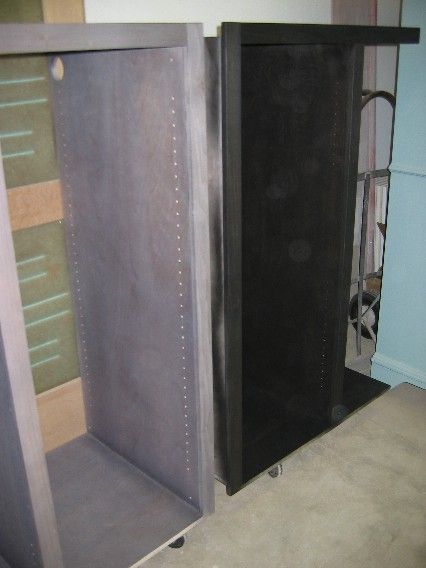
Here's an example of the dye and stain steps. In these pictures, the birch ply and poplar trim cabinet on the left was dyed a shade of grey and the one on the right was dyed and stained. This job had poplar, birch and maple in it and the final finish was ebony. The grey dye equalized the color on the different woods and gave me a base color to build on.
Dye evens out variations
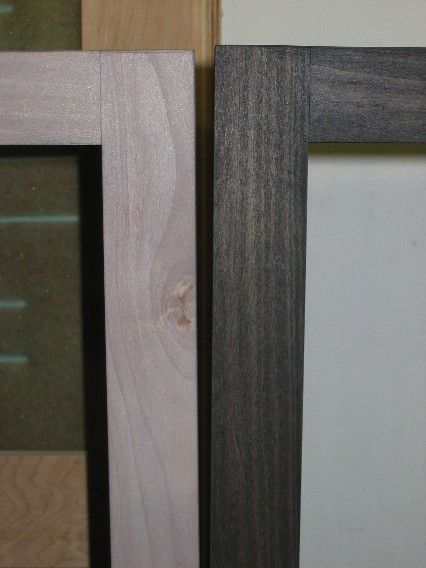
Stain over dye
After the stain dries (an hour or less with a good stain), seal it in with a coat of sealer/finish. Then sand the sealer smooth and spray a toner over it. The toner adds the last of the color and helps to even everything out. The color variations in the wood don't stand out enough to cause any problems by this point. Spray a couple topcoats over the toner.
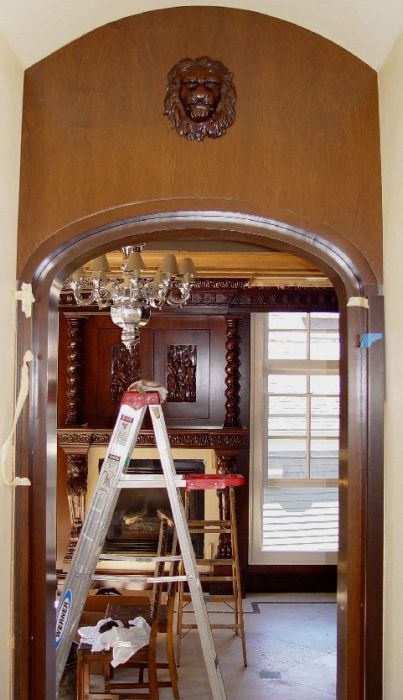
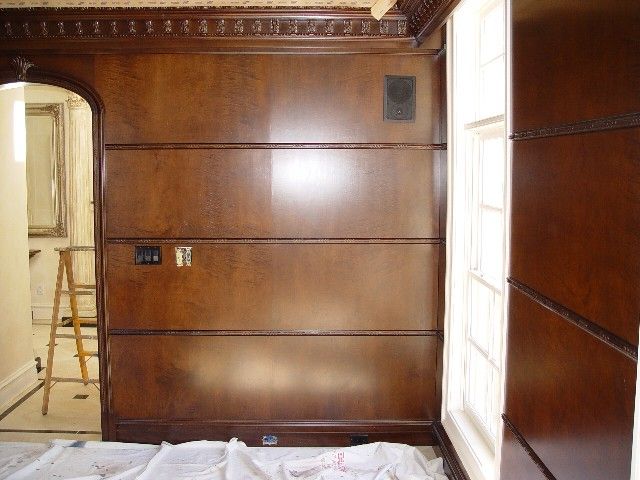
Here's another example with a reddish brown walnut color. The wall panel is maple and the trim around the arched door opening is poplar. The 3 step coloring process makes the poplar blend right in with the maple.
Maple with poplar trim
Here's the same job, inside the library, showing the maple wall panels and trim pieces. The trim around the door and between the panels is poplar and the baseboard is pine.
Maple with poplar and pine trim
The first thing I always do before I start a new finish is to work out the steps on scrap or cut-offs (the larger the better!). I also experiment with different colors at times to work out new finish samples for customers to choose from as well as just to see how they look. I keep all the good samples and use them over and over.
Here's a schedule to try (with the Campbell products you're using):
* Dilute microton "walnut" dye 1 part dye to 4 parts thinner (change the ratio to change the intensity).
* Spray a light, even wet coat of the dye on all the wood. Don't worry if the coverage isn't perfectly even, the stain will hide problems/imperfections.
* Spray and wipe Woodsong wiping stain. Change the intensity as needed by reducing with the clear stain base.
* Seal with a coat of sealer or finish. Sand smooth.
* Mix 1 - 2 ounces of the walnut microton dye in a quart of thinned finish (28 ounces thinner, 1-2 ounces dye, 4 ounces lacquer) to make your toner. Less dye means less color but is easier to spray without getting stripes.
* Don't sand the toner. Spray a coat of lacquer over it and sand smooth. Spray the final topcoat.
Do a sample or three, the larger the better, before starting on the cabinet. Work out the thinning ratios for the dye, toner, and stain to get the color you want.
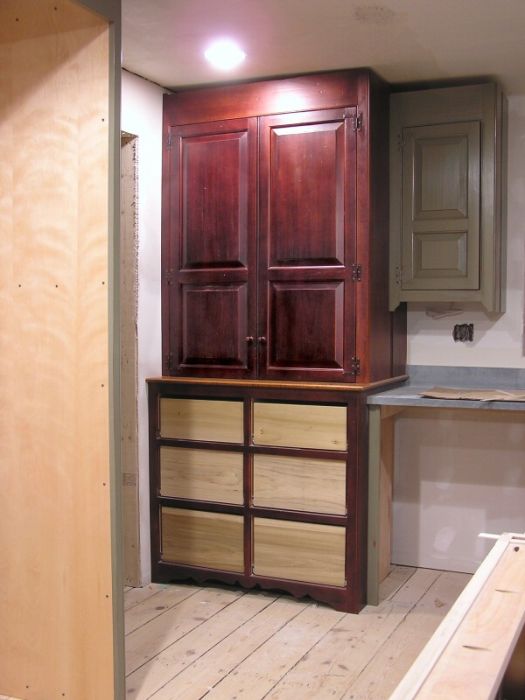
The lighting in this picture isn't the greatest. If I had the forethought, I would have turned off the light above it, but alas I didn't. I wasn't able to complete the drawer fronts, as I was getting the rest of the cabinets on the wall before the floor guys come. I will be able to get more pictures next time I go up there. Maybe I'll be able to take a picture of the curly maple tabletop that will be a yellow/red-orange color. Boy, is this thing going to stand out.