Tools and Methods for Beaded Face Frames
Cutting the beads and the miter joinery could be a CNC deal, a table-saw and jig deal, or a hand chisel and shooting block deal. Here's the debate. April 15, 2011
Question
I'd like to compare two inexpensive beaded face frame systems (I do not have the 5k for a Morso). Kreg has been out for a while now, and I would love to get some opinions on that, and Sommerfelds just came out with a giant cabinet saw blade 1-1/2" wide that will take the notches out. Cheaper, but heck of a lot of jigs to make, and I'm sure tear-out would be a nightmare.
Forum Responses
(Cabinetmaking Forum)
From contributor S:
I purchased the Sommerfield system a month ago after spending an afternoon seeing demos on both. The Kreg system is more money and is used on a router table. It seemed way overpriced for what you actually get. It's aluminum extrusions and router bits. Not sure if a router lift comes with it or not, but was listed as an extra included item on the show deal.
The Sommerfield system is $229 list plus you have to make a sled jig which costs $50 for the fence (from Sommerfield) and I made mine from a sheet of HD plastic which cost me $50. Took me 2 hours to make the sled and set up. Sommerfield system is a table saw setup. Check if you have a long enough arbor on your table saw for the cutter. You need about 1 1/4 minimum. The cutter is heavy, 6 bladed 7 inch diameter cutter to do the notching and the dog ears. It's a little scary, and a 1 hp table saw doesn't cut it power wise. The setup is easy, but you need to be accurate. Set comes with two sizes of beading bits.
I have always found a reason to talk customers out of beaded face frames, which I will never do again, as it is super easy, and the results are perfect.
Kreg has a video available on their web site. Sommerfield has a video available as well as very good printed instructions. I have not done a hands on with the Kreg unit, but I am very happy with the Sommerfield system, and it costs about half as much, even factoring in the sled. Both systems are intended to be assembled with pocket screws, which I was already using for face frames. I was a little concerned about keeping square frames, but that ended up a non issue, as everything seemed to snug up square on its own. Tear out is no problem, as the jig has a MDF backing and I cut both stiles and rails at the same time set face to face in the jig.
From contributor R:
I have the Kreg system and it works good. I set up a second router table so I wouldn't have to change bits. Once you get the hang of it, it goes pretty fast. Check online for sellers that won't charge tax and shipping.
From contributor C:
I am always perplexed when someone asks this question about beaded face frames. Years ago I did a ton of architectural millwork for a federal courthouse. On this job we did tons of notched type face frame work. We notched the profiles (beaded or some other profile) with a jig, a router and a chisel with superb results. Unless you make beaded face frames a lot or plan on doing so, why spend money on a machine? It's like spending money on a hollow chisel mortiser if most of your work is floating tenons. If you have the money, I guess do it, otherwise be a clever jig maker, as that is one the many facets of woodworking. Another option is farm it out if you do little of it. Don't mean to sound smug, just my opinion.
From contributor M:
I always just used my saw and a dado head. That and a couple of good jigs. Once the jigs are made, the setup time on the saw is no longer than for the other systems mentioned. Dial in the height, set the offset and cut. I admit that doing this now would not jive with my lean flow type production ideas because I would precut and batch all the parts. I don't think either of these systems are worth it, unless you can't figure it out on your own. And there are tons of Youtube videos showing this I am sure.
From contributor S:
Well, I would hardly even look at $300 as an investment. $300 is a toy where I do business, not an investment. These systems make a very good beaded job a no-talent endeavor. A guy asks about a tool comparison, and someone wants to see his entire business plan.
From contributor A:
It looks like Kreg lowered the price a bit. It is still a bit steep, but it is a much better system in my humble opinion than Sommerfelds.
From the original questioner:
Thanks! Wow - a chisel and an ax... hand made notches. I would use that too, on a cozy federal job! Milk that goat for a year or two. It's almost as if the money came out of nowhere.
From contributor M:
I am willing to bet I can produce beaded notches with a dado head and chisel as fast as you can with routers, jigs and all that. There are times when chisels and hand planes are faster and better. But you have to know how to use them. There is a difference between the hobbyist idea of chisels (with their $500 sharpening devices and special imported Japanese steel) and a carpenter's chisel. My chisels are all rusty and covered in goo. But they are sharp and I can hack out a quick notch, clean a corner, trim edge banding or cut a mortise in no time at all. I sharpen them with a wet stone and have no idea what the grind angle is.
We have chisels on all the benches (we are a euro cabinet shop with automatic edgebander and panel saws) and use them all the time. A carpenter with a good eye and experienced hand can cut the 45 bead miter in 10 seconds. If you use a 45 degree shooting block, anyone can do it.
I would not suggest we get rid of our CNC machines and go back to handsaws and bit-braces, but don't ridicule experienced shop hands/owners for using techniques you have not considered.
This story hits particularly close to home for me. Before I outsourced my CNC machining to another shop. He was basically a woodworking hobbyist who saw CNC production sharing as a good business. (He was right.) One day I was waiting on my job to be finished and saw him staring at a beaded face frame and the notches. He was trying to figure out how to cut the notches on the CNC. I grabbed a couple pieces of stock and a shiny 2 cherries chisel off his work bench and hacked out a perfect notched mid-rail/stile joint in a minute. He just laughed and said nothing. In the end we did figure out a fast way to use the CNC. We stacked all the parts together and clamped them, then had the CNC cut all the top, bottom, and mid notches in succession. It didn't work very well because the slightest variation in material would result in over or under cutting (the usual problem with CNC machining). But the point was he definitely could have done the job faster using a dado or a router and a chisel. The joinery below was done with dado and chisel.
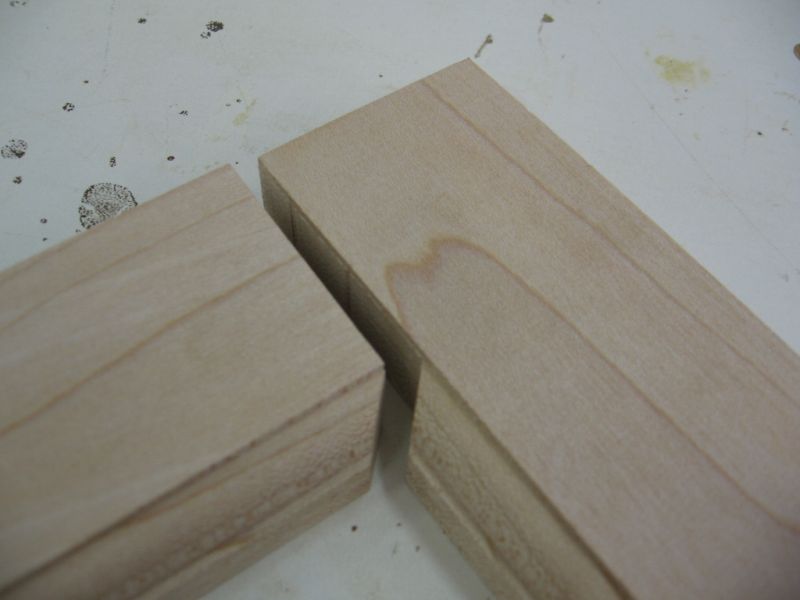
Click here for higher quality, full size image
From the original questioner:
I'm a moonlighting after hours shop that does not have the luxury of learning these from a father that did this. So I have to take this on with little time and experience and a due date. I think it's great you old timers can do this and I'm jealous, but you didn't pick up a chisel and do it without seeing it done. I wish I spent time in a cabinet shop versus a print shop when I was in my teens. I love wood but I also love technology. So if there's an accurate, repeatable tool for the job, I'll use it.
So if anyone can do it, I might try. But I just googled a shooting block and I get nothing. I have to rely on the web and books for a lot of things. So any tips on the shooting block would be appreciated.
From contributor M:
What you are saying is right on. Fortunately using those old tools is nowhere near as hard as Fine Woodworking and the other hobby magazines/books make it sound. Whole books are written about sharpening tools - that's nuts. I live in the Philippines and I see guys sharpen their chisels on all kinds of stuff.
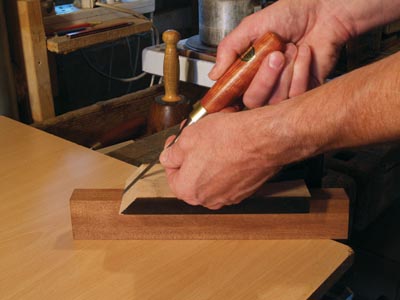
"Shooting block" or shooting board has many meanings. What I am referring to is a block of wood cut at exactly 45 degrees that you place on a marked line and use to guide the back of the chisel. As in the picture below.
I haven't done any beaded face frame jobs since I moved here. This thread has me thinking about it. I would probably use a router and jig. He he he.
Click here for higher quality, full size image
From contributor S:
After reading all these posts I am sending the unit I bought back. I think I'll send the table saw back too. If a sharp rock was good enough 200 years ago, why have more advanced tools now?
I know some guys that are a heck of a lot better at woodworking than I am. They can flatten a desktop in a few hours. Me, I just send it through the drum sander and be done with it in a minute or two. They are probably more skilled than I am, but I get the same results faster and easier, and for me that's what production is all about. If you want to do a piece for Fine Woodworking the old masters way, fine, but the two systems asked about are a giant step forward in ease of use and the fact that with these systems one can use a lot less skilled help (read that cheaper wages) than doing it with the old methods.
From contributor M:
I would say that setting up one of those jigs requires as much or more skill than using a chisel. By the way, my shop is completely modern and I do mostly panelized European type cabinets.
From contributor B:
I'll take a pass on the philosophical argument, but here is a shooting block. This allows both block and work piece to be quickly clamped together in a bench vise.
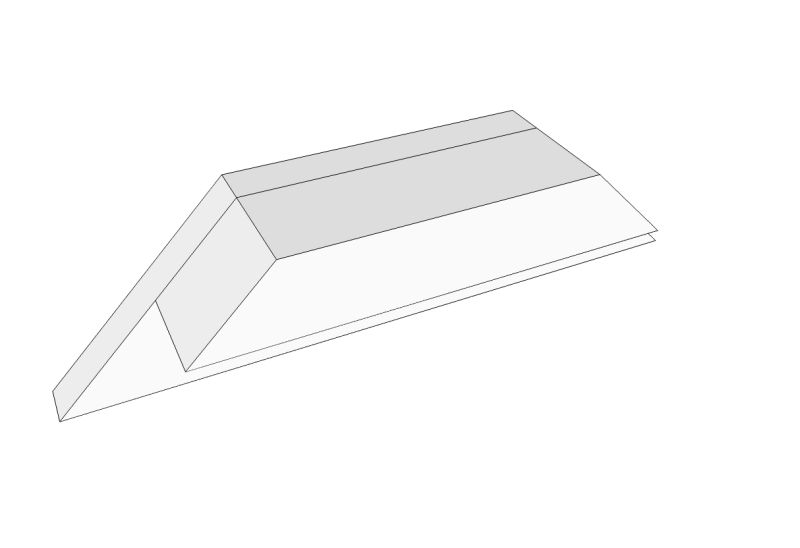
Click here for higher quality, full size image
From contributor M:
I like the design. Thanks for sharing.
From contributor U:
We use the beaded face module from RouterCad, makers of Autocabinets, and run them on the CNC. Fast and accurate. Same as our dovetail drawer parts - perfect every time, using a Shopsabre 4896 CNC.
From contributor B:
There is another solution, particularly for cabinet work. That is to simply apply the bead by gluing and pinning to the assembled face frame. This greatly simplifies the face frame construction and eliminates the need for specialized equipment. The visual quality is equal to the solid version and structurally it is fine, even for butt hinge application. Mill some wide stock to the thickness of the face frame and joint or plane, then route and rip. If a hinge side, the mortises can be made after routing and before ripping. The hinge screws will pass through the applied bead and anchor into the solid frame.
Just for the record, I use other methods depending on the style. If cutting a haunched frame as described in this post, I do not double miter the joint. Cut a miter on the rail or mullion (tenoned) end and use the mitered line to cope with a carving gouge. The bead on the mortised stile is cut square to receive the coped end of the rail. This results in a superior joint and in my opinion is very efficient. I also use the shooting block shown in my previous post to slice the miters.
For shaker or similar work, the bead can be cut into the completed face frame with a scratch stock and the corners carved in. This gives a look and quality appropriate for the style and allows custom sizes not normally available in off the shelf router bits as the scratch stock is also ground by hand.
For the shops with the volume to justify it, I am not arguing with the use of specialized machinery or the latest CNC module - it makes perfect sense. For the small custom shop, however, there are other considerations and methods available.
From contributor U:
Yes, I have machined an offset bead on the shaper and brad nailed with a little glue. That was back before we had the CNC, but it worked perfectly well. Then we used a small custom made, but stock item, biscuit that was 1/4" thick by 1-3/8" long and we cut the slot on the router table with 1/4 slot cutter with a bearing. Very quick and easy for adding strength to the butt joints of the face frame.
From the original questioner:
Sounds good. I'll get the Kreg system then.
From contributor J:
Interesting thread to me, since I have never done this for volume and efficiency. I see two tablesaw setups. Or one table saw setup and that mitred shooting block. I'm not highly experienced on shapers, but what about a cutter sharpened on the top with mitered ends? Also, I find that applied mouldings that are mitered and glued find a way to come apart at the joint ever so slightly over time, no matter what I do. What's up with that?
From contributor W:
I make a lot of beaded face frames. However, I don't make a long run of cabinet boxes side by side. I make one large cabinet. The problem I had with milling the bead on the rail stock and mitering the bead is if you get the location wrong on a long bottom rail with four or five stiles coming into it, it makes all your openings off square. So I rabbet with a router the edges and mill a quarter inch beaded moulding on my moulder and glue and nail into place. I tried milling a bead the thickness of the framestock, but had problems with my hinge installation. I use a
Blum hinge which screws in from the inside of the cabinet. Seems to take about as long to mill the bead, route and miter the moulding, as it does to pocket screw the face frames together, but it's more accurate.