Tools and Techniques for Coping Wide Baseboard
Most carpenters apply a whole range of specialized tools and methods, but everyone has a favorite approach. November 19, 2005
Question
I have a job we have already started and the home owner has change the base to a 5"x11/16" poplar with three flutes horizontal and a bead profile on top. This takes a long time to cope around each profile. What about making a 1/8" tracer with a router or roto zip from a good fitting pattern? I have seen a jig like this before and will consider any ideas. Does anyone have any thoughts?
Forum Responses
(Architectural Woodworking Forum)
From contributor F:
Since you said you would consider any ideas: Once in a while, like when I recently installed 6" tall base in a semi-turret that had a series of three walls running at 45 degrees to one another.
Rather than cope these inside joints, I cut standard inside miters and after I had all the pieces cut and fit, I counter sunk and glued and screwed them together from the back side. When I got them all screwed together, I pushed the whole assembly in place on the wall and nailed it. When an inside miter, whether it is 45 degrees or 90 degrees is screwed from the back, it is just not going to open up when the two parts are nailed to the studs.
From contributor G:
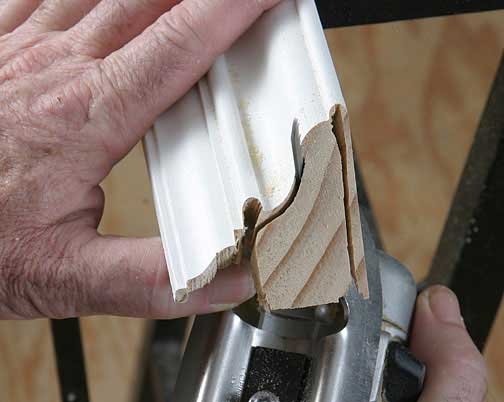
I would suggest looking into The Coper. It's a hard-plastic jig with toggle clamps that secure a piece of baseboard. This jig will handle base up to almost 6 inches tall, so it'll work for you. The kit comes with a two-part resin, for making a template. You use a 1/4 inch bearing-guided template bit (also comes with the kit) for routing. It's noisy, but it�s not too expensive and it works. Also, you don't have to miter the baseboard first.
You might also try a Collins Coping Foot. I cope some pretty elaborate stuff, and hardwood, too, with that foot. If you're doing a lot of coping (base, crown, chair rail) you may want to look into getting a Copemaster. That's a big ticket item, meant for professional trim crews, etc.
From contributor J:
Two years ago I did a trim job where all the stock was hard maple. The house had 20' ceilings and we were installing a crown molding build-up consisting of two pieces of five-and-a-quarter inch crown over a decorative crown base. The 5,600 square foot house was one of those trim carpenter nightmares, with all sorts of off-angle walls and weird corners everywhere.
After coping about five of those built-up hard maple corners with my trusty old coping saw I couldn't even grip my hammer. Something had to be done, and since we were 5 hours away from any major cities and were staying in a trailer on site, going down to the tool store and buying one of those nifty coping devices wasn't an option. After pondering for a while, I got out my roto-zip with the angle grinder attachment and a one- sixteenth cut-off wheel. This sounds crazy, but after a little practice it worked really slick and fast. Intricate profiles were no problem at all. It takes a steady hand and it also smokes a little, but I use this setup all the time now.
From contributor P:
I recently installed crown molding in a family room and tried several methods to cope the inside corners. Using a 4 1/2 angle grinder with a 36 grit sanding disk was by far the fastest and most accurate way. I cleaned up the profile with a flat and a round micro plane.
From contributor G:
I used to use a grinder, some files, a Dremel, a coping saw - but what a mess. I hated all the dust and the noise of the grinder, and then having to file and sand the finer beads and fillets. A coping foot is an all-in-one tool, and no dust, very little noise, and with a good jig saw, very little vibration. Give it a try sometime and you'll never go back. It�s kind of like using an impact driver to run decking screws.
From contributor F:
My experience with a coping saw is that even though you can saw very accurately with one, there is still fine tuning to be done to the profile intricacies with files and chisels etc. I don�t know from first hand experience, but I suspect the same will hold true with the "Coping Foot".
From contributor L:
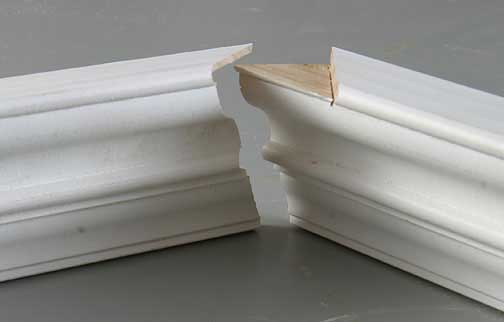
They say practice makes perfect. I do all of my copes with a coping saw. The trick is to imagine your saw as the other piece of trim. Even on other than 90 degree corners, the cut should be relieved. The more you do the easier it is on your hand. Take a scrap piece and hold it against to see if it fits on front and back. That tells you if you cut too much or not enough. It also makes a difference which coping saw blade you�re using.
From contributor G:
Actually, I've found that I don't need my little rat-tail files or grinder anymore at all, even for really tight beads. The jigsaw blade gets in to places that no other tool can reach, and it back-cuts beautifully.
Click here for full size image
From contributor G:
For this chair rail below, I cut an overlapping miter on the top, the same way I do for baseboard (and for crown, but it's on the bottom), then I mortise out a mitered section for the lap to seat in. For base and crown I use my utility knife to make that mortise, because it's pretty small, but for this chair I used my miter saw and just made repeated passes.
Click here for full size image
From contributor D:
I have had the Collins coping foot for about 10 years now. I have been using a jig saw as part of my arsenal of coping tools for about 20 years I had heard about this tool in a magazine so I thought I would give it a try. To make a long story short, I preferred the stock jig saw base to the Collins base at the time of purchase so I put it on the shelf. (One reason that I didn't want to use it was because I purchased some spring miter clamps along with the coping foot.
I was convinced that if I used the proper technique, the Collins tool would do a great job. I used it to install 2500 lf of 6" Oak base on a University law library and 1600 lf of 6" maple base at a new golf course this spring. It is now the preferred method of coping for my outfit. I am very happy with this tool, it's very fast, very accurate and safe to use.
From contributor M:
I've been a trim carpenter and furniture maker (way too much trim, way too little furniture) for 13 years. I use a jigsaw for all but the most delicate coping without a foot at all. I use Bosch 101BR or 101D blades. With a little care, I get as good a cope as with my trusty hand saw. You can support the roller guide from the back with your finger, and use your thumb as a guide/damper on the piece. I believe I could cope 2 or 3 sides in the time it takes to clamp on a jig and roto-zip it. Also, it surely is easier to get a tight joint when you can back cut the majority of the molding enough to allow a tiny bit of "crushing".