Touchup Fix for Sanded-Through Veneer
Ways to patch a sand-through problem using touch-up products like an air-brush, shellac, colorants and pencils. December 8, 2006
Question
I'm refinishing a table and sanded through the veneer in a small spot (the size of a nickel). The veneer is pearwood (very light color), and the substrate is dark, possibly phenolic. Any ideas on how to fix it? I prefer a finishing trick versus any kind of patch, since I don't have any pearwood veneer laying around. I'm thinking of putting down a base of opaque paint followed by padding with a bit of shellac and Mohawk Blendal powders to get the color close to the wood, then use markers and brushes to add some grain. The surrounding wood will have only a very subtle amber dye applied. Is this a good approach? If so, what type of paint would make a good base coat to cover up the dark substrate?
Forum Responses
(Finishing Forum)
From contributor J:
Sounds like you know what to do. If the customer doesn't know you did it, and you do a good job, they'll never see it. If they're aware of the blemish, no matter how good the job, they'll see it every time they look at the table. Just like you will.
From contributor R:
For painting the grain back in on sanded through veneer, I like the Konig paint box. These are lacquer based paints in a box like water colors. I would use them first and after sealing, I use a Stabilo pencil (writes on any surface) to blend in the surrounding sanded through area. I find the pencil is much more accurate than other methods. After that, a little selective shading with an airbrush or aerosols using a paper shield and it should blend in pretty good. Konig also makes an excellent graining marker that could help.
From contributor M:
If you're not familiar with doing touch-up repairs, it's not the time to learn on that piece. Find a good furniture serviceman and let him do the repair. You should really learn how to do your own repairs. You should have learned when you learned how to finish.
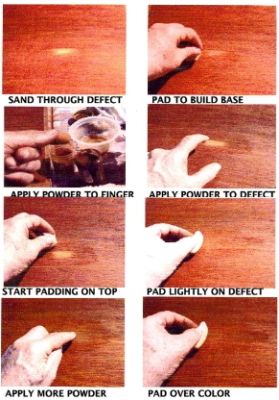
I would start with a white and a little French yellow ocher. Blend these colors between your forefinger and thumb to get the base color.
From contributor C:
Boy, I have no doubt of the effectiveness of this technique... but I'd never do it that way, contributor M. It really is not safe to use your finger to apply pigments, especially powdered ones. Most pigments have some toxicity and some are downright poisonous. I make them up in a glaze using a clear medium and then apply them with a small brush. I have to admit that the finger is one of the human's most handy tools... always at your fingertips, as it were. It also possesses those marvelous grooves and the finest touch, which does indeed make it a tool of great potential. I have had to be stern with myself (working daily, as I do, with pigmented coatings) to train myself to use only indirect tools (i.e. brushes, pencil tips, palette knives, etc.). The good news is that good brushes are quite effective tools, too!
I regularly use water based medium so that small repairs can be given several coats to build the depth of tint needed during the same visit. I use a heat gun to speed the dry time if I have only a small amount of work at the site, otherwise I just rotate around the room recoating each area as it becomes dry enough.
From contributor M:
I have been using this coloring technique for almost 50 years. I have used both dyes and pigmented stains even before they took the lead out of the pigments. No brush can color and blend in like finger padding. If someone is concerned about the trace chemicals, they can wear a surgical glove. It takes some practice, but it can be done. I prefer doing it with my finger, as I have been doing all these years. Another method that is also being lost is using touchup markers. I prefer adding the colored powders to the pad, and then padding with color. Neither of these techniques are being taught anymore. In my opinion, no brush or marker can compare with finger coloring or padding with color.
From the original questioner:
Thanks. Those tips are good. The part that I haven't encountered before is how to deal with the dark substrate. It's really dark brown, almost black. Like I said, possibly a phenolic backing on the veneer. I assume I need to bring that color up to a light color by using an opaque material like paint. If so, what kind of paint would be a good choice? If I get the base color close, will the same padding techniques work over top of the paint?
From contributor M:
You could use these same dry powders. First you apply them as a base color. These powders come in many, many colors. A good base color is to use either a gold or silver powder. In your case, I would use the gold. The iridescence will help the translucency of the wood when you begin to color pad.
From contributor E:
Contributor M, with all the choices of medium for padding color, do you use them all for different reasons? Or do you prefer one for 90% of your padding? Also, you mentioned touchup markers as another lost art. Do you have an article covering those details? I hate it when I don't use a tool, or for that matter my head, to its full potential.
From contributor M:
In most cases, I use the same padding lacquers. Remember, padding lacquer and French polishing are two different products. I personally prefer padding lacquers for finger padding in color.
Let me add that I also use brushes for touchup, usually for very small defects that are not intended for finger color padding. My comment about the lost art was not meant to be about markers. Color padding can also be done where you add the powder directly on the pad, work the pad on a piece of newspaper, so you distribute the color evenly, then you can color pad larger areas. I use it when I have to plane down drawers and doors when they expand. You can seal the wood first with the clear padding lacquer, and then pad on the color � it's a fast way to add color.
From the original questioner:
The paint idea didn't work out so great. It was very difficult to get the repair to blend in with the surrounding areas, even after padding on top of it. Here's what I ended up doing. I used the Mohawk Blendal powders (ochre, white and a little sienna) mixed in with dewaxed shellac to make a not quite opaque color. I sprayed it with an airbrush to simultaneously build up the color and blend it in with the surrounding area, which I had already dyed and sealed with shellac. Worked like a charm. I just got the airbrush. What a great tool.
From contributor W:
Finger padding is an excellent technique for treating problems like sand-throughs, but it does take some practice and it's difficult to make something dark turn lighter. Air brushing tinted or pigmented shellac or lacquer is also very good and I'm surprised it wasn't recommended.
Padding lacquer is indeed a product and I know there are nice folks who market a product they call "French polish" and there are other very nice folks who like to talk about how they mix their "French polish," but French polishing is generally considered to be a technique (this may be an art so lost we don't even remember what it means anymore), not a product. You can pad shellac like you pad lacquer, but that isn't close to French polishing.
From contributor Y:
Finger padding and color padding is still being taught. It's just specialized. I was introduced to it in Minnesota 1998. I'm a road warrior by trade.