Question
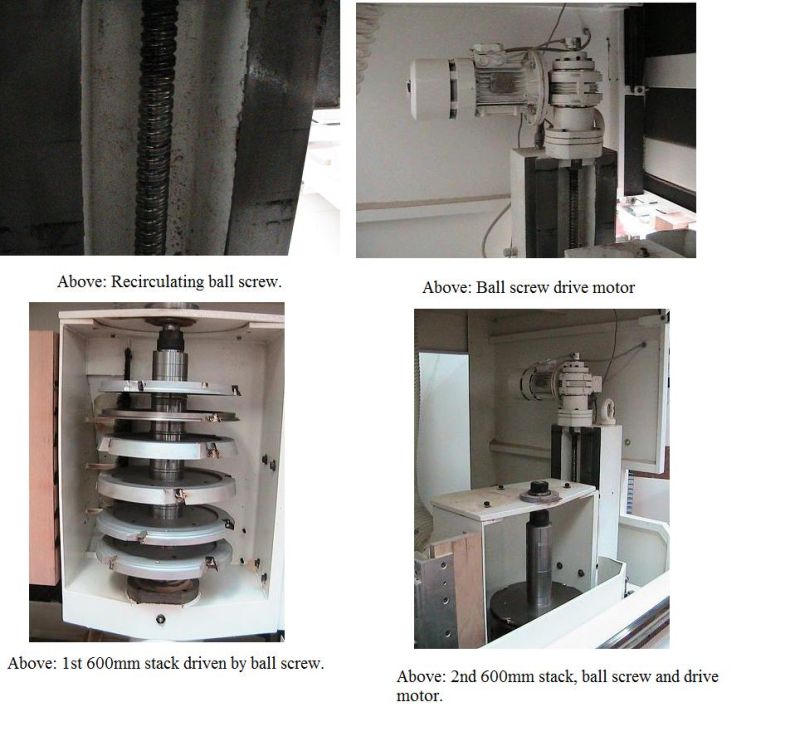
We have a single end tenoning machine which has two 600mm stacks. These stacks are raised and lowered via a powered re-circulating ball screw thread as in the first picture below. We have split tools between them. The problem we are having with these stacks is that they have a vertical tolerance of +/- 0.15mm. This means that when we are making a counter profile using both stacks, the profile can be as much as 0.3mm out (+0.15mm out on one stack and -0.15mm out on the other makes 0.3mm).
In joinery, 0.3mm might not sound a lot but when splitting tools, like what we are doing, it causes a significant problem of inaccuracy. Can anyone give any suggestions on what we can do to improve the accuracy? We have tried different lubricants on the dove tail slides and on the screw thread itself to no avail.
Can anyone tell by looking at my photos why the stacks are inaccurate? Is it something to do with the screw thread? Is there a more accurate system other than the ball screw thread?
Forum Responses
(Solid Wood Machining Forum)
From contributor K:
All machines have backlash, some more than others. When I check out a digital readout against the machines mechanical dials on the hand wheels I always approach the index point from the same direction. In your case, when going down I would set it up to drop a little below the index point then bring the stack up to where it needs to be. When going up just go up to the index point, don�t allow �overshoot�. If your machine can do that, your errors should go away.
You have probably checked but it could be a tooling issue. I see what you are saying about the tool splitting compounding the error. Did you stack and shim the spindles yourself? We are not splitting on ours but using stacked tools on sleeves. We had issues with the tenon fit when setting the machine up. We discovered the cutters on sleeve were not stacked properly and had to do some adjusting and re-shimming. I will be curious how it works out. I am interested in toolsplitting but can see where a super accurate machine is required.
I would get a tech person from the factory but I have told the manufacturer about the problem and they say that the error is -/+ 0.15mm and there is nothing they can do to improve it. The machine manufacturer installed the tooling for me at their factory. The tooling is made by Oertly which is made in Switzerland, and I believe they are one of the best tooling manufacturers around. I very much doubt there is anything wrong with the tooling and we have explored this possibility by changing cutters and inspecting the shims to no avail.
On the first stack I have our scribe cutters and then on the second stack we have our combing tools so, as the tool set is made up over two stacks and the stacks are out by up to 0.3mm, I don't think changing shims will improve this. In effect, this inaccuracy between the two stacks is like having a shim that is randomly changing its thickness from zero to 0.3mm. I would like to get this error down to 0.1mm which is -/+0.05mm. There are other machine manufacturers who quote this accuracy of -/+0.05mm and I would like to know how they achieve this. I'm going over to Germany in May next year to see the big woodworking machinery exhibition in Hannover and hopefully will see how other manufacturers address this problem of inaccuracy.
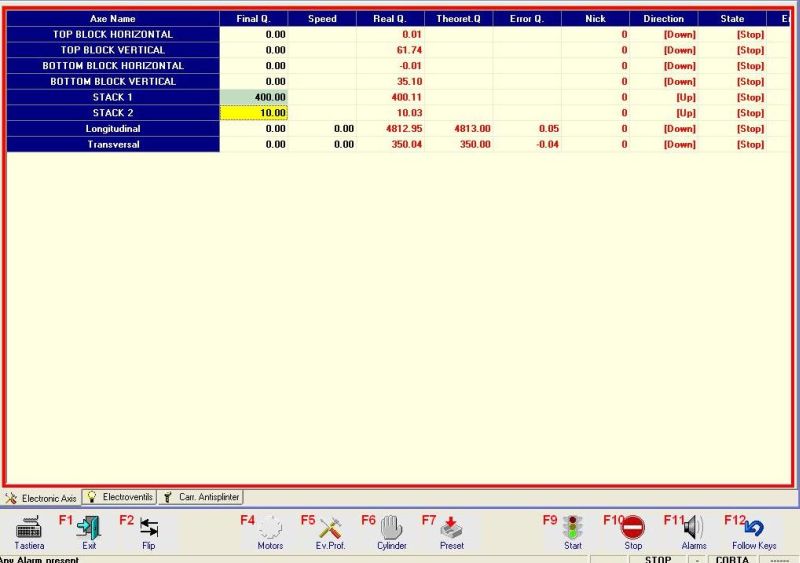
Below is a screen print of the control panel which shows the inaccuracies of the two stacks. The first column (final Q) is where the user enters the required measurement and the third column (Real Q) is where the stack actually lands. As you can see Stack one is supposed to be at a measurement of 400mm but it has landed at 400.11mm giving an inaccuracy of +0.11mm. This stack could have landed anywhere between 399.85mm and 400.15mm given it's tolerance of -/+0.15mm.
I have thought about asking the machine manufacturer to alter the software so the machine has several attempts at getting the stack at the correct measurement instead of just one. There must be a reason why they haven't done this already. Maybe it's because they think the drive motor may burn out, I don't know.
If your tools are good then I would suggest the following checks to better define problem:
First clean and lubricate slide perfectly while adjusting it through its full height range. Next make six repeat settings to two different tool heights and compare screen measurement with a height caliper to confirm if the variation is electronic or mechanical.
A. If the repeated measurements (screen to actual caliper) are varying at all I would look for something loose in the drive/spindle assembly. You could try levering up the whole spindle assembly to see what it is solid or loose (often a loose re-circulating ball race is the culprit)!
B. If the screen to caliper measurements do match (which it should with a ballscrew) I would suspect that something is binding on the slide causing the override variation (dry or dirty slide/overtightened gib, etc.) Hopefully this process will help you find the exact cause, then you only need to find the solution!
Our old CNC seized an x-axis screw one day. I disassembled and repacked it, and I can assure you it was like surgery for eight hours, and I'm a very impatient guy. The techs wanted four thousand bucks to rebuild it and it would have been down several days - and they told me I had beginner's luck because very often the whole ballscrew cannot be salvaged and has to be replaced.
Six repeat settings to two different tool heights. At the moment I have been running timber through the tooling and taking measurements from it using a vernier gauge to compare with the screen readings. I have found this to be very unreliable when getting down to accuracies of around 0.1mm with the timber moving, rough surfaces, rough edges etc. so I have just relied upon the screen readings. I probably need to check this using some piece of apparatus to measure vertically from the bed to a point on the tooling.
The thing is that whatever the problem is, it is applicable to both stacks because they are both showing the same errors. I consider it unlikely that both stacks have the same malfunction to give the same errors but I will investigate anyway. Let's not forget that, according to the machine manufacturer, there is no fault as it is operating within its tolerance and this is just the way the machine is.
But do all machines of this type have this error? Is it inherent in the machines nature or are there more accurate rise and fall mechanisms? Even if there are, could they be retrofitted to my machine or is it the case that either I have to live with the problem or buy another machine?
There are better manufacturers, but you get what you pay for. The best manufacturers will have their own technicians available to the customer, that is how they know how to build it right for the country/methods/application which do vary enormously around the world. I don't believe that measuring from the wood will be accurate enough for you to define the problem. Variables in wood clamping, feed, flatness, straightness, etc. need to be eliminated.
A typical encoder has measuring increments of 0.01mm or better. With normal machine variances effecting load/acceleration/drag (including lubricant viscosity, temperature, weight, vibration, etc.) the spindle should stopping at final position within three increments of the encoder, or +/- 0.03mm.
Find a way to measure the actual spindle setting position to confirm this precision, and then define why you have the variances you have. Did you look for any looseness in drive, or binding on slides/gibs?
I think that this machine would have been ok if I wasn't splitting the tooling. What we do to get over this problem of the tenon counter profile not being exactly correct is to alter the profile tool sets on our spindle moulder. We split the tooling on this machine as well. We have to shim up or shim down on this profile tooling to counteract the inaccuracy on the tenoning side. I know we shouldn't have to do this but at least we can still use the machine.
I agree that in this case, I certainly got what I paid for. I paid around 70K for this machine. I had a quote from a Dutch firm of 100K for a machine with the same specification. The 30K difference for the amount of problems and hassle I've had with this machine is simply not worth it. I've tugged and pushed on all the components and they seem as solid as a rock. I cannot see any looseness anywhere. This machine is built like a tank.
1. Get a digital height caliper that will allow you to measure setting precision on these two spindles in multiple test settings, as advised earlier without cutting wood.
2. If they are both varying excessively (which would indicate it is a machine design/component/software fault) then this problem should be addressed by the manufacturer. In this case I suggest you write directly to the manufacturer, demanding technical correction, or they should take back the machine and refund your money! (To support your claim you may wish to separately get advice from Oertli, and other manufacturers, on the tolerances expected from tenoners with combined stacked tools - there are many of them).
3. If your multiple tests prove the tolerance problem is more on one spindle than the other (I noted earlier that one spindle was set within 0.03mm), then I would report this directly to the manufacturer and demand their tech comes to correct the fault in the one bad spindle.
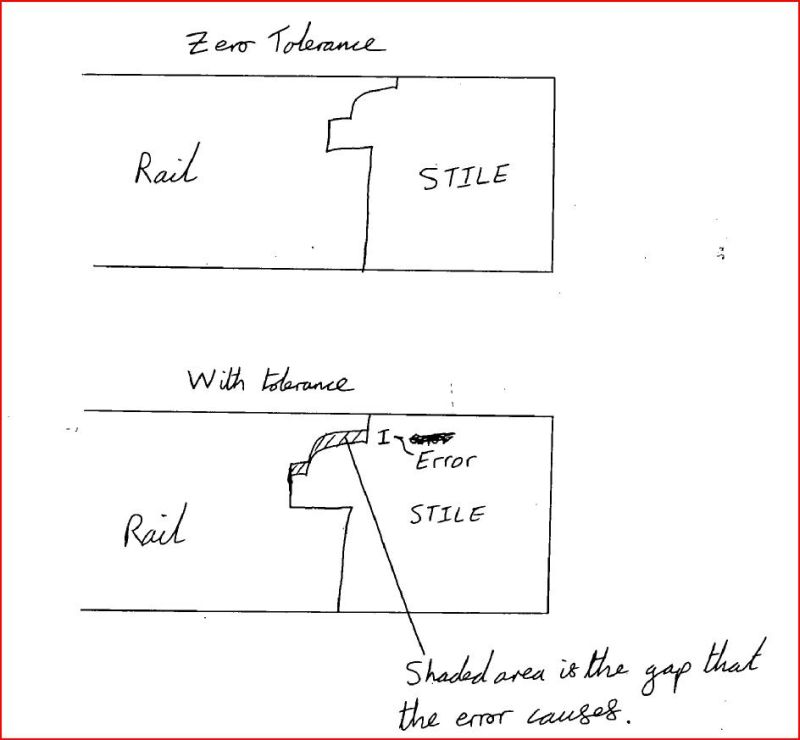
I suppose the tolerance that is needed in a machine depends on the application. My application requires excellent accuracy otherwise the customer will see gaps in their window joints. I have drawn out diagrams to illustrate the problem more clearly below. The diagrams are cross sections of where our counter profile meets a profile. The first top diagram is where the error is zero. The counter profile fits perfectly around the profile. This is what I would like to have. The bottom diagram shows what my machine produces. As can be seen, there is a gap. Because my machine has a tolerance of +/-0.15mm, the error or gap can be anything up to 0.3mm which is noticeable. A gap of 0.1mm, which a tolerance of +/-0.05mm would give, would be far less noticeable. I'm under the impression that a tolerance of +/-0.05mm is an industry acceptable level of error for my application.
His opinion is:
- Multiple attempts at reaching a setting position tolerance is not necessary (and not possible with standard control logic/software).
- If you pulse the adjusting motor on/off repeatedly it should not burn it out, but this will probably heat up and trip out overload circuit, requiring reset.
- Suitable encoder and control should readily position the spindle within +/- 0.03mm (wood tolerance will be more, depending on various factors).
Over a few days cutting I am within .1mm accuracy. When off, it�s usually to the + side. I am measuring wood and as pointed out that is not the most accurate. The first half year we used the machine it would come up .1mm off on the readout like yours does, but seems like it rarely does that anymore. We use the machine more in the manual setting mode than the automatic settings but that doesn�t seem to make any difference.
There are settings in the parameters for inertia (how many mm are necessary to stop the positioning motor). Recovery (how many mm the shaft goes down before going up to correct position). Mine is set to 10mm from the factory. Num impulses encoder (number of pulses to the encoder, mine is set at 250). Screw step (the step of the screw installed, mine is set at 5).
I don�t know if this is useful information but if some of the parameters are off it might affect accuracy. Your machine is also more complicated than mine because of the two shafts and moving table. Do the two shafts hold about the same or is one more accurate than the other? I am curious how you do tool splitting on the spindle moulder but will save that for another post.
Also, a good method of accurately holding the proper position is to have a position clamp strong enough to hold during cutting operations and engage the clamp when the position reaches about 1/8" before the final position. The positioning motor must then drive the ball screw the remaining distance against clamping pressure. (This may require a stronger drive mechanism than you have currently.)
Most of the time, the machine gets within +/-0.05mm on the first attempt and for the rest of the time the maximum number of attempts needed seems to be three. If this solution doesn't prove to be satisfactory there is another option of using a two speed motor. The idea being that when the motor is running at its slower speed it will be far more accurate. This sounds like a good idea and if I had been offered it at the time of manufacture I would have had it as the cost would have been relatively small. If I wanted these two speed motors retrofitting now, they are saying that I will have to pay.
See my �print screen� below where I have circled the error message in blue. I have only just been told about this error message so my operators have never known to look out for it. The other thing about the machine failing to reach the desired target is that it doesn't pause to wait for an input from the operator, as what to do about this problem; it just carries on machining regardless of the inaccuracy. So, if the error was 10mm, the machine doesn't care, it will just keep going. The error message should pause the machine and wait for a decision from the operator whether to run the attempts again or stop the program so the operator can inspect the machine for possible causes.
As my salesman wants evidence of my problem I have told him that because it is intermittent it might not be possible to detect it over just a period of hours. So, what I suggested to my salesman was to ask Colombo for all the recorded actual values that the machine has achieved in getting the stacks to the correct position. This would show all the inaccuracies and everything my salesman would need to satisfy himself that I have a genuine complaint. To my surprise, my salesman told me that Colombo doesn�t record the actual values achieved by the stacks. He then went on to tell me that it wasn�t possible to do this. This came as a surprise to me as well. Fancy that, a computer that can�t record values, especially when it records all program and parameter changes which is no different to recording the actual values. I find this all terribly convenient for a salesman wishing to deny my complaint.
So, what do I do now? I can�t prove the inaccuracies because I can�t expect my staff to write down every single actual value and then my salesman could say that they were made up or false. I�m thoroughly disappointed. The other issue I have is how many attempts to reach a desired position are acceptable? I�m sure a machine with the worst accuracy could achieve its desired value if it were given enough attempts. I want my machine to reach my desired accuracy the first time. I�ve had to set my number of attempts to 10 to achieve an accuracy of +/- 0.04. Am I asking too much of my machine? I don�t know. Colombo has stated it is only accurate to -/+ 0.15mm. So, I feel, it is really just luck when it achieves my desired accuracy.
I�m investigating another machine company called Vertongen. They are claiming that they design their machines far different to Colombo. I�m going to visit one in action. I hope the above is useful to anyone buying a new machine, i.e., make sure it records and saves all its actual values because if it doesn�t you might end up in the same position as me.
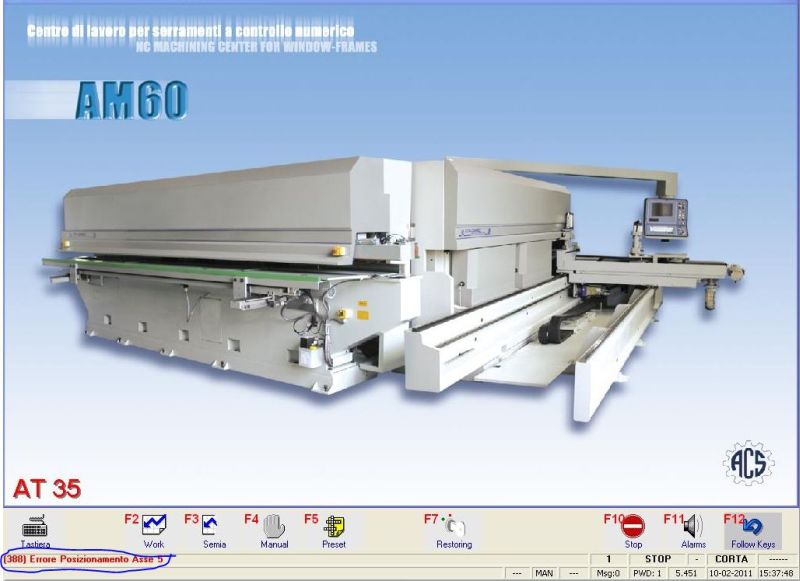
Prior to buying my Colombo I found that trying to get information and prices was like getting blood from a stone. This goes for all reps and all companies. Why this industry is like this I do not know but that is how I found it. This is why I value this forum so much. Vertongen may be an exception to this idea as they are now releasing technical information to me about servos and drives and software. I think this is a good sign.
Why wouldn�t they want to talk about accuracy? Surely they are capable of accuracies as good as anyone else. The hardware and software that the likes of Duin, Vertongen, Weinig etc. use must be available to Colombo as well. I don�t understand Colombo�s reasoning on this issue. What am I missing? In any case, I just want them to fix my machine. I can�t see it costing Colombo and/or Denwood much more than 4000 euro.
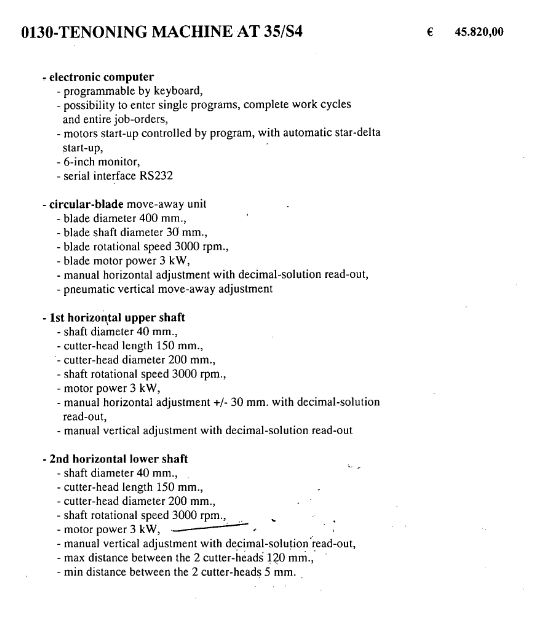
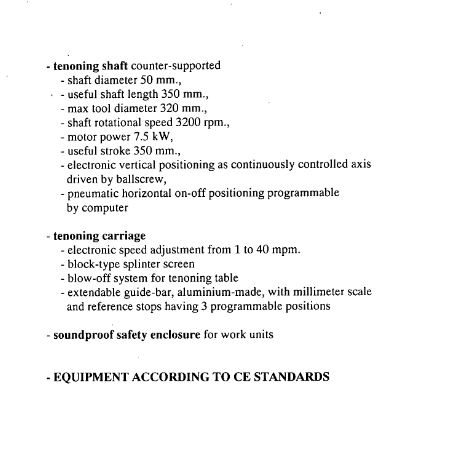
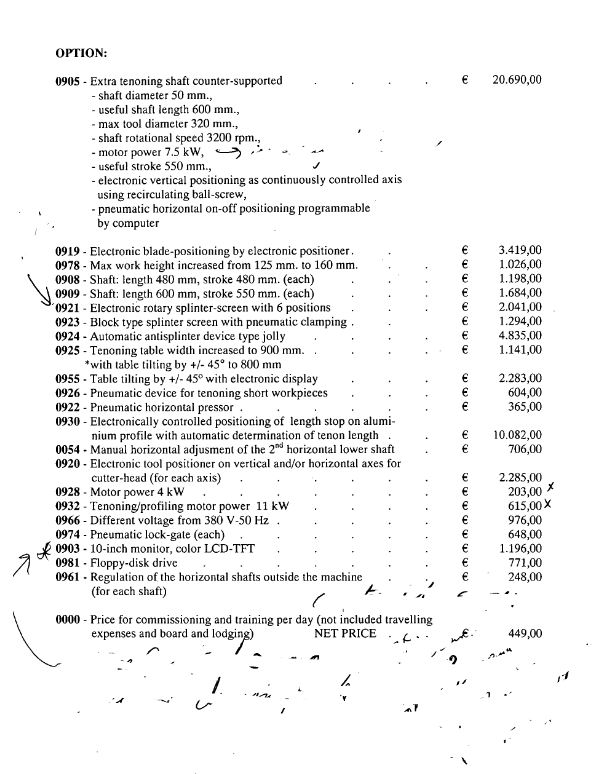
Colombo does not list their options very well in the literature. A lot of things I would have done different if ordering again. I think a lot of the small Italian companies that make window and door machines are good in their own region but not for international sales.
