Question
I have two types of white pore problems, likely related, that don't appear to be sanding dust, on some African mahogany bookcases and shelves. Under a magnifying glass and in the photos below, you can see the difference. The first photo shows the speckles and the effect of the stain. The second photo shows the elongated ridges on the lower right. The specs or sparkles are down in the pores. There is some polyurethane in the pores too. The sparkles could be dust caught on those edges, but nothing seems to get rid of them (water, compressed air, naphtha and toothbrush). They go away when wet, so at first I was unconcerned, till I remembered that with waterbased, dust stays white. And brushing on some waterbased only partly helped. Applying some glaze/stain helps, but they are still lighter than the wood.
The other problem appears to be raised pores that turn white when sanded. In some places you can still see and feel the ridges, which explains why I sanded more.
Some of this showed up because of some orange peel on the shelves. The orange peel was not really noticeable except by feel, and once I started sanding I could see the high points being sanded off. I did not completely sand off the orange peel, as I noticed a difference in the pore look and thought I might be sanding through. I scuff sanded everything after two topcoats before getting ready for the final. Cases mostly needed light scuff with P600 to get dust nibs and overspray. A few legs and pieces - the ones also looking bad with raised ridges - needed a bit more sanding to feel smooth. Some white pores/lines appeared. I thought perhaps it was fibers that had raised. Since they disappeared when wet I didn't think it was a problem.
I wiped everything down with two microfiber cloths to get the dust off. Last night they looked good. This morning I can see white spots in some of the pores. I've tried more wiping, wet grey wool, water or naphtha with a toothbrush. Doesn't seem to get it out.
What caused it? Is there something I can do? At this point all I can think of is reglaze, trying to minimize the overall darkening, and spray one light top coat. I think this will dampen down the effect, but the already filled pores will be lighter than the surrounding area.
I really need to get these done, and because we're matching the existing furniture, I don't want to get the pores filled more. After the second coat, I felt the look was a bit too thick/poly, which is perhaps why I sanded down some of the orange peel. I'm more used to Fuhr 355.
Schedule:
1) Raised grain with distilled water. Sanded P400, vacuumed off dust and wiped with damp rag.
2) Sprayed Transtint in water because it looked awful on 1/4" plywood if hand applied. Was probably not wet enough on cases, but was on shelves.
3) Sealer (good coverage on shelves, too much overspray on cabinets)... General Finishes High Performance diluted with 10% water.
4) Scuff sanded with P600 and 3M, wiped with damp cloths.
5) Glaze of General Finishes Pecan waterbased brushed and wiped (nightmare! used extender on the cases).
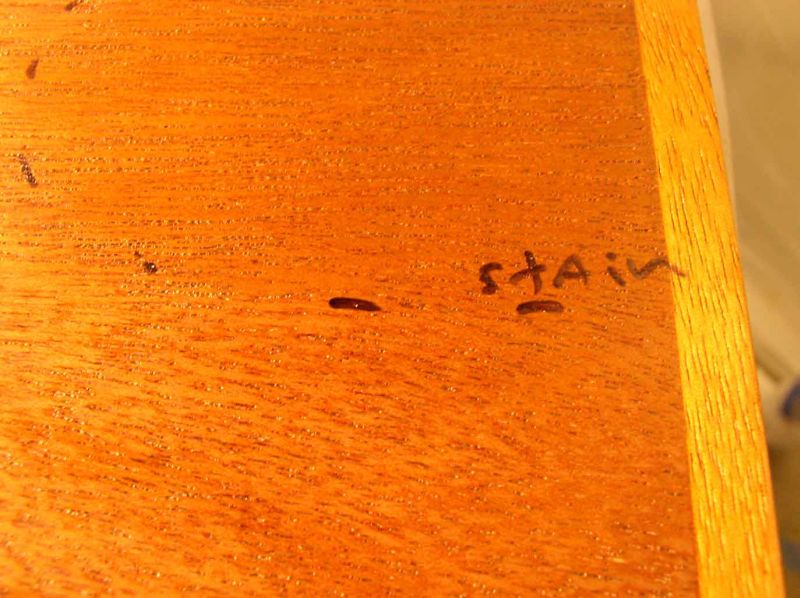
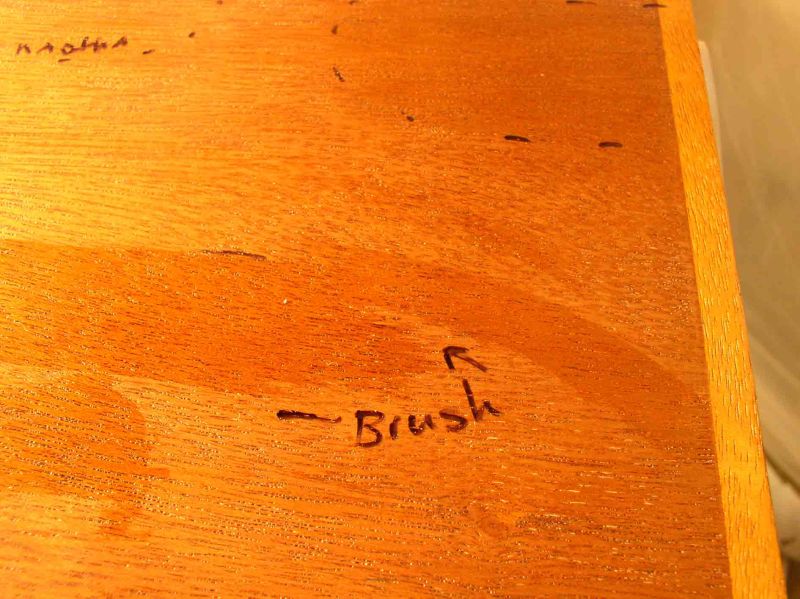
This photo shows where topcoat was brushed on, not much, with the stain upper right. It also shows the difference between the speckles that are down in the holes and the sanded ridges. I should have added that shop temp is ~ 70F and RH 30-40%.
Forum Responses
(Finishing Forum)
From contributor R:
Those crystals you're talking about are inherent in mahogany. Usually it's a good idea to brass brush the pores prior to staining. Light colored stains and natural finishes show it the most. The crystals are now sealed into the pores by your coatings. Maybe using an oil stain instead of the water based would have colored the crystals better than what your picture did. Did the crystals show up on the large sample piece you made prior to finishing the project?
The remainder may not be dust but more like a slurry of not fully cured coating that was ground into the pores when you level sanded with a too fine grit sandpaper. Then when that is left in the pores for any length of time, it continues/finishes its curing and bites into the underlying coating. Therefore it won't blow out under any amount of pressure.
If you are still, this late in the game, trying to figure where to go from here, I can only recommend you try a brass brush and scrub it out of there as best you can, then do a light sand with your P400. Don't ever sand with the P600 unless you have a very thorough cure or are using a coating that goes back into solution.
The brass brushes I have, though rather fine (Osborn 252 B 9), don't do anything. Perhaps not fine enough. It wouldn't do anything for the lighter ridges. What seems to work on the sample is another wipe of glaze and then topcoat. I'm going to start that on the shelves.
What's the explanation for P600, that it makes finer dust? Actually I don't see this where I lightly sanded with P600 - only where I used P400 or sanded more aggressively with P600.
I am really frustrated with this whole process. I've tried to follow the best advice from the beginning. Of course the samples I did at the start of the job for the customer's approval didn't have any problems, nor the many samples I've done recently. I need a system that's reliable and high quality. I've had good success with Fuhr 355 but never used dyes or stains with it.
I really want to thank everyone for the help. I need it.
As for the poly slurry in the pores, I admit I'm not sure what will work at this point if the brass brush isn't. The coating particles down in the grain are probably not fully attached to the under coating, but if you can't find a tool with fine enough bristles to get into the pores to scrub the coating particles out, you may be stuck trying to mask them. My tendency would be to try to use a dye to color them, but you can't use a water based dye to color poly - you would need to use an alcohol or oil based dye which won't bleed into your water based recoat. Or you could try a water based dye with a waterbased coating incorporated into it, even if it is a small amount of coating to act as a binder and lock it down. But it has to be something that will bite and not be dissolved by a subsequent coating.
The P600 is about the equivalent of 360 CAMI (American Standard). While I always use the finest sandpaper I can, that is dependant on the job at hand. In your case with a less than fully cured poly, your finer grit is more likely to mush into the pores than to cut the coating off the surface that a 220 grit no fill (American) may have. This wouldn't be a problem at all if you were using an evaporative coating like NC lacquer or shellac, but with a poly you don't get any full burn in or melt with the previous coating, so any dust or residue is just incorporated in a new coat but not dissolved. And when you have left coating crystals, you have a multi-surfaced object that is simply embedded and causes light refraction and therefore shows up white under the new coating. So your more aggressive pressure/leveling with P600 had a tendency to mash the coating crystals into the pores where they chemically began to adhere as they finished the curing process. Like attracts like.