Troubleshooting a Cupping Table Top
Moisture-related wood movement works its bad voodoo again. July 15, 2011
Question
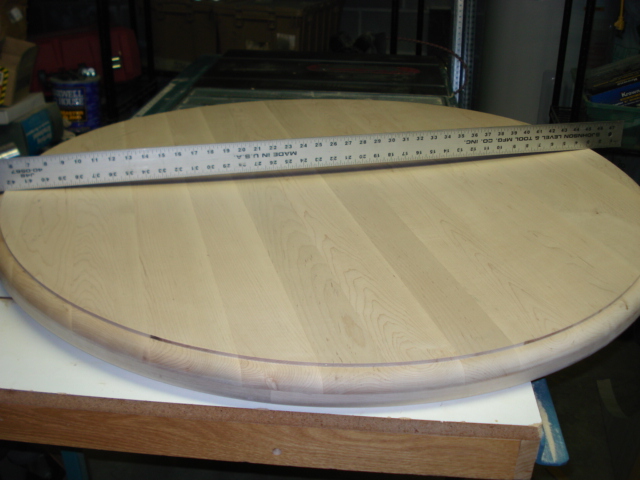
I made a 42" diameter table from 5/4 maple, 6-7" width jointing, alternating the grain up and down. I built up the edge with 5/4 x 6 to get to a 2" thick edge profile and recess to hide the base mounting - a piece of 12" square plywood screwed to an 8" fluted column. The table was lacquered by others and used for 18 months or so when I received a call that it was warping. I picked it up, brought it home, and set some weight on it figuring it may flatten out after a couple of weeks but that didn't work.
I made another table without question, same material, and this time jointed my boards at 2 1/2"-3" thinking my larger jointed boards were the culprit. Other than that I made it the exact same way. I delivered the unfinished table on a Friday into a heated environment, laid it flat on the floor, and left. The following Thursday I received a call that after the finisher had picked up the table it was cupped as well.
So, I've made a third table, this time from 8/4 poplar and turned the grain on edge butcher block fashion with the jointed board thickness at 1 3/4", thinking the grain will not bend up if it's on edge. I routed a 1/4" recess to conceal a 30" dia. steel plate to use as a mounting platform. Apparently using steel was a bad idea from reading another post about splitting. I did get a moisture meter and checked the first two tables. It was too low to get a reading and for the poplar it was 5%. I am baffled as to why the first two tables bent upward across the jointing.
I know it was my construction method - thoughts please? Alternating grain is supposed to counter this isn't it? If steel is a bad idea to use as a mount for the third what may be another way to do this? Is the third table going do some of this too?
Click here for higher quality, full size image
Forum Responses
(Furniture Making Forum)
From contributor U:
I generally attach two heavy wooden battens to the bottom, running cross grain with slotted holes for the fasteners to allow for movement.
From contributor M:
Not to ask the obvious, but are you sure you're square, and that your square is square? Not likely the problem, but you never know. I have been burned by leaving anything on the floor of my shop or anywhere for that matter.
From contributor S:
Did the tops warp before or after they were sprayed, and did he spray both sides?
From contributor H:
I had a similar experience two years ago. I used 3/4" poplar, 4-5" widths, 42" square top on a four leg wood base provided by the customer. I alternated the boards by grain, primed and painted the top and the bottom with equal coats. Three months later the customer told me he really got a bargain. The edges were probably 1/2" higher than the center. The edge grain sides were far worse than the end grains. I have offered to pick up and redo, but since I recommended a plywood type top, he hasn't pushed me.
From contributor G:
A couple things come to mind: Did you finish both sides equally? The panel must be balanced. If you claim the wood was at 5% MC, and the piece is moved to a different environment, you can have movement. I this case, the bottom appeared to have absorbed more moisture than the top face, and cupped upward. Finishing both sides equally helps this. Never place a piece like this on a flat floor, it will cup due to unbalanced circulation. Also, the reason a plate is precarious is this: moisture cannot be exchanged evenly and the plate acts as a barrier. The top can still warp and even bend the plate. The best way is to add stretcher�s under the table. 2 x 3 maple glued and screwed only in the center 8.0 inches. Slot the stretchers and screw them to the top to allow for seasonal movement. #12 FH screws and washers work well.
From contributor R:
Is there an apron under that top? Hard to see what is going on under the top, but I don't see as much end grain on that as I do on the top. Maybe a cross grain problem? Did you surface more wood off the top of the boards after you glued them up? If the wood was wetter on the inside, and you removed a drier skin on one side of the boards, the assembly will cup.
From the original questioner:
Yes both sides were finished, it rested in an alcove with glass one side - 17 months. It was anchored to a 1/2"x 12"x12" piece of plywood screwed on a pedestal base with plenty of air movement. The top two never made it to the finish process. It cupped in transit and I agree setting it on the floor wasn't a good idea. I should have elevated it. I understand the air flow around and evaporation from top surface vs. underside.
I had the 5% MC but I never checked the first two tops. The third top is back from the finishing and I was going to mount it today. So the steel will restrict proper flow underside? I have to tell no delivery tomorrow and make some stretchers for marrying the top and base. I have to mount them cross grain with oblong screw holes to allow movement. If I used clips to float the top on the steel will that have the same restriction on air flow - 1/4 steel will pull up with the wood? No steel at all? The top will still cup even though I turned the grain on edge and not laid flat out?
What do you mean when you say balance or not balanced? Is that in the finish coatings, all surfaces, or the wood being thinner in the field and built up on the edges?
From Carl Hagstrom, Systems Administrator at WOODWEB
Over the years at WOODWEB, this type of question appears frequently. And over all those years, I've had the opportunity to read many many responses posted by Gene Wengert, Professor Emeritus in Wood Processing, Department of Forestry, at the University of Wisconsin, and volunteer technical adviser at our Sawing and Drying and Commercial Kiln Drying Forums. Unless I've mis-read his advice over the years, the *only* cause for what you describe is that one side of the table top is releasing or absorbing moisture at a different rate then the other. It's my opinion that this is what you should focus on, and determine the best way to allow balanced moisture changes to both sides.
As others have commented, grain orientation is not the culprit, and using "strong backs" to hold the top flat may help, but they must be set up to allow the top to expand and contract (not an easy task, BTW). Read all you can in the Knowledge Base archives - this will help you understand that this is being caused by differential MC between the top surface and bottom surface of the table top.
From contributor F:
I had a piece cup like this for a vanity I built this past Christmas. You should wet the top, turn it over and add some weight. The cup should be out overnight. As soon as the piece is dried out, finish it equally on both sides as soon as you can. I would still add stretchers to the underside which is not a difficult thing. Make sure the screw holes in the stretchers are elongated and they go cross grain. Don't torque them down too tight. If the lumber was kiln dried, the alternate growth ring thing is a wives� tale to me. This was started long ago before dry kilns and maybe made a slight difference back then, but not enough these days to be concerned with. It's way at the bottom of my priority list when gluing panels.
From contributor L:
I have had similar problems, and can feel your pain. You said glass on top? That would restrict air flow. Even with a finish on top the air cannot get to the top as it would the bottom. Here is an interesting thought that came to me reading your thread; every time I have seen a table or countertop cup, it always has cupped up from the edges, concave looking at it from the top, I have never seen one convex from the top - why? Is the air flow that much more free over the top of counters and tables, than under?
From the original questioner:
It�s nice to know that many others have been through. I have read about MC and different levels above and below from acceptable limits from the kiln, and cellular loss and seizing at that shape not to be reformed. I am not the finisher in this case and have no control whatsoever how it's done, nor can I control the placement or environment in the homeowners. On a sidenote the third top was lacquered by a different person than the first to balance a finish to control/influence natural movement through air circulation evaporation. I did try to weight and water the second top after I got it back, drywall bucket impression in the pic for a week and it didn't move a bit. The first top I just weighted for a couple of weeks, needless to say it didn't budge either. For the edge inquiry I built up the edge with 5/4 x6 to get a 2" edge profile, eight pieces glued and screwed. I needed to conceal the mounting and beef the edge up for shaping. Table one and two construction is identical except joint width.
Click here for higher quality, full size image
From contributor F:
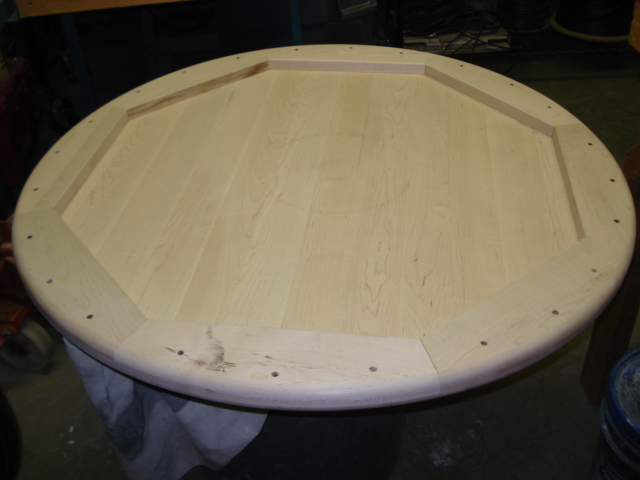
I think your construction method could have something to do with the problem now that I see the bottom. It appears that you're restricting wood movement on the ends of the piece while allowing it to move in the middle. I need to wrap my mind around this, but it would seem that the stresses opposing each other would cause a cup. I'm really surprised that the tops have not separated at some point. Are there provisions for movement that I can't see in the picture? This would explain the reason they have all cupped.
From the original questioner:
I kind of thought the edging was a strong candidate, pretty but damaging. I wasn't sure how to build the edge to 2" (designer want) and route the profile. A skirt was not an option at the design level. Other than make the whole top at 2" thick, which is what I did for top number three. I see my approach initially was flawed, obviously, meeting the clean and narrow line requirement by the designer.
So I now have these two large frisbees that I want to tinker with. If I remove the beefy edges am I correct to think the surface may relax and get somewhere close to flat? Or will the moisture loss at the cellular level not replenish and allow a form shift? I will leave the surface at their thickness and build a tall narrow skirt and clip it to the underside, thus allowing movement between the two.
The cupping is so severe that I did look at the straight edges I was assessing with and I found that two of them are in fact bent! I also checked my jointer to see if I had jointed a bevel into the equation and that was square.
Contributor R - the apron was glued and screwed to make the edge solid for profiling. I did run the tops through the wide sander, both sides, after I glued them up. Removal was 1/16 each side with issue to the stretchers for reinforcement underside incorporating them into marrying the top and base. The base this is mounted to is an 8" round fluted column that is at best an 1 1/2" at its thickest points. Is there enough strength to gain in fastening stretchers at 7-8" apart (column diameter) in one direction and then cantilever 42-8=34/2=17"? It seems to me when excessive weight is applied wouldn't the perpendicular force (non in line with stretchers) tear the fasteners out from the stretcher/top points and tip? Or are the stretchers for top reinforcement purposes at a wider position and not good for marrying the two?
From contributor O:
The construction method with the addition of the cross grain sub-top to get to your target thickness is 100% the cause of your problems. While the equal finish from side to side and air circulation play a role in the series of strategies to keep solid wood flat, the added rim doomed this project.
Wood moves. Wood moves in response to changes in its moisture content, usually as a result of the relative humidity in the location where the product lives. The tops moved from your shop to drier environments, the wood tried to shrink a little, and the cup resulted.
It is our responsibility as makers to understand the properties of wood and build things that will accommodate movement. The design criteria may be at odds with this accommodation of wood movement, so it is often our additional job to educate the designer, and to offer solutions that will satisfy the design and work in the real world.
From contributor N:
I'd like to weigh in here a bit on the notion of alternating the grain, as a practice, being an old wives tale. My personal experience doesn't bear this out. Flat sawn lumber, with a u-shaped pattern in the end grain, will cup only one way. I've said this in other discussions before, but occasionally out of the thousands of doors we've built, here and there one will have a cracked panel. Upon inspection we've always seen the glue-up error.
When an individual piece of wood cups, the once square edges will be slight interpretations of the letter "V" and the letter "A" in angles. You want VAVAVA, not VVVVVV. So, this practice is in anticipation of that movement. If you are lucky your piece of furniture may live out its life in a fairly controlled environment. The exterior doors I build will not, so I have to do everything I can to keep panels flat. In doors, the panel floats, and there are manufacturers who market "spaceballs," essentially compressible BB�s specifically for this purpose. I personally prefer no balls, and a small micropin in the center of a vertically oriented panel's upper and lower profiles to keep it centered; reasoning being that if it expands greatly, enough to want to push apart a stile and rail joint, the small extra volume of that little piece of compressed rubber in the panel groove will be amplified that bit more in the crack. Better to have no crack, but I'd much rather see a 1/32" crack than a 3/16" one.
An easy way out is to use vertical grain material. Then your expansion will be in width only, but that is no guarantee. All in all, if a design does not allow for wood movement, it should be sealed against moisture as best as possible.
From contributor Y:
If I understand top three does not have the cross grain structure problem (the steel plate). If the top was flat 24 hours after glue up (time for glue to fully cure) it�s not the jointer. You can't stop wood from moving or warping if it�s very thin. If you force it flat and the moisture content changes and those pieces are not stable they have to either will warp or it will split.
The best solution is to equilibrate the wood to the expected final conditions before final milling. 5% MC is pretty low - what part of the country are you in? Is your shop much lowerrelative humidity than the client�s house?
Working with thick solid wood requires wood MC perhaps by controlling shop R.H. Generally you need to let the wood equilibrate to the desired R.H. and rough mill to close dimension and allow the wood to warp, twist, whatever it�s going to do as it's going to do (overnight can be enough to indicate problems, 2" think stock can take a lot longer). Get rid of any that move a lot as they will continue to move with R.H. or milling. Do final milling then glue up. As long as you've selected stable wood by the above process and have it equilibrated to the average MC it can be held in place without much warping or splitting. This process is not conducive to today�s fast pace.
From contributor J:
I have never had a square top warp and I do alternate the rings. I did make a 36" diameter tilt top table once out of pattern grade mahogany. When I got back to the shop the next day after routing out the center it was potato chipped by about a half an inch. After a few days it calmed down to about a 1/4" and I was able to hold it flat with underside strong backs. I wonder if circles aren't more liable to warp because there is more end grain vs. face grain as you get to the sides allowing more drying than the center hence a warp?
From contributor N:
You are thinking what we've seen for years in plank type doors, specifically roundtops. We cap as much end grain as possible these days with breadboard inserts as end grain wicks moisture more rapidly than side grain. The roundtops were always worse than rectangles in this regard and I believe your assumption is correct.
From contributor H:
I was wondering the same about the round tops vs. square tops. Thinking back, I have never had a square top warp like the round one in my earlier post. I have only made 5 or 6 square tops, no problem, and then the one round top I do, it warps.
From contributor F:
I think I would have glued blocks on each board end in the same grain direction prior to glue-up to get the edge thickness. Glue-up then profile the edge. Granted at this point the underside will not be pretty because of the different lengths of the blocks, but you could if you wanted, use a router and swing a circle to cut the blocks more even. I think it was all that different grain direction that was going on when you glued and screwed the blocks under the top.
From contributor C:
Having now seen the underside of the table top, finishing issues are kind of moot in this instance. As noted, balanced finishing is generally important but your construction method completely disregards the nature of wood and is likely causing the problem. With the exception of thin ply laminations (e.g. plywood), gluing two pieces of wood perpendicular to each other is quite simply an elementary mistake that will almost never work as intended. I am trying to state the facts, not trying to be harsh. I only point that out because I can be a pretty blunt person and never know how people might interpret my thoughts. Having lost my shirt on my fair share of projects (as we all have at one time or another) I can honestly say good luck: I hope this works out for you. Third time's the charm!
Regarding alternating grain direction on a butt joint glue up: Yes, wood tends to warp in a certain pattern relative to growth rings (as noted). But that doesn't mean that any two boards will have the same tendencies and will equally counteract each other. So, sure, historically alternating growth rings might have helped a bit in earlier days, but efficacy of that help is pretty much left to random chance. So is the fact that some panels that don't alternate will remain flat. I guess that amounts to a wives� tale as suggested.
By the way, Contributor Y gives good advice regarding MC/RH and milling procedure. I would take it a step further and suggest that in critical situations you even take the time to mill down over the course of a few days and store the wood stickered. I know, I know, such old school practices have no place in today's fast paced production environments, unless you are on top of things and schedule your work flow well!
From contributor H:
If we have a designer wanting a table like yours we will tell them that the only way to trap the center by creating the edge detail is to use an MDF core veneered sheet for the center. We glue up a double sheet for the center in the press creating a 1.5" thick center piece. I would think your table top design will eventually blow out the joints on the solid edge as well.
From contributor O:
Regarding the movement as alluded to:
If the cross grain restricted tops continue to lose moisture from the environment, they may well open up splits as the wood shrinks beyond its capacity to pull the cross grain parts into a curve. These splits may open in glue joints, the wood or both. I have seen/heard this happen suddenly - pop like a gunshot - all the way down the length of a top. If the tops were subjected to increased moisture, they will eventually flatten (though perhaps never reliably enough to be serviceable). Continuing moisture uptake will cause the bow to reverse as the wood upper section expands relative to the lower cross grain parts. The fibers all crush just a bit across their width to accommodate the restriction. Then, if the top loses moisture, splits will open up as the now less than resilient fibers try to expand but can only move so much.
From the original questioner:
Thanks to everyone for sharing their opinion and knowledge on my obvious under estimation of wood. Its ability to manipulate a flawed construction method and to destroy in doing so got me this time, despite glue and screws. I do not profess to be a high end furniture maker nor have the ego not to seek a resolution or understanding when presented with a baffling situation, and for me this was. I now realize I made the error in construction method. MC, RH and perhaps an unbalance finished all were part of this, ultimately it was me. For some that mistake was basic, for me it's a reaffirmation of the respect for wood and knowledge, both simple and complex that goes into being someone that works with wood.
From Gene Wengert, forum technical advisor:
Wood shrinks across the grain (about 1% for a 4% MC change, give or take) but not along the grain. However, if there is no moisture change, there is no shrinkage. Further, if the moisture change occurs slowly (such as we see seasonally), then the shrinkage is less. So, in this case, the moisture content of the wood was not in equilibrium with its environment. In most cases, the wood is too wet. Some suppliers of kiln-dried wood indicate that they are to have 6 to 8% MC, but in tests we did we found pieces as low as 4.4% and as wet as 11.0% MC. It is essential to check the MC before using it. Note that a check of the MC now will show dry, as the excess moisture has already left. Further, with the heat on, it is common to find that shops are often at 5% EMC and a customer's home may be 6% EMC.
The side of a piece of lumber closest to the bark will shrink the most. However, the difference in shrinkage for piece cut more than 8" away from the center of the tree (the rings will appear fairly flat on the end grain) have so little difference in shrinkage from one face to the other (and also the MC change is so small in most cases even if there is a shrinkage difference), that AVAVA or VVVV will not make any important difference. So, as stated, we need to look at why one face is exposed to a different environment than the other face (finishing difference, glass top, etc.) or if there was a little bit higher MC in the core so that when we planed or sanded the top more than the bottom, we exposed the wetter core on the top and then it shrank more than the bottom. I suggest that millions of tables have been made over the years with few problems using solid wood. Therefore, figure out what is wrong, correct it, and use more solid wood.