Troubleshooting a Tablesaw Starter Switch
Dirt and wear can interfere with starter switch performance. Here's advice on cleaning and maintenance. February 19, 2013
Question
The starter on my older single phase Unisaw has stopped working. When I push the start button, nothing happens. Sometimes it will start if I hold the button in and keep it in, but usually not. I am looking for a way to test the separate components by bypassing them. Any help?
Click here for higher quality, full size image
Click here for higher quality, full size image
Forum Responses
(Cabinetmaking Forum)
From contributor L:
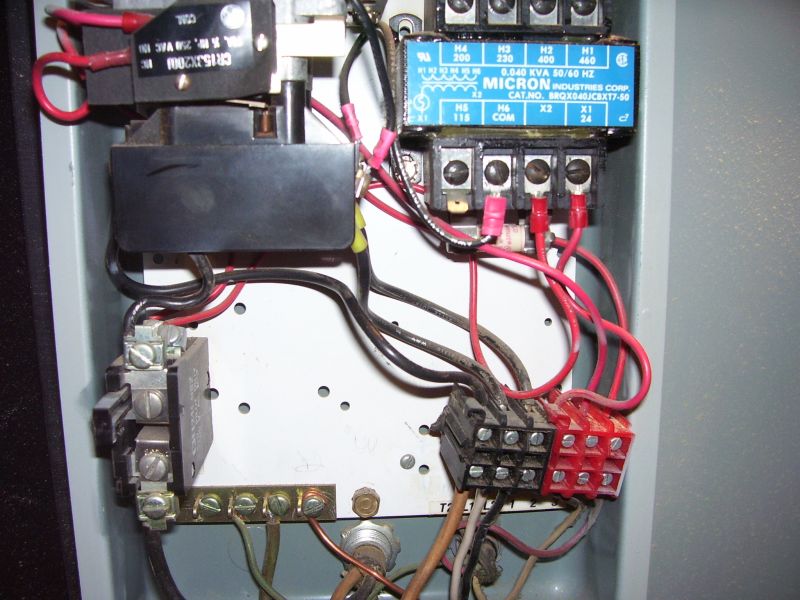
Two simple things to look for. The on switch and the off switch. If either of these get dust in them they can stop working properly. The on switch is a normally open style switch and the off is a normally closed type. When you press the on switch it powers up the contactor, which in turn powers a self latching switch. When you hit the off switch this breaks contact with the self latching portion of the contactor. If the on switch has dust in it and can't make contact, you cannot start the self latching process.
You can test this by shorting out this switch. If it starts, then the switch needs cleaning or replacement. Or you can short out the contacts of the off switch and then try the on switch again. If that works then clean the off switch or replace it. If neither of these work, then it is another problem. Probably the coil.
From the original questioner:
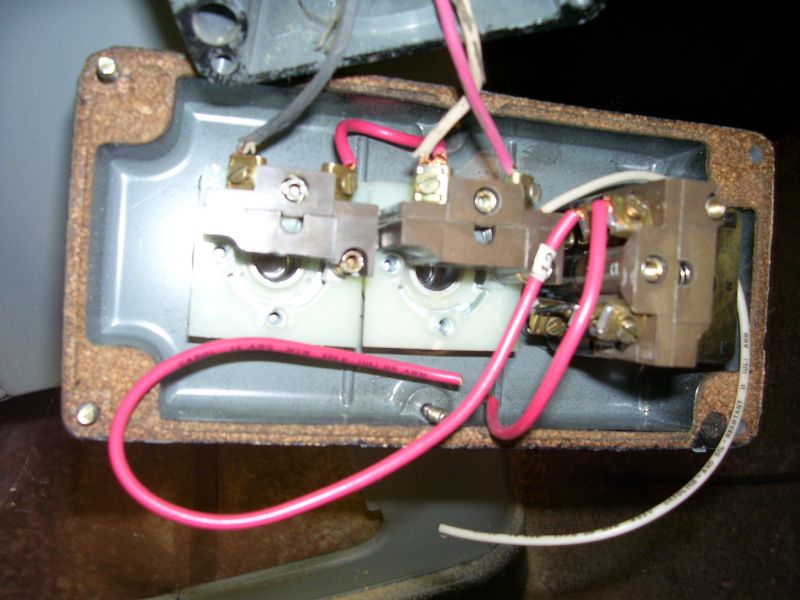
Thanks. I tried blowing it out with a compressor as well as vacuuming it, but nothing helped. The picture of the start switch shows the red and white wire going into it and the off switch was the black coming out of it. When you say short the switch, do you mean connect the red and white together with a jumper wire? I'm not sure what you mean by shorting the coil wires.

Click here for higher quality, full size image
From contributor L:
Yes, the red and white look like it is across the on switch. If you take a length of wire and touch both the white and red with the wire it will be like pushing the on button.
This is a high voltage across the switch (120-220vac). Do not touch it or you will be shocked.
Another safer way to do this is to power down the machine by unplugging it and unscrew the white wire and screw it to the red wire. Then flip the breaker that controls the circuit to the off position and plug the machine back in. Flip the breaker on. If the machine works then it is the switch. If not, you can try the same thing with the off switch. In this case you will press the on button and the machine should start. If it does, you will have to unplug it or trip the breaker to shut it off. If it does work the problem is the off switch. Do you have a volt meter?
From contributor B:
I had the same problem for years with my single phase PM66. In my case, the contacts were burned and pitted. Unplug the machine, then take the contactor apart enough to slip the upper set of contacts out of their carrier. Clean them up with emery cloth or whatever, then do the same to the fixed contacts. Blow the dust out of everything, then reassemble.
Mine seemed to need attention every eight months or so. Your mileage may vary. Some starter manufacturers offer replacement contact sets; my problem wasn't chronic enough to bother trying to chase down the required parts.
From contributor L:
Once the contacts get pitted and burned, they are pretty much gone. They will be usable for a while if you get rid of the pitting, but just use that as a time saver so you can use the machine before you can get the replacement.
From contributor B:
I got ten years plus out of my pitted, burned contacts, and I don't think the new owner has ever had a problem with them since he bought the saw from me over a decade ago, though he's a hobbyist and gives it much lighter use than I did. Clean 'em up, see how it works, and replace them if the problem persists.
From contributor L:
Nice. I've never had long lasting luck when filing contacts. Only last weeks in my case before I am filing them once again. Once the original high polished surface is damaged they seem to pit much easier/quicker.
From contributor B:
I tend to be lucky that way. It's a gift. Or, more likely, machinery develops a fear of having me work on it, so it behaves itself unless something dire is going on.
I could've replaced the contacts easily and cheaply, given the time I spent nursing it along all those years. Of course, when it would fail to start and engage (always at the wrongest possible moment), the game plan was always to just get it back and running - on the rare days when I'd have time to do elective maintenance, it wasn't acting up, and therefore forgotten about.
Kind of like my leaky roof - when it's raining, it's too wet to go up there and repair it, but when the weather's good, it works fine.
From the original questioner:
So far no luck. I sanded the contacts - the ones that I could see. The manual says they are the interlock switch. Also no luck when I pushed them together from underneath. I tested all the wires from input terminals and wherever they led to and had 220v at all locations. I jumped the switch but nothing happened. I checked the fuse and it was fine but there isn't any power going between the fuse terminals. I don't know if this should be always hot or not. I tested the motor and it works. Any suggestions on how to test the magnetic contactor?
From contributor L:
On my contactor you can push the contacts down and have them make contact and start the motor up. Can you do this with yours?
From the original questioner:
I'm not sure if I am even pushing the right points. There are called the interlock switch and they are located on the left top corner of the upper picture, the thing with the white letters on it. Maybe it isn't even what I need to be pushing on. I push them together with a piece of wood. The starter I am working on is a Delta model 52-704. I got the diagram off the internet.
From contributor B:
I don't know your particular starter. An interlock switch is usually used to prevent the machine from starting when the starter cover is off, so you'll probably need to defeat or bypass it in order to proceed. Looking at your picture, I'm guessing the actual starter and contacts are in the black thingie below the interlock switch.
From contributor B:
That'd be the lower black thingie with the screw terminals and wires, nearest the bottom of the starter case. Sorry for the lack of specificity.
From the original questioner:
You guys are really a big help here. I finally got it working. As it turned out it was the stop button that needed cleaning. When I was jumping the start button I did it wrong - I jumped the red to the white instead of to the black on the stop switch. Once I determined that the switch was the problem, I jumped the white to the black on the stop button and it worked. Then when I disconnected it, it didn't work. I was able to take the switch apart and clean the points. All is well now. One good thing is that I got an education on how it works and what to look at in the future.
From contributor L:
With all the dust flying around it's usually a switch. They never seem to seal them enough to keep out the fines.
From contributor Y:
Never clean contacts with abrasives! Use a fine file.