Using the Rip Fence as a Stop on a Sliding Table Saw
There are calibration and accuracy issues when using the rip fence as a work stop on a slider, but they are minor ones. November 20, 2008
Question
I�d like to get some input on how others are using the rip fence as a stop block when cross cutting on a horizontal slider. At first it seems straightforward - pull the rip fence back to the front of the blade, run your stock against it, and cut. But here�s the issue. The setup on my Altendorf has you adjust the �free cut� so that when you rip, there is a minimal clearance on the rising teeth to the stock, .003-.005. On cross cutting again, the stock should just clear the back/rising teeth. So if you do the geometry the rip fence and the crosscut fence are not at a true 90 degrees. So now I try to cross cut a 1�X10� long board into 1� long pieces. I slide the rip fence back to the front of the blade, set the rip fence 1� from the blade, using the slider I slide my board up against the rip fence and cross cut the board. 1� long? Nope. The rip fence may be 1� from the blade right at the front of the blade, but because the rip fence is at a very slight angle, the board contacts the rip fence a foot forward of the blade, thus ending up with a slightly shorter piece. And the wider the piece, the larger the error. The only way I can see to use the rip fence and get accurate results is to have a stop block on the end of the rip fence so the stock always contacts the rip fence at the same location. Of course you would have to add the thickness of the block to your setting. Any thoughts?
Forum Responses
(Cabinetmaking Forum)
From contributor B:
This doesn't make any sense. If the rip fence is pulled back to the start of the blade and you run your stock into the fence, it is simply a stop. Your stock would be held against the cross cut sled and not moved laterally against the fence as you push it forward. If you have a digital fence, it would be easier to compensate for the miniscule difference on length because of your fence not being exactly in line with the blade. I cross cut against the fence all the time and don't see this as an issue.
However, if you do, then why don't you tape a stop block to the end of your fence and compensate the thickness of the block in your rip fence setting? Seems like a lot of trouble to me, but then I might have just fallen off the turnip yesterday.
From contributor D:
I'll agree with contributor B. Sounds to me like you need to re-think how to cut a board :)
From contributor M:
To the original questioner: Yes, technically you are correct. But you need to look at the dimensions here. .006 - .010 is over the length of the fence. So you are looking at +.003 to .005 at the beginning of the fence, and - .003 to .005 at the end of the fence. When you pull the fence back so that the end is in front of the blade, your reference theoretically should be '0', with the front of the fence being +.006 to .010. This is correct.
But why does it matter? With the typical sheet of paper being .004, I can assure you that you will not be as accurate as your saw. If you are cutting wood, it will move more than this based on humidity and temperature. Your machine is more accurate than the material you cut, and unless you have clamps and a motorized feed, you will not be capable of tolerances of .005 or less. And, if you got one of those WA8 models, I doubt that it will hold .005 over the length of the carriage.
I have a digital fence and can calibrate it. But I have yet to find the need to worry about the free cut tolerance when the fence is in the back position.
From the original questioner:
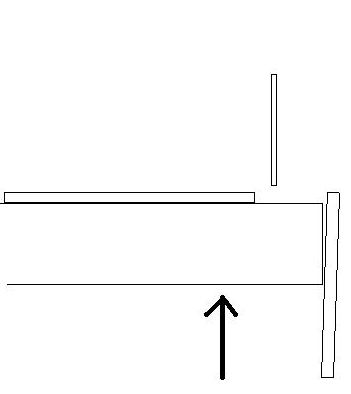
I've included a picture to show the gap at the front of the blade which causes the discrepancy. My saw is an F-45, so the tolerances are there, but when I cross cut 30� wide boards, there is a 1/32� gap between the material and the rip fence closest to the blade. Lateral movement at the cross cut fence is not the issue because as soon as you start sliding, the material no longer contacts the rip fence. So if this is really the method to use, the rip fence and the cross cut fence need to be as close to 90 degrees as possible.
From contributor D:
I personally have my rip fence parallel with my blade and my cross cut fence 90 degrees to my blade/rip fence. No problems making a cut here.
From contributor M:
You might want to do a 5 cut test to make sure your crosscut fence is square to the blade. You should not be out more than .010, with 1/32 being .031. After you are convinced that the carriage AND crosscut fence is square to the blade, then set your rip fence.
From the original questioner:
The 5 cut test will ensure the crosscut fence is 90 degrees to the direction of travel on the slide, but the slide is not necessarily parallel to the blade. In fact, the Altendorf setup manual has the slide travel slightly out of parallel to allow for the �free cut.� So in this situation, if the slider is even a fraction of a degree out of parallel and the rip fence is perfectly 90 degrees to the cross cut fence (or parallel to the slider direction), using the rip fence in the traditional way, the material would be marred by the rising blade.
From contributor S:
I do it the old fashioned way. Clamp a 3/4 spacer to your rip fence, slide your board across until it makes contact with the spacer, make your cut. Your board never comes in contact with the rip fence, just the block placed before it gets to the blade. There are no issues with binding or having to make sure that your slider, blade, and rip fence all line up. You do have to make sure that your slider is square to the blade, but that's a given.
From contributor J:
Your geometry is correct. You seem to understand the machine. The geometry of parallel fence and parallel rolling table can not coexist at this level of design or manufacture. Beam saws and double end tenoners are not just for production, they offer enhanced features for more accurate results. The F45 will do what you need with ease if you work within the parameters you understand. Adjusting the rip fence to as near parallel as you can get will help the most without having to fuss with the rolling unit. If you are fine trimming on the left, and going to the rip fence for a final dimension, you will, as you say, encounter heeling on the rising side of the blade on the left side. This is because the rolling unit and the rip fence travel away from each other. You can, and probably should, restore the rolling unit edge before going to the rip fence again. You are ahead of the curve to understand this. This issue matters only if you want edges completely free of heeling, and you use the rip fence in the traditional way.
From contributor M:
This must be a used saw, or you opted not to have Stiles set it up and voided the warrantee? Are the ways phenolic or steel rod?
I assumed that you know when the material is hitting the back side of the blade... That is when you hear a ringing sound after the material passes. That is why I capitalized the AND when I said "carriage AND crosscut fence square to the blade." If your carriage is out, then yes, you can still crosscut a square piece, but your edges will look like crap. It will have circular cuts rising from the bottom edge to the top, and probably a good amount of chipping on the bottom edge.
I am not sure what you are looking for. Perfection does not exist, even in the aerospace industry, and certainly not in woodworking. We do not need to keep a constant 68 degrees so that our parts will measure in 4 places.
I have been working in tolerances of .001 for more than 5 years. If you need more than .005 in wood, you should get a CNC router that is rated at less than that. And even then parts move.
I set my crosscut so that the last cut on a 5 cut test will be less than .015. The rip fence is .005 off at the tail end.
Your carriage has to be parallel with the blade. Start here. The best way to do this is by hearing. Dial indicators will not be as accurate as material passing the blade. Then move to your crosscut fence. Make sure it is square, and by the way, you don't need to have free cut here because there is no chance of binding after it leaves the blade. Anything on the right will fall away from the blade.
When the crosscut is square, then make the rip fence parallel and move it .005 away. If you have more than .010, something is either worn or still out of adjustment, or you are not squaring your material before you bring it to the fence.
From the original questioner:
I appreciate all the input. After I got my Altendorf I was surprised how little there was out there in the way of using a horizontal slider. I really thought there would have been a users group available. WOODWEB is definitely the best resource we have.
Anyway, my saw is a 1996 F-45 with phenolic ways that was set up by Stiles. The saw was used for only a year or two in a one man custom shop, then sat for about 10 years. The ways are virtually perfect, it has factory digit displays, and a Tiger Stop. I talked to a tech at Stiles and he confirmed the �free cut� set up stuff. I agree with you on the carriage setup, the carriage needs to be as close to parallel as possible - I think mine has too much free cut. On the rip fence, if I have a 300mm blade raised to clear �� stock, it�s about 8� from the front teeth to the back teeth. With a .005 clearance over that 8�, that equates to .030� over the 48� length of the rip fence. I just trimmed the 48� end of a 4X8 foot panel then slid it up against the rip fence. Guess what? There was a 1/32� gap at the end in front of the blade. I�m also a machinist, so anything over .001 seems like a big number to me. So what have I learned from all this? There are many ways of accomplishing the same task on these machines. Between the saw setup and the tolerances of the finished product, you have to find what works best for you.
From contributor H:
I have been using my rip fence as a stop for at least 15 years and also use a Tiger Stop. Never had a cabinet out of square yet. I am not a machinist and glad about it.
From contributor L:
The idea of "free cut" by having the fence a little out of parallel doesn't strike me as something desirable. First I think every blade/arbor has some tolerance, so when it is spinning, it works a bit like a wobble dado there by providing a bit of "free cut" on both sides of the blade. This is okay because it allows you to set your blade parallel to the slider movement, use the 5 cut method to bring the cross cut fence right on the money (ours has a cam adjust on the outer end that makes it easy to get close enough that you can't feel the offset). Then use the slider to set your rip fence parallel. At this point you have as good as it gets for cut accuracy and excellent cut quality on both the slider and the traditional way of using the rip fence. It takes some care and time to get everything adjusted, but it will run true for a long time if not totally abused. Our saw has been used in a production shop, often by employees that have slammed it to the limit of the stops, banged the fences, dropped a 90# sheet hard on the carriage, etc. The saw has much of the extruded ripple worn off the slider (before we got a beam saw it often ran two shifts a day) and still it will cut very well. The original ball bearing system on the slider is still running well. The only things I have never liked are the crosscut fence stops. Italians have never been as good at scales and stops as the Germans! SCMI SL16.
From contributor G:
Thanks for this post. I've never been able to get the cross cut and rip fence on my slider to be exactly 90 degrees, for the reason you mention. There must be some gap between the blade and the rip fence, else you'll get teeth marks on the wood. One thing to try is to pull the rip fence back till it is almost in front of the blade. This allows you to use the fence as a stop, but start cutting with the slider, the wood no longer makes contact with the fence.