Question
For the first time I am forming curved laminations in a vacuum bag outside of a form. I am tasked with building a veneered bar and banquette in a residence that involves several curved in plan diewall sections with varying radii. The curved panel work I have done in the past has largely been constructed of 3/8" bending luan and 1/8" bending poplar substrates laminated over a form inside a vacuum bag. I have always formed up the core and trued the result up with sanding blocks prior to veneering the faces; sometimes this has been rather tedious. Subjecting the form to external atmospheric pressure without air inside to support it requires considerable internal blocking, and the resulting structure can be so massive as to make getting it inside a plastic bag difficult. We have frame presses, but they are limited to forms of less than 6" in height, so small radius shapes of any width are hard to deal with that way. I have not experimented with ambient air pressure bladders inside a lightly built form inside a vacuum press, but I would be interested in learning more about that process.
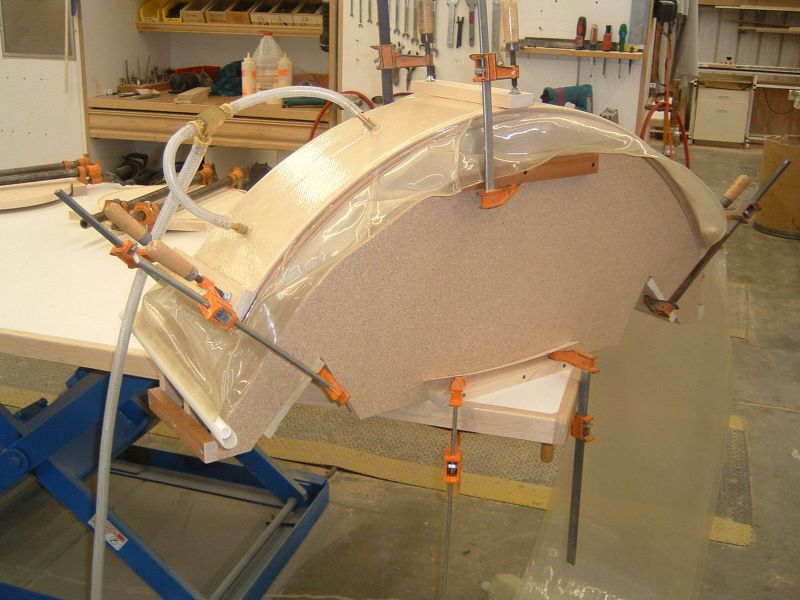
I decided to try the external bagging technique to avoid building a heavy throwaway form for the initial section of this project. I have to make two sections of wall with about a 230" radius - one independent about 60" long with a concentric, hidden back surface, the other, longer, is backed up and integral with a 50" radius section that will surround upholstered banquette seating built by others. I made a form with 2 plates of 3/4" ply 82" long with a 230" convex radius and flat back spaced 36" apart by 3/4" ply studs 10" o.c. My intention is to take apart the oversize form when the laminating is done, cut the plates to the smaller wall section profile, and insert shortened studs so that it becomes the actual wall frame with the laminated panels screwed to it. My first layup had a 3' 8" wackywood core and two 1/8" 3 ply poplar skins with the face grain running in the long direction of the form. When I initially laid a piece of 1/8" over the form, it made a fair curve in the long grain direction, but deflected across the grain between the studs. Clearly, it needed some crossgrain stiffness, so I tried the 3' 8" luan core for that purpose. The resulting panel, glued up with Titebond, showed some kinks along the edges and unfair areas between the studs. It will serve as a structural back panel but would need a lot of remedial sanding to serve as a substrate for face veneering.
On the second go-round I laid up 3 layers of 1/4" MDF with epoxy. I clamped a bar across one end of the bagged laminates down to the form, and held a bar down across the other end with hand pressure as the air evacuated. Once vacuum was established, the sandwich was quite rigid, and could probably have been set aside independent of the form for curing. The resulting panel was really fair in all directions, which I think is due to the isotropic bending characteristics of the MDF as opposed to the plywood I used on my initial attempt. It seemed the longitudinal stiffness of the 1/8" ply there was not enough to overcome the uneven crossgrain bending of the 3/8" core in between the form's studs.
So I learned something useful here, and hope to learn some more from others who have used this method. What sort of radii are achievable with Kerfcore material without telegraphing the kerf facets through face veneers?
Forum Responses
(Architectural Woodworking Forum)
From contributor M:
Our method is to either place the studs closer together or screw a stiff substrate to the face to prevent the flats. A layer of the 1/4" MDF screwed to the studs probably would do the trick.
The limber aspects of bending ply can be overcome by using a second ply of something more even, or using that as the platen. The thickness or thinness should be sized depending on severity of the bend.
Using a board across each end is a good idea, but also a batten or lath around the long sides will help even out the pressure along the curve. Too much pressure along the bend can cause flats, so go easy there.
I like the fact that the form only has to be strong enough to resist the bending pressure of the combined spring-back of all the plies, which is usually not much with this type work. To illustrate that point, I have taught a number of classes where I used 1/4" MDF for the form, with scrap 3/4" plywood for ribs.
The more you get into this the more creative you can get without a lot of expense. Any shape that you can bend the individual plies to can be made into plywood, just by making a simple disposable form to hold it there.
About a week ago, I was giving advice to a newbie wanting to veneer a church door. He mentioned going out to buy a vacuum pump. I have offered the suggestion of just opening the drain in a compressor, then screwing a hose adaptor in the intake side, which will work. But I had been wondering about just using a shop vac. Epoxy doesn't need much pressure, just full contact between all parts. It dawned on me that I could easily test how much pressure a shop vac produces by putting my bathroom scales between two 12" x 12" squares of plywood. I surrounded it with cardboard, cut a little window to view the scale, and put it in a thin drum-liner, just hand holding it around the hose without a seal.
I was really surprised that my Sears 16 gallon pulled 175#, and a little 1 hp 1 gallon Sears pulled 190# per square foot. If your veneer face isn't something buckled like some burls or highly figured veneers, that is enough.
If you do much business with a plastic laminate wholesaler, ask them to save their cover sheets from the pallets. This is my favorite platen material. Some of it is sanded on both sides, and can be used as the second ply. The price is right also. It is hard to beat free.