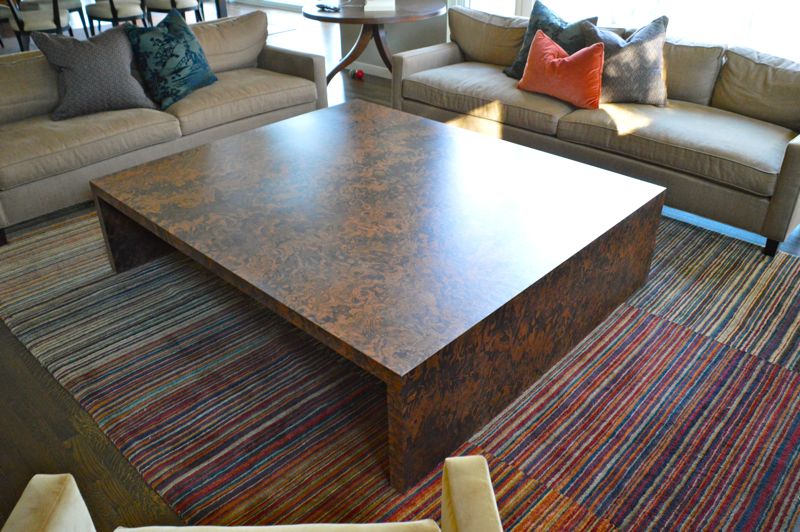
I have a question as to the best way to veneer a modern designed table. I've posted a simple design that would have veneered sides, top, front etc. The base would all be made of mdf doubled up. I know if I were to build a piece like this with laminate I could just use contact cement and flush trim bit and it would be pretty simple. Just wondering how others would go about a piece like this. Build the form and then vacuum bagging. I don't know much about vacuum presses but do know I should use it with veneers. Any help is appreciated. Thanks.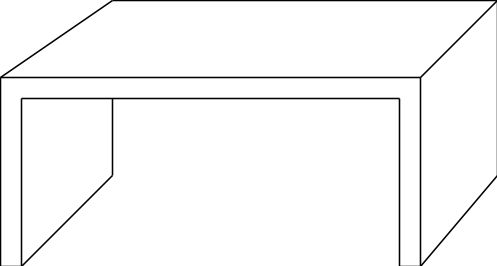
From contributor C
Chad:
To answer your question about veneering this piece, I'd lay up the veneer, use either a 2 part urea/formeldahyde or PVA glue and place the parts in my vacuum press.
I think you will need to use more than just doubled up MDF for this piece. I would develop a better design where the leg/ends and the top join. Also as you've drawn it the top will definitely sag over time! MDF is flat when you buy it but left unsupported as in this design it will sag and depending on the weight of objects placed upon it may actually break! You could incorporate a modesty panel which could both stiffen the top and strengthen the leg/end-top joint.
Another concern, if you plan to veneer all sides of this piece I would recommend that you laminate or inlay solid wood at all edges before veneering the piece, this way the occasional ding will not expose MDF and it will help protect the veneer as well.
You mention you're not as well versed in vacuum press veneering as you might like to be. Check out the web site www.joewoodworker.com they have a real wealth of information about veneering, vacuum presses and even how to make your own bags. Good stuff!
Oh, and forget contact cement! Leave the contact cement to the Formica projects and stick with glues designed for veneer work, you'll be happier and your clients will be as well!
Hope this helps!
CJ
From contributor Da
CJ is correct on all points.
"Simple" is never simple to do. The cleanest, most spare contemporary things are often much more difficult than their predecessors with their moldings, layers, do-dads and stuff to cover up everything. Also, MDF has a hard time supporting its own weight over time.
So.....this can be done two ways: Quick and dirty, like p-lam, and it will be on the curb in a couple of years. Or as a well made furniture piece, worthy of good design, methods and craft, that will last and be valued for quite some time.
I would make this as three torsion boxes so I could incorporate solid wood for both strength and joinery opportunities. This will also keep the weight down - a major factor in making long-lived furniture. The veneering will take very careful planning and execution to come out right, since all the parts must be made flat and veneered sequentially.
From contributor ch
Thanks guys.
Yes there is a stretcher on this piece that supports the top etc. I just sent this basic sketch mostly to see how one would go about the vacuum bag process. I understand how the flat panels work in a press, but have not seen how one would do a piece like this in a bag, placement, support, etc. Maybe there are some videos online I can look at too.
I've been making furniture for about 15 years, but mostly in a solid wood, craftsman, joinery style. I need to get my veneer up to speed big time. You are also right on the simple projects being the trickiest sometimes. I do quite a bit of art nouveau, arts and crafts style work and can hide stuff. A big modern flat box has to be perfect or it really shows. It's like the difference between inset and overlay drawers. Luckily all I've ever done is inset, so the others are a snap.
From contributor Ed
If you would like more info on vacuum veneering just request our free 2 hour instructional DVD http://www.qualityvak.com/dvd.html
From contributor ch
Heres a photo of my clamping caul set up that worked perfectly using Better Bond Cold Press Veneer Glue. All the 5' maple cauls were bowed to get the equal pressure from the center out. The top is 5' x 6' and the piece weighed 280lbs. at the end. I built it how the architect insisted and he helped deliver it. We'll be changing the weight on the next one, ha.