Walnut Slab Table Top Finishing Tips
Woodworking and finishing tips for a craftsman working on a Walnut slab table. January 8, 2010
Question
I am building a 3" thick x 42" x 12' solid walnut table for a hotel. I found the slab in Washington, which the company is kiln drying (which is estimated to take 7- 8 weeks). The base is metal, which will have slotted holes to allow for expansion. Any suggestions on a finish that will be durable for commercial use? How do I address any open splits or knots?
Forum Responses
(Furniture Making Forum)
From contributor B:
Splits and checking are usually countered with butterflies. What do you mean commercial use?
From the original questioner:
By commercial I mean a hotel lobby. I am looking for a finish that will be durable and not need a lot of maintenance, such as applying wax or polish every month, as you know the hotel help will not do. They will probably be washing the table everyday with soap and water.
From contributor G
Automotive filler (Bondo or equal) tinted blackish with dye for the cracks and holes. (Never have had the situation, but if you think a split is active, then perhaps butterflies). I finished the few office counters and desks I have done in 2 inch walnut with Danish oil - either natural, walnut, or cherry (try sample under actual lighting) under wipe-on poly. But that requires a bit more poly from time to time, and I think soap and water would destroy that finish in no time at all.
From contributor W:
Why not use a bar top finish?
I also have used a turpentine and tung oil finish where I start with 50/50 then add tung to 25/75 and finally all tung. The turp helps get the oil into the wood and the lesser amounts help fill. So far the customers are happy and they are not ones to maintain their furniture.
I include a once a year visit to look over the piece and do any repair work as needed and charge my time at $25/hr. There is no questioning.
From contributor B:
How many coats are you putting on like that? Do you lightly sander between coats? The reason I ask is I hear more and more that there's no need to sand between coats. The guys that do sand lightly between coats say that it gives the next coat something to stick to. The guys that don't sand between say if that's the case, how is the next coat sticking where the sandpaper hasn't hit? When you go back to your client a year later at $25, do you add drive time, etc.?
From contributor W:
I usually drench the first 50/50 coat and let it sit for about 2-3 hours and wipe off the excess. Waiting 24 hours, I drench the 25/75 coat, letting it sit 2-3 hours again and wipe off excess. Let dry at least 24 hours. You can see some weeping from open pores and I wipe it periodically during the day. The last all-tung oil coat is wiped on early in the morning. It is let set for 1-2 hours. I wipe off excess and during the day check and wipe any excess that may weep out.
Most of my customers are close enough that I don't get picky about travel time. However, out-of-town (more than 20 minutes) I would include travel time or change my rate to cover that time. Heck, plumbers charge $60 per hour with no specific travel time.
From contributor P
Take it to a real finisher and have catalyzed
polyurethane put on it. None of the above will stand up to a real commercial situation.
From the original questioner:
I had in mind either catalyzed lacquer or a urethane floor finish. I was not sure if those finishes would be too hard and not elastic enough to move with a solid piece of wood 42" wide. I did not want cracking in the finish. The slab will be kiln-dried to 6-7% MC and should be relatively stable. How many coats would you suggest? We have the spray booth and air assist spray equipment.
On a preparation note, I will be surfacing the slab on a CNC router. I was planning on orbital sanding the surface and hand sanding the live edges. Would that be proper or should I hand-scrape the surface? What about filling the grain? Is that necessary?
From contributor B:
What's the difference between catalyzed lacquer and non-cat lacquer? And then there's pre-catalyzed.
From contributor J:
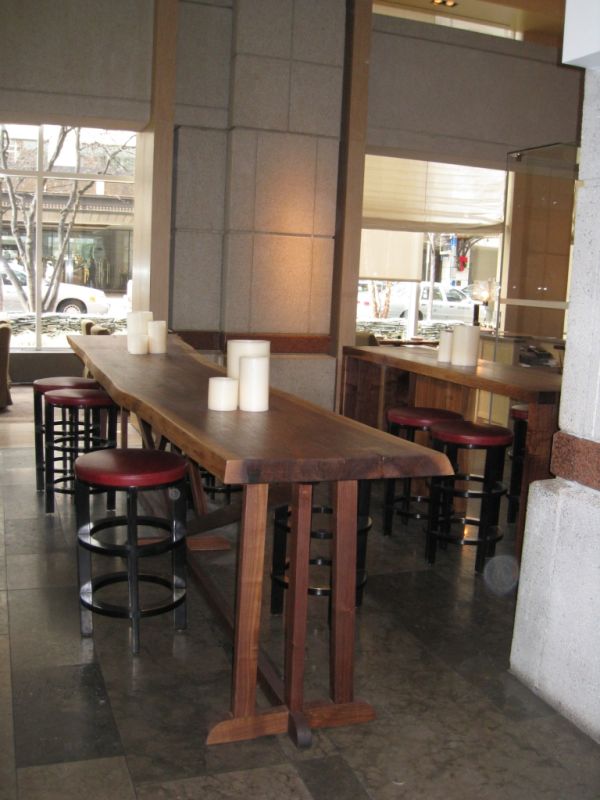
In the recently completed Communal table I finished for the Hyatt in Washington DC, I used Gabon ebony and fast setting epoxy to fill any cracks and knots. The finished appearance is cleaner than using walnut wood dust.
From contributor M:
The undesirable truth is that any finish will wear, and that the top will need to be maintained. This is especially true in a commercial setting. I've experimented with many spray-on "bomb-proof" finishes. These days I find myself preferring a true marine spar varnish like Interlux. The benefits are: it can be thinned for initial coats, providing protection even if the surface film is breached; it is waterproof to protect against the inevitable botanical garnish; it can be easily and selectively abraded and touched up, or recoated with a good brush; it's packed with UV inhibitors for that sunny inviting hotel lobby; it is moderately durable; and if the help can be convinced to clean only with Murphy's oil soap, then touch-up services will not be required for a long time. Just my thoughts: a timeless piece of woodcraft should not be made disposable with a one-time-miracle finish. Incidentally, I spray conversion varnish for vertical surfaces.
From contributor C:
I have adopted an approach to finishing that has worked for me in some occasions. I would sell the inevitable ware and tear as part of the piece. The patina will change with use and rather than fussing forever, allow it to age. Use a hard wax base and just maintain it by buffing it and adding a little butchers wax as needed. (Applying a hard wax base finish is not as easy as it sounds, but it looks amazing.)
Embrace and celebrate every drink ring. You could offer to "seed" the patina by distressing it a little before you hand it over, so that first devastating scratch is already there. They might go for it.
From contributor J:
All clients have concern about their investments. The walnut will age and get even more beautiful if you leave it alone.
If you want to see some images of butterflies applied to cracks in a walnut flitched top, I will be happy to post them.
From contributor B:
I'd like to see the butterfly images. When you put the butterfly in, is there a way to gauge exactly where it goes? Do you put it in the middle of the check? End of check? Both? Or is it a feel for where it goes?
From contributor G:
Are those butterflies meant to be structural, in any real way? The ones I have seen instructions for in magazines do them with a router and are only set a bit one side or the other of a quarter inch deep and are only put on the show side of the table. I always assumed it was Mr. Nakashima's way of saying that he knew the crack was there but that with the little butterfly it could be a decorative feature. Perhaps letting the viewer know this is real wood, and thick, and not plastic. If that is true, I would presume that their location is by the eye.
From the original questioner:
How is the butterfly actually cut into the piece and how is the butterfly made? Does it get glued in place?
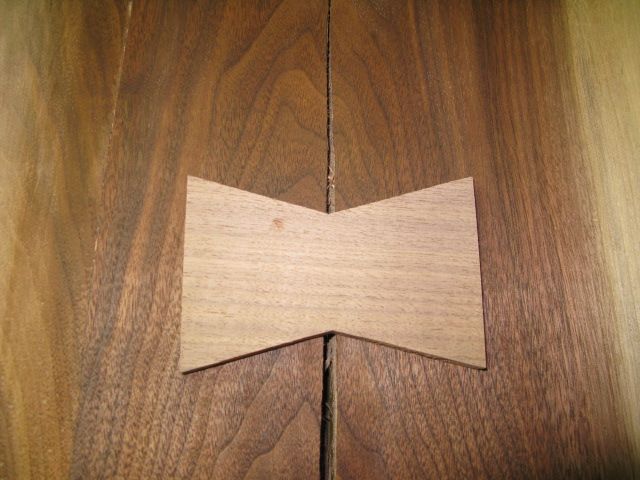
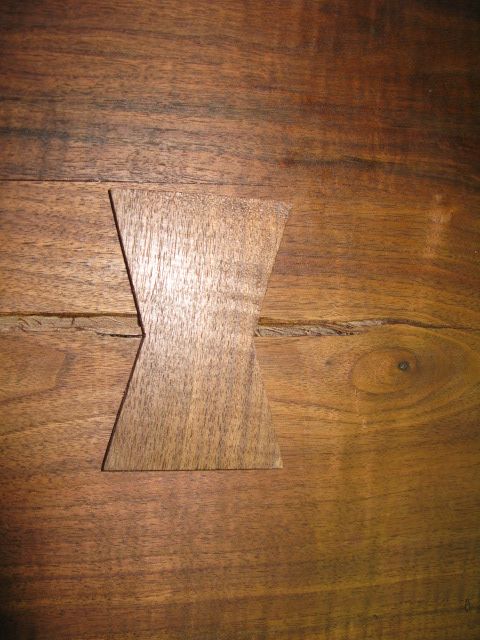
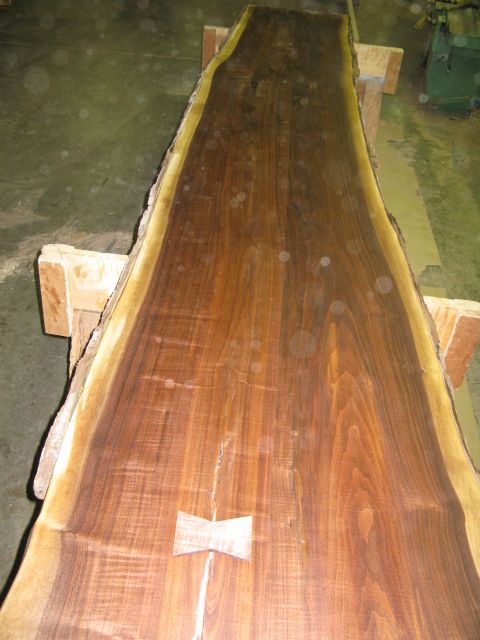
From contributor J:
Here are some of the butterflies.
Click here for higher quality, full size image
Click here for higher quality, full size image
Click here for higher quality, full size image
From contributor B:
How deep are those butterflies?
From the original questioner:
How do you determine the size, shape, or angle of the butterfly? Is the mortise handcarved in the piece of wood and the butterfly cut on a bandsaw and then carved to fit snug? Is it white glued or epoxied in place?
From contributor S:
I'm not sure how contributor J does his, but when I put in a butterfly, it's with a router template for a pattern in the base wood, also for the butterfly patch. The trick is to use a templating bushing in the router base, then remove another bushing from the bushing, cut a patch from scrap wood, bandsaw out the back edge, and it fits perfect, as long as you are using the right sized bushings.
Rockler and Woodcraft, among others, sell the templates, guides and bushings.
From contributor B:
Contributor S, a decorative template like the one you described won't hold a slab from splitting further. The butterflies you see on slabs are usually made on a tablesaw.
From contributor S:
Principle is the same, whether you're talking decoration or structural. True, it can be done the hard way, but the router is quicker, whether you go 1/4" deep or an inch deep.
From contributor J:
There are a number of options. The butterfly shown was cut on a bandsaw to get the architect to decide the size he wanted. Butterflies were placed on either end of the table top and bottom 1/4 inch off the surface with fast drying epoxy. I make a template so that everything is consistent.
Click here for higher quality, full size image