Widebelt Sander Adjustment and Scratch Patterns
A close look at widebelt sander head adjustment and its effect on the quality of the results. April 29, 2010
Question
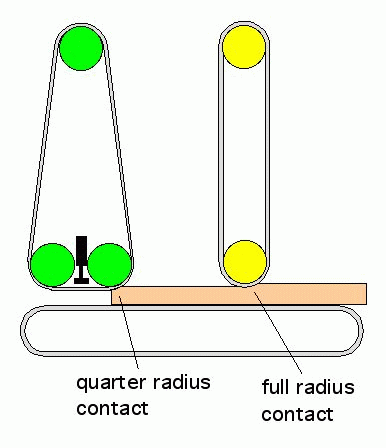
I have a question about the mechanical logic of widebelt sanders and scratch patterns. We have a two head widebelt sander. The first head has a steel drum. When wood makes contact with this drum, it engages the full radius of the drum. It calibrates material to thickness. The second head has two rubber drums with an optional air bladder between them. When wood makes contact with this drum, it only hits the front corner of the radius. This produces a shallower scratch pattern than the first head because the product is only hitting a portion of the contact surface.
In order for this to work, the bottom of the drum on the second head situates slightly closer to the conveyor belt than the drum on the first head. Is this a correct assumption of how the mechanics of wide belt sanders work? We're trying to produce a tutorial about how to operate our Butfering sander, so I would like to get this right.
Here is a section view of the sanding heads. When I look at the diagram I have a hard time understanding how the second head introduces a different depth of scratch. I do, however, clearly remember the fellow from Stiles (who set up and trained us on the Butfering) make that statement. Can anybody explain the differences in scratch patterns that might show up from differing head/belt set ups?

Click here for higher quality, full size image
Forum Responses
(Cabinetmaking Forum)
From contributor A:
I don't really get your quarter radius theory. Most Timesavers have either a platen or just the drum. If you lower the platen (wide, flat surface), the sanding is flatter and less aggressive, usually used for finish sanding. Your double drum setup looks like a stretched belt to resemble a platen. The entire flat section of the belt is abrading, not just the corner as shown in your diagram.
From the original questioner:
Thanks. That theory sure does break down when examined with a cross section drawing. I've been somehow operating with that theory since the sander was installed 8 years ago. I'm pretty sure that is what I heard him say so I did not give it any more thought. As I recall, he was also an ex-torpedo technician in the Navy. Could be his skills were just in electronics.
From contributor G:
Without using the platen (which is shown in your drawing in the up position so it is not doing anything) the second head will operate the same as the first head regardless of how far around the drum the belt goes. If the same grit belt were used on both heads the scratch pattern for all practical purposes will be the same.
The first difference in scratch pattern comes from using a finer grit belt on the second head, thus shallower scratches than the first. The second head is a set lower than the first. The amount lower is determined by the grit difference and belt thickness difference between the first and second heads. The second belt needs to be aggressive enough to remove the first head scratches but also needs to be adjusted properly to allow it to do so.
The second difference comes from using the platen in the down position. In the down position the platen kind of acts as a third head. In the down position it is set slightly lower than the second head. By nature of being set lower and being flat instead of convex, as is the drum, it will leave a better finish than the second head alone will.
The second drum on the second head does not contact the work at all.
The head and drum settings will need to be changed as belt thickness and/or grit changes. It is very important, actually required, that the heads and platen be in almost perfect adjustment with each other. Not only from one to the other but also across the full width of the sander. We are talking within 1 to 3 thousands of an inch.
This can be hard to understand completely, much less to remember. After eight years it may be worth hiring a good tech to retrain you and your staff on this machine and check out all of the adjustments.
From the original questioner:
Thanks. That is a very easy to understand explanation.
From contributor G:
It is said that 90% of multi-head sanders are not adjusted correctly. Obviously then, all the benefits from such a tool are not fully realized. We run a three head and the training at the time seemed to go right over our heads. Through use came understanding of the machine and the importance of accurate adjustments and setup. I now realize that the two head we used to run was probably never set up and run properly to realize the full potential it had. With that said I have no regrets for upgrading to the 3 head.
From the original questioner:
You are probably right about aligning the two heads to each other. The majority of our work is solid lumber. If there was a significant misalignment it would probably be more noticeable with veneer. As I said, the assumption I made about the difference in contact now seems really stupid. It was just the movie I had running on a loop in my mind. We launched our first effort today at video training. More accurately, this was our first effort at training ourselves to make a video.
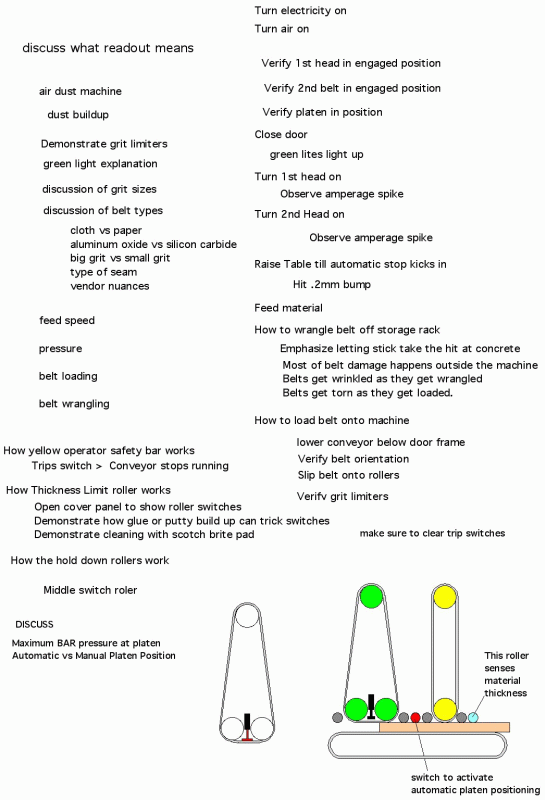
Take a look at these notes. There's a lot of things to know about widebelts. There's a lot of things to remember to teach somebody and a lot of things for that person to remember. Right now it's a stream of consciousness. These topics need to be organized into some kind of cogent chapters so the information is retrievable.

Click here for higher quality, full size image
From contributor G:
Do not discount the necessity of accurate adjustments because the sander is used for solid wood and not veneer. .005" out of adjustment can have a negative effect on solid wood, especially when using fine grit belts such as 180g or finer which should only be removing about that much material in the first place. One thing I find helpful when training or teaching one of my guys is to not only explain what to do, but also why to do it. I think it makes it easier to understand and remember the lesson or task at hand.
From contributor C:
Using the platen versus not using it was a question we dealt with for months before finally deciding to not use it. We found belts with the right joint splice that enabled us to eliminate using the platen. We've found we get much shorter cross grain scratches without it, while also avoiding chatter usually associated with using just a drum. Picture the contact area of the drum against the platen to help understand this.
We're blessed with a three head bottom and four head top Costa, each of which has huge rubber drums. For your machine, you might find different results. Play around with different belt splices and grits to find which one works best. It's not the same for everyone, or even every machine for that matter.
One more thing about training, and it's something I struggle with communicating to my guys over and over, if the second belt is loading up prematurely, either the machine needs calibrated, or the first belt needs changed. Don't just keep on changing the second belt.
From contributor G:
Contributor C is right on when he said, "it's not the same for everyone, or even every machine." We did not see a benefit with our 2 head sander when using the platen, but we do with the new 3 head. I have since learned the felt pad on the platen of the 2 head was probably too hard and did not give enough as the belt splice crossed under it.
From the original questioner:
We picked the widebelt sander for our first video for a couple of reasons: It's a complicated machine that is time consuming to train and it wasn't going to move, so we could keep going back till we got the video right. Part of this is to teach us how to do good video and part of it is to teach us how to become good teachers. Just the act of storyboarding a video is very instructive. You don't really realize how many steps there are to something until you take the time to actually write it down.
From contributor J:
Good idea on the video training. I will echo the other responses on the importance of dialing in the second head and platen. I decided to stick with just 2 grits on my 2-head, from the same manufacturer. Belts last so much longer and dull out rather than loading up. In the rare cases when we have to use this like a planer, I just put a coarse grit up front, raise the second group out of the way and never adjust anything else. Then go back to normal setup and grits to finish off.
My SCM is probably very similar to your Butfering: relatively small steel drum, then rubber drum and platen combi head. We run 3 contact points, using both the drum and platen on the second group. Towards the end of the initial setup, I ran a stick on each side and tested the e-stop in order to put a caliper on each section of board and dial in the head relationships, and also side-to-side equality.

