Question
At the moment we mitre our beading into the corners using a small chop saw. I do not think that this joint gives good durability, as the mitre could form a water trap if the treatment cracks.
What I would like to do is cut the top and bottom beads square and to dead length so they butt up to the sides of the sash. The two side beads would need counter profiling over the top and bottom beads. This would mean that if the treatment ever cracked where the beads met, there would be no water trap and the rain would just run off the bottom bead. What is the best way of counter profiling the beads for this purpose? Do I just use my chop saw at a different angle, as the bead is a simple bevel?
I have even seen manufacturers that leave the side beads slightly short so there is an air gap between the bottom bead and the side beads. I suppose this is to stop the bottom of the side beads sitting in water if any does get in. There are also beading systems that have plastic brackets at the ends of the bottom bead, which holds off the bottom of the side beads, which gives ventilation.
Or is there another jointing method? Although I don't think mitres are the best jointing method, I have seen CNC machines creating mitred beads by cutting them from window components they have just produced. Obviously, mitres are the only way a CNC machine can produce joints for beading efficiently, so this method is more about convenience than what's best.
Forum Responses
(Solid Wood Machining Forum)
From contributor J:
I have some sectional drawings of UK style windows. I always wondered why you guys put the stop on the outside. Seems like they would be prone to getting moisture under no matter how you attach them. Did it evolve from the days of single glass and putty? Just curious.
Also, we are taking some measures to let the water drain away if it does get behind the stop. We have made the rebate on the frames sloping and in the sashes, we have put a groove in the flat rebate so the water will drain away through the combs/tenons.
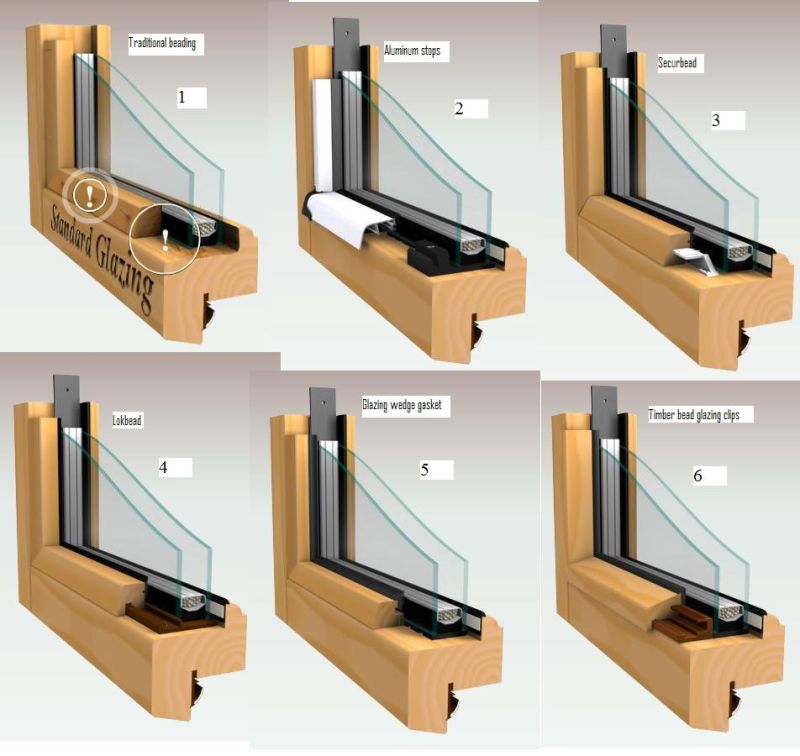
At the moment we just use the stop system as in picture one, below, which isn't very good compared to the rest. I like the system in the second picture, as it gives plenty of ventilation and won't deteriorate, as it is aluminum. The only limitation with this system is that it could only be used in conjunction with a painted white finish.
System number 4 or 6 probably looks the best for me. The brown brackets are only about 50mm long and several of them have to be used along the length of the stop to secure it. Using these brackets would leave an air gap for ventilation in between the stop and the sash/frame. I would think about combining systems 4 and 6 by using the bottom stop from system 6 and the side and top stops from system 4. The bottom stop in system 6 would give good rain deflection and plenty of ventilation if we left a small gap in between the lip of the stop and the sash. The side and top stops from system 4 look nicer. To join the stops I would counter profile the side stops from system 4 over the bottom stop from system 6.
Yes, stop = glass bead.
Thanks for posting the picture and explaining the reasons. Makes sense to me, especially given the historic structures in the UK. Here in Colorado our history is young with most of the historic millwork shipped in from Eastern factories 100 + years ago. We duplicate some of that, but for the most part our work is new construction.
The UK drawings I have are like your #1. Your idea of using 4 and 6 with the verticals coped over the bottom bead is a good idea. The new tenoner with a counter profile backup might work. Or cope first, then profile. One reason I got the horizontal clamp on mine was for the few times we cope already profiled work.
Will you use the dry gaskets? We converted to those a few years back and for the most part like them. Does your new SCM shaper have the pull out extensions for doing the outside wing cut on the sash? We have done some outside profiling of large sash with the Martin. It works once you get the feel of it. A six roll feed would help. I just picked up a used SAC P3 with a 10 roll feeder. It should be good for wing cuts.
Yes, our SCM shaper does have pull out wings which we are finding quite handy.
There is a major UK window manufacturer called Jeld-Wen and they profile all their timbers first and then cope them on cheap Saomad single end tenoners. Apparently, this is the most efficient why to mass produce windows. This came as a shock to me because I thought the quickest way of manufacturing windows was on window lines. It makes sense really, because those Weinig profiling machines can thrash out sections at rates immensely faster than a typical window line.
Contributor M, twisting isn't really a problem for us. We only machine the sections in the pictures to short lengths, 2' to 4' usually. If we machined long lengths of it, like 7', I suppose it might be a problem. We don't make storm proof doors, so we would never know. The only thing I can say is that the smaller the section, the more likely it is to twist, so maybe using a larger section would help. The softwood timbers we use are slow grown from Sweden. We don't use laminate timber because the Swedish timber is a lot cheaper and we don't have any problems with it. The hardwoods we buy are mainly from Africa and they do twist a bit sometimes, but very rarely to the point where we can't use them.
I don't have any experience with timber from America other than American white oak, which I find very unstable. In fact, the African hardwoods that we use, like sapele, iroko and idigbo are far more stable than American white oak. Maybe American timber is naturally more unstable than European or African timber, who knows?
Contributor D, that is an interesting way of glazing. It makes sense because we buy in doors that have single glazing and timber panels that are clamped into a double bead like what you are talking about. I think the problem with double glazing in a double bead system would be what sealant to use, which would allow the glass to move and not damage the double glazing seals without making a mess. You say caulk, but what sort? Or is it a type of silicon, e.g., low modulus, high modulus, neutral cure, acetoxy cure? I've heard so many conflicting stories about silicon I wouldn't know which one to use.
I could ask our office staff to find out what kind of caulk they use (they're good at that kind of thing), although I suspect it's not as important as assembly technique. We've changed a couple times over the years, actually to a lesser quality Tremglaze U1600 UV stable polyurethane caulk. Back when I didn't know any better, and coming from the marine industry, I used 3M 5200, which is messy and hard to use, and big time overkill. So much so that if a single IG unit broke and needed replacing a couple years down the line, we'd be lucky to not completely destroy the door trying to get the glass out.
Currently we miter our stops, but on the interior side, even if matching existing old putty glaze units. The sashes take the weather much better this way, and after all, the end customer usually has no clue whether one profile is machined solid from the stile or rail or shot in as stop on another, or even shot in as stop on both sides.
I'll post my findings after dissecting that door.
The unit I looked at was dry glazed. In Germany and Italy all the caulking is done after the IG is stopped in, so a wet glaze should not be a problem with this either. I didn�t understand how the blocking was done while assembling. Dry glazing probably does not cut it in your Florida market.
I will be interested in what you find about the Simpson door and if the IG can be changed. I looked at one of those single glazed for interior and wondered if it is throwaway if the glass breaks.
To the original questioner: The company I bought the SAC from was profiling with a Weinig, then going to custom built single end tenoners with 2 stacked spindles. The first spindle was counter rotating and jumped in near the end of cut. This is pretty common over here with a variety of systems like the Stegherr double head cope and drill machine. I have only seen it with dowel and cope construction. I don�t know if it is possible or safe to swing large tenon heads on the jump cope. At this auction, the moulder, insert tooling (lots of it) and one custom tenoner went for about what my Colombo cost. The tenoners were set up without saws, like you were thinking about doing. A lot of shops in Italy use that Swede pine. It is nice material.
Contributor D, I notice that your Tremglaze U1600 UV and 3M 5200 are both moisture curing. The only thing we use that is moisture curing is PU glue. Is moisture curing the reason why you use it on double glazing? Why don't you use butyl tape, which is what we use?
Contributor J, no saws on tenoners - I thought I was the only one to think of this. All the salesmen and manufacturers had certainly never heard of it. I have altered the specification of my Colombo tenoner so the saw is furthest away from the operator. The work piece table will probably never even reach it, so it won't hinder the overall speed of the tenoner. We have a new tiger stop and it is more accurate than what we can cut to with a pencil mark, so I can't see how we will ever use the saw on the tenoner.
Our DP rating is important, and much higher with a wet glaze. In fact, on one test of a direct set unit we built, 80" x 80," they turned the vacuum up to simulate a 240 mph wind, once from each side. That unit held. The glass looked like a kid blowing gum and stretched to a bubble deflection of over 6 inches. No swiggle walk-in, no caulk failure. The 2" x 6" crossbuck frame the testers made to hold the unit in place failed when 16 penny nails literally got sucked out of the wood and the whole unit went flying. That was with Tremglaze, where we can slice out a unit in minutes. The 3M 5200 is designed for below the waterline usage on boats at sea, and is much stronger.
My concerns are still on the double profile, though, and its lack of squeeze-out, which will allow water to get behind wood, and eventually rot the profile. Our number one rule teaching the new guys here is squeeze-out must be complete - no bare wood touches bare glass ever.
We couldn't figure out how to get squeeze out with their method without making a huge mess.
If viewed at any angle besides straight on, the bare wood spots are visible through the glass looking at the opposite profile. My guys pointed out there would be no way to get stain in there properly, and those spots would look horrible after finishing. Also water could collect in the crack (there is one, they mill the groove slightly bigger than the glass thickness) between the wood and glass, and eventually rot the profile from within. So the excitement was short lived for us, because even though this is an extremely efficient method of glazing, its quality is not up to our standards.