Reprinted with permission from www.joewoodworker.com.
Part 1: Edge Trimming
You can use any number of methods to prepare the veneers for taping. The method you choose may depend upon factors such as the thickness/quality of the veneer and the size of the seam. For some joints, you can clamp the veneer(s) between two boards and use one of the following tools to trim the edges:
* Router with a flush trimming bit
* Low angle block plane
* Stationary jointer
However, for most seams the best method incorporates the use of a veneer saw. These saws are made for right handed users. Though I am a "lefty," I found little difficulty in using my right hand for the work. You may want to verify that you have the right grind on the saw to make an accurate seam. Click here for more information regarding blade grinds.
Start with two flat pieces of veneer and place a straight edged board (about �" thick) along the projected seam line, and lightly saw into the veneer (along the entire length of the seam) until the cut is complete.
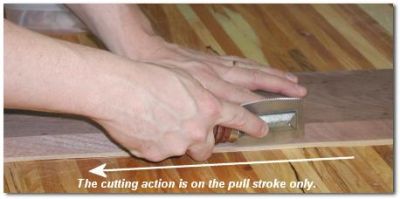
Be sure that the straight edge board is on top of the "keeper" side of the veneer. In other words, you are sawing off the waste side. It is imperative that the straightedge be absolutely true. While sawing the veneer, place adequate pressure downward on the straightedge. You should also make certain to hold the saw 90� to the veneer face by keeping it firmly pressed against the straightedge.
It should take several passes of the saw to fully cut through.
The straight edge I am using in this example is a piece of walnut that has been passed across my jointer. It has a nice, clean edge. I placed some 100 grit self adhesive sandpaper on the bottom side of the board to help keep the veneers from shifting while being cut.
You can also use a drafting straight-edge from an art supplier or machine shop. They are expensive but they work very well. In fact, we have received so many comments about them, that we bought several cases of two different Gibraltar Paramount models and are offering them very reasonably at VeneerSupplies.com.
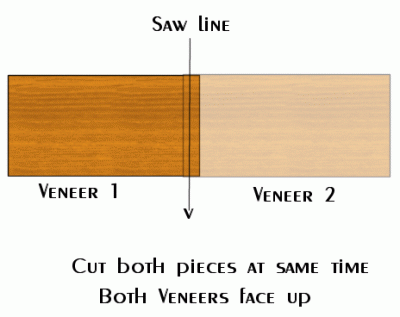
If you are not sure about your straightedge or the veneer pieces are very large, you can place the two veneers with one slightly overlapping the other (both facing up) and saw a straight line down the middle. Your straightedge will not have to be perfect because you will be sawing reciprocal parts at the same time. Just saw lightly so the keeper piece on the opposite side of the straightedge doesn't tear up. Here is a drawing of this technique:
I use a very high quality veneer saw made by Two Cherries in Germany. These saws are available (pre-sharpened) at VeneerSupplies.com.
Part 2: Seam Taping (How to Apply Veneer Tape)
Seam Taping
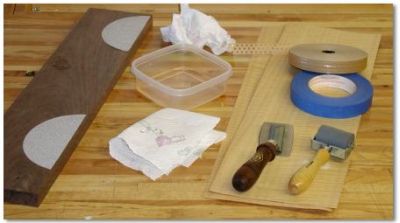
Veneer tape is required to keep the veneer edges tight while inside the press. The beauty of veneer tape is that as it dries, it shrinks. This shrinking action helps to hold the seam together while in the press. There are a variety of veneer tapes available. Tapes come in various weights and widths. It also comes in a solid and a perforated variety. The solid tape is suitable for thick and unruly veneers that require a bit more strength to maintain a tight joint. The easiest veneer tapes to use are those which are perforated with holes. Three hole tape allows the user to see the seam under the tape which allows for adjusting/tightening of the seam before the tape dries. Additionally, this type of tape is thinner and will not create a thick buildup if multiple pieces of tape are used for making complex joints. And three hole tape can be used on the glue side (as opposed to the face side) of the veneer if necessary.
Ok... let's get taping!
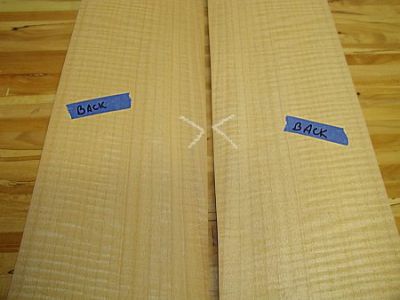
Mark the back side of the veneer as shown in figure 1. There are two markings on each sheet. The first is the blue tape indicating that this is the back of the veneer. The second marking is light chalk indicating the two edges that are to be taped together.
The blue tape, commonly called clean release tape, is available at your local hardware store in the paint aisle. It's expensive but will last a long time. You can find it reasonably priced at VeneerSupplies.com
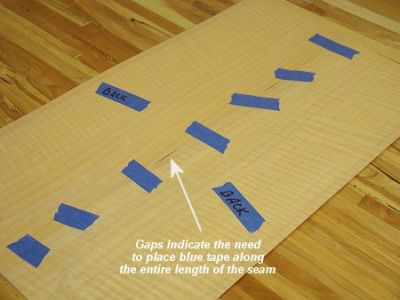
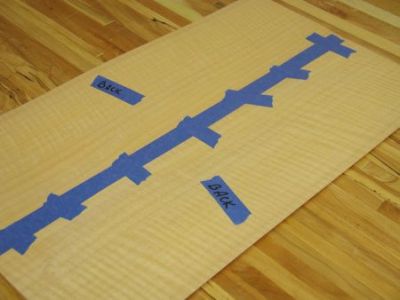
Carefully pull the two veneers together tightly and place small pieces of blue tape across the seam as shown in figure 2. Remember, the blue tape goes on the back of the veneer. If the veneer is being stubborn and does not lay flat across the whole length of the seam, place a strip of blue tape longitudinally on seam as shown in figure 3.
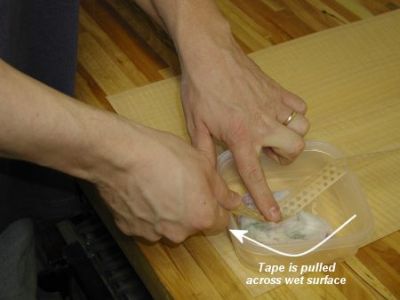
Next, tear off a few dozen small "cross strips" of veneer tape. These will be placed perpendicular to the veneer joint about 3-4" apart on the face side of the veneer. To activate veneer tape, simply slide a piece of it along a very wet sponge or wad of paper towels (figure 4). Remember... the adhesive is on the shiny side of the tape. Be careful that you don't saturate the tape with water. Too much water on the veneer tape will cause the veneer to have light markings on it after staining.
Roll the veneer tape smooth with a wallpaper seaming tool or "J" roller (figure 5).

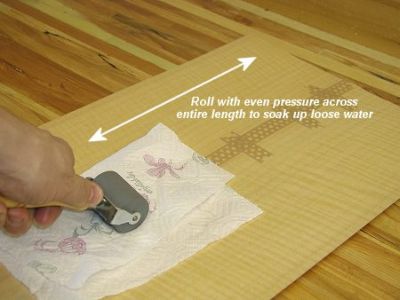
Then place a piece of veneer tape along the entire length of the joint. Lay a piece of dry paper towel on the seam line and firmly smooth out this last piece of veneer tape with the seaming tool (figure 6). The paper towel will absorb any "loose" water in the veneer tape. By doing this, you'll prevent the veneer from absorbing the water which might cause it to get swollen and ripple up. And again, it would cause the veneer to stain unevenly.
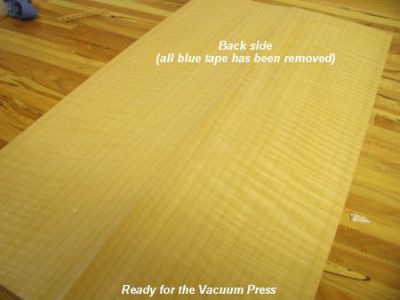
Let the assembled veneers sit for 5 minutes so the brown veneer tape can "set up". Then carefully flip the veneers over and remove the blue tape.
Since brown veneer tape shrinks as it dries, it will pull the joint tight when all of the water has evaporated. I like to place a scrap board along the length of the seam and place a weight on top of that. This prevents the veneer edges from stacking on top of each other as the tape pulls the seam together. I recommend leaving the seam under the weight for an hour before you put it in the press.
Before the veneer is placed in the press, check the seam for any areas that do not fit together correctly. If the veneer has rippled up a bit, the seam may look bad. You can check to see if the veneers have truly separate by pressing down the veneer where it is rippled. Usually, you can press the veneer flat with your fingers and see the seam go back together. If it does, you are in luck because the platens in the veneer press will force the veneer flat and once again, the seam will come together.
Removing the Tape
After the veneered panel has been adhered to a substrate in the vacuum press, you will need to remove the veneer tape. There are two options. Since the tape is thin, it can be sanded or lightly scraped off. Wait until the panel is completely dry to avoid the risk of smearing the glue from the veneer tape onto and into the veneer.
The better method for removing veneer tape is to lightly re-moisten it with a sponge, let it soak in for about 45 seconds and then peel it off of the panel. If any of the adhesive from the veneer tape remains the veneer, let it dry and carefully sand it off.
Tips & Techniques
* To prevent the veneer tape from leaving residue on the panel try these tips:
- Use as little water is possible to adhere and remove the tape.
- After removing the tape, wipe the surface with denatured alcohol.
- If you're comfortable with a scraper, remove the veneer tape with a scraper
instead of water.
* Some woods have a tendency to develop dark spots from excess moisture around the veneer taped areas. This can be prevented (in most cases) by using distilled water to moisten the veneer tape for application.
* When you are finished with the veneer tape, you can prevent it from unrolling from the spool by lightly dampening the loose end and sticking it back onto the roll.
Reprinted with permission from www.joewoodworker.com.