Reprinted with permission from ShopBot CNC Tools.
By Gary Campbell, Islamorada Woodworks, October 2nd, 2008
While waiting for our shipping date to arrive, my son and I, like most new users, agonized over all the details of electrical, vacuum, placement and layout of all the items necessary to running our Bot. We probably read every post on the TalkShopBot Forum concerning vacuum going back to 2005. After asking a few questions, we decided we wanted a 15 HP regen blower, or ring compressor. After a quick call to our electrician, we found that it would cost over $10,000 to get 3 phase power to our building and install a new panel. Add that to the cost of the blower and it didn’t take long to put that decision aside. What we decided to do was install every other component of that system that we could, and use a less expensive vacuum source.
We used 4 Ametek vacuum replacement motors, purchased from Grainger. We selected a 240v model that had 7.5” Hg and 110 cfm. All the motors that were 240v and higher numbers were much more money. We probably could have saved a few bucks by going to 120v motors, but these motors only draw 4.2 amps and the 120v versions drew 10 or above. This way all 4 vac motors can run on one 240v 20A circuit. The motors were installed by drilling and recessing carriage bolts down thru the table, similar to the way that the table board is installed to the machine frame. Long 1/4" bolts were used and they had a washer and nut installed at the bottom of the table board to keep from turning. A mounting plate made from PVC holds the motor up in place by using nyloc nuts and washers. A strip of 1/8" by 1/4" wide AllStar adhesive back gasket was placed around the mounting face of the motor to seal it to the table.
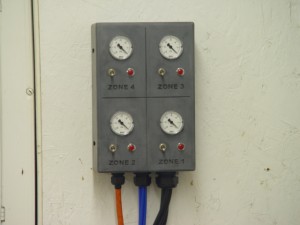
The control system uses 4 DPST switches, 1 for each motor. Since it is all one circuit, I was able to use a #12awg pigtail and plug into a 240v 20A receptacle. It is my intent to use these switches to control either air or electric operated valves when we can get the large blower. I also drilled and tapped a hole in each zone, near the vac inlet, and installed a fitting and tubing that runs to a vacuum gauge in the control box. This allows us to monitor each zone for vacuum while cutting, which, I feel is a very good feature.
After using this system for 7 or 8 months here are my thoughts, both for and against:
For:
* Price... OK... under what a couple Feins cost with higher flow numbers
* You save on all that plumbing cost and work also... no ball valves to replace
* Easy to control and eye level gauges are a plus
* Using thin Plexi for a zone mask keeps cutting vacuum around 5-6’Hg, anything below 3” smaller parts will start to move.
* With a couple relays, it could easily be controlled by the SB control box using unused outputs if available.
* Gives a relatively simple, neat clean installation; doesn’t use room under the table.
Against:
* If I were to use this as a permanent system, I would work on sound deadening. Even though it is not as noisy as a regen, 4 unmuffled shop vac motors are NOISY!!
* There is no filtration in the system. We have not found this to be a problem yet, but I should mention it. The motors have a steel housing and impeller it may never be a problem.

Reprinted with permission from ShopBot CNC Tools.