by Dr. Eugene M. Wengert
The hobbyist can save a great deal of money and realize a greater sense of achievement if projects are made from lumber sawn and dried �at home� rather than from �store bought� lumber. It is easy to do-it-yourself if the following procedures and suggestions are closely followed. SHORTCUTS ARE NOT ADVISABLE.
1. Use only live trees, with no large wounds or dead branches. Standing dead trees frequently are heavily stained and may not produce the premium lumber required.
2. All logs should be end-coated as soon as possible after the tree is felled to prevent end-checks. Satisfactory end coatings are asphalt-base roofing cement or aluminum paint in a spar-varnish base.
3. The logs should be sawn as soon as possible after felling. In the summer quality loss can occur within a week; in the winter losses won�t be noted for several months. When sawing must be delayed, quality loss can be retarded by submerging the logs in water or continuously sprinkling them with water.
4. Before sawing the logs, determine the lumber thicknesses needed. As a general rule, it is very difficult to manufacture and dry lumber thicker than 2-inches. If projects require thick lumber, it is better to saw 1-inch boards, dry them and glue them together in the same order as they were sawn. The glue lines will be almost invisible using this procedure. Do not plan to resaw thick dried lumber into thin boards or turning squares after drying � do it before drying. It is also advisable to avoid sawing lumber into pieces thinner than 3/4-inch, as warping will be a problem.
5. Although it is possible to saw your own lumber from a log (for example, by using a chain saw and a special attachment or by using a portable mill) usually it is more satisfactory to have the log sawn at a commercial mill.
6. If the sawn lumber is quite variable in thickness, one or both faces of the boards should be planed before drying to obtain a uniform thickness, in order to reduce warp and drying variability. Such planing also reduces face or surface checking in oak.
7. Green lumber will begin staining immediately if not stacked for drying.
8. Results are usually best if green lumber is put directly into the kiln (go to step 9, below), but the lumber can be stacked outside for air drying. The air drying location should be exposed to drying breezes. The lumber pile should use bricks, cement blocks, and/or large timbers (i.e. RR ties) to keep the lowest layer of lumber at least 12 inches off the ground. Grasses and weeds should be kept trimmed around the pile.
9. The lumber should be stacked in neat layers with the thickest material on the bottom. Each layer should consist of only one thickness of lumber, with the longest boards on the outside edges. Each layer is separated from the adjacent layers with stickers. (A sticker is a dry piece of wood, 3/4 to 1-inch thick, about 1 1/2 inches wide, and as long as the pile is wide.) Within the pile, all stickers must be the same thickness. Stickers are placed perpendicular to the lumber�s length, every 12 to 18-inches along the lumber�s length. The stickers in a layer are placed directly above and in-line with the stickers in the lower layers. The purpose of stickers is to permit air movement through the pile and to KEEP THE LUMBER FLAT. The ends of every board should be supported with a sticker. While the lumber is being stacked, several boards must be cut in order to provide sample pieces that can be periodically checked for moisture and can be observed for possible drying losses. (See concluding section.)
10. After stacking, the exposed ends of the lumber should be re-coated with end coating, if necessary.
11. The stack should then be covered with a sheet of plywood, old boards, or other material (separated by stickers from the top layer of lumber) to protect the upper layers from repeated wetting and direct sunlight. Rocks, scrap iron, and other weights can be placed on top of the cover to weight the top layers of lumber and keep them flat. (Figure 1)
12. For air drying only: Air drying (to 20% moisture content) takes 45 to 60 days of warm, not too humid, weather for 1-inch material; 60 to 90 days for 2-inch material. Additional drying is unnecessary and may result in more splitting. However, further drying is necessary before the lumber can be used indoors. Failure to dry lumber fully will result in splitting and/or warping in use.
13. Drying green-from-the-saw or final drying for air dried lumber is typically done in a commercial dry kiln heated from 110 to 180 degrees F with controlled humidity. Kiln drying is easily accomplished by the do-it-yourselfer by building a solar heated dry kiln � a plastic or fiberglass-walled greenhouse with fans to circulate the hot air. (See next section for construction details.) Temperature in the dryer will average about 15 degrees F above average outdoor temperature and are sufficient to rapidly dry lumber. Lumber, once dry, can be stored indefinitely in the dryer provided green lumber is not reintroduced into the kiln.
14. After drying the moisture content of wood should be checked before use to make sure it is dried sufficiently. Many operations can afford an electric moisture meter; alternately, the hobbyist can check moisture by cutting a piece 1 1/2- to 2-feet long from a wide board (but not from the end of the board), weighing this piece to the closest ounce and measuring the width to the closest 1/64-inch. Then place the board near a radiator, hot air register, or stove for several days. If the weight decreases by less than 3% (e.g., a 2 lb. board loses less than 1 ounce) and the width changes by less than 1/2% (a 6-inch board decreases width by 1/32 or less), then the wood is ready to use.
Construction Details for a Solar Dryer(2)
For the hobbyist without access to a commercial kiln, a homemade solar heated kiln has been shown to work equally well. There are over 200 solar dryers in the U.S. based on the Virginia Tech design. Basically, a solar kiln is just a greenhouse with a solid, insulated north wall and solid, insulated east, south, and west walls as well. Both of the east and west end walls should have a door so the dryer can be easily loaded. A fan or fans provide air circulation.
As the sketches (Figs. 2, 3, and 4) indicate, the length (east-west direction) is variable; 8-feet is suggested. However, this is only a guide and can be altered to accommodate longer length lumber. The suggested width (north-south direction) is 4 to 6 feet to accommodate a 2 to 4-foot wide pile of lumber plus at least 1-foot clearance on each side to facilitate air movement through the pile.
The basic, variable design consideration is the angle of the roof. For best year-round performance, the angle should be approximately equal to the latitude of the kiln�s location. To increase winter performance, increase the angle by 10 degrees. The roof (and south wall if it is desired not to make it solid) is covered with one or two layers of fiberglass, plastic, or glass. Two layers work better but may not be needed if drying time is not extremely important. Corrugated fiberglass is probably the most durable covering and can be easily handled by the hobbyist; plastic films often tend to become brittle as they age. The maximum capacity of the dryer in board feet is 10 times the roof area in square feet. For green lumber the dryer should be loaded to its maximum to avoid too rapid drying. The dryer is always loaded in full load batches, rather than a piece or two at a time.
The structural walls are made of 2 x 4�s and 3/8-inch plywood; the floor uses 2 x 6�s and 5/8-inch plywood. All plywood should be �exterior glue�. Insulation is batt- or blanket-type without a foil vapor barrier (or make many holes in a foil type). After the kiln is constructed, the inside only is painted with two coats of freshly mixed aluminum paint (18 grams of aluminum powder and 102 grams of spar varnish) to provide a vapor barrier. Then flat black paint is applied. The exterior is stained with a dark color, penetrating stain. However, do not use the aluminum paint on the outside as it will tend to trap the moisture in the walls.
The fan can be a typical, multispeed window fan. A word of caution � when the fan is off, temperatures in the dryer can exceed 180 degrees in the upper corner of the roof. Avoid using inexpensive fans or plastic components that can melt at these high temperatures. Generally, the fan is turned on during daylight hours only. However, with green oak or other check prone wood, the fans may be turned off during the hottest part of the day on sunny, hot days to avoid checking the lumber.
At night, as the dryer cools down the humidity builds up and water may condense on the walls. This is an essential part of the drying process as it relieves stresses in the wood that develop during the day as the wood dries.
The length of drying time is governed by many variables, so it is hard to predict; generally it is 4 to 6 weeks. The dryer is designed to dry a full load of 1-inch oak lumber without any losses due to checking or splitting. For 2-inch heavy, green hardwoods, half of the roof should be covered to prevent receiving too much solar energy, which would result in too rapid drying.
Drying Lumber in a Solar Dryer
When first beginning to dry lumber or when drying lumber thicker than 1-inch, it is desirable to monitor lumber moisture content to avoid drying too rapidly and developing degrade such as splitting. Moisture is measured from sample boards and the daily rate of loss of moisture is compared with the �safe-rate� for that species. When drying is too fast, it may be necessary to block off part of the collector, or else turn the fans off and open the vents during the hottest part of the day.
In the solar dryer, the roof area and capacity are designed so that even on sunny days (except in the summer in the sunniest parts of the country) the dryer cannot dry 1-inch lumber too rapidly. That is, the maximum drying rate will be about 2.5% MC loss per day. For thicker lumber, with required slower drying rates, samples must be cut in order to carefully monitor the drying rate.
The fundamental rule of drying lumber is that the quality of drying (freedom from degrade such as checks, splits, etc.) is controlled by the rate of drying (moisture loss per day). If quality were of no concern, wood could be dried in just a few hours with artificial heat.
The maximum �safe-rate� for some hardwoods are presented below for 1-inch lumber. For 2-inch lumber, the 1-inch rate should be divided by 2.5.
| Species | Maximum Rate of MC Loss Per Day (1-inch lumber) |
| -PCT- | |
| Beech | 4.5 |
| Birch, Yellow | 6.1 |
| Cherry | 5.8 |
| Elm, American | 10.4 |
| Maple, Soft (Sap) | 13.8 |
| Maple, Hard | 6.5 |
| Oak, Red Upland | 3.8 |
| Oak, White Upland | 2.5 |
| Oak, Southern | Variable 1.0 to 3.0 |
| Sweet Gum (Red Gum) | 5.3 |
| Tupelo (Black Gum) | 10.9 |
| Walnut | 8.2 |
It is important to adhere to this rate when the lumber is first put in the kiln as the first half of the cycle is most critical in preventing degrade. (That is why air drying is generally not suggested � during the critical part of drying, conditions are not well controlled in air drying. As the lumber dries below 22 percent moisture, the risk of creating new degrade is nil.
This safe-rate refers to the loss in one day, not the average loss over several days. An 8 percent loss one day and 2 percent the next is not equivalent to a �5 percent per day� safe-rate.
In order to measure the moisture loss rate, it is impractical to weigh every board in the dryer and electric meters are not accurate enough at these high moistures. Therefore, we use the sample board method to estimate the moisture of the lumber in the kiln. This method uses short, carefully chosen sample boards sawn from larger pieces of lumber. These sample boards are weighed periodically and estimated moistures are calculated. Generally, because the wettest lumber in the kiln has the highest risk of degrade development, the sample boards should represent the wettest lumber in the dryer; this means the lumber that is the most recently cut, is the widest and thickest, contains the heartwood, and is quartersawn.
The precise procedures in preparing sample boards are:
1. Select lumber to be used.
2. Cut a 30-inch long sample board (full width and thickness) and then two 1-inch sections from each end of the sample board. Avoid cutting the sample board from areas near knots and areas closer than 12-inches to the ends of the lumber.
3. Number the sections and sample board to facilitate record keeping.
4. Immediately weigh the sections (accuracy of about 1 gram required). It is important that they not lose weight after cutting and before weighing. Record weight on the section with a marker pen.
5. Weigh the sample board and record weight on sample (accuracy of 0.1 pounds).
6. End coat both ends of the sample board.
7. Place the sample board in the lumber stack in a location where it will dry at the same rate as the rest of the lumber in the dryer.
8. Place sections in an oven 215-218 degrees F (102-103 degrees C).
9. After the samples are dry � usually 18-24 hours depending on the oven � reweigh and obtain the oven dry weight.
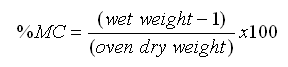
10. Calculate the moisture content (MC) of each section and average the MC of two sections to obtain the MC of the sample board.
11. Estimate oven dry weight of sample board using average MC above and weight from step 5.

12. Write the Est. O.D. weight on sample board when it is next weighed so that it is readily available.
13. Periodically reweigh the sample board to obtain a new, current weight and then calculate a current moisture content.

14. Occasionally it is necessary to cut new sample boards when the lumber is at 20% MC to obtain more accurate values. To do this, cut one new moisture section 6-inches from the end of a sample board and delete the est. O.D. weight previously used. Then follow steps 3 through 11, except that only one section is used. The �wet weights� in steps 10 and 11 are then the weights determined after the sample and new section are sawn.
Some Useful Publications
A. Log Treatments
Lane, P. H., and Scheffer, T. C.
1960. Water sprays protect hardwood logs from stain and decay. Forest Prod. J. 10(6): 277-282. (Forest Products Lab., P.O. Box 5130, Madison WI 53705).
B. Sawing
Malcolm. F. B.
1965. A simplified procedure for developing grade lumber from hardwood logs. U.S.D.A. Forest Serv. Res. Note FPL-098. (Forest Products Lab., P.O. Box 5130, Madison, WI 63705).
C. Polyethylene Glycol
Mitchell, H. L.
1972. How PEG helps the hobbyist who works with wood. U.S. Forest Serv. (Forest Products Lab., P.O. Box 5130, Madison, WI 53705).
D. Drying and Storage
McMillen, J. M., and Wengert, E. M.
1978. Drying eastern hardwoods. U.S.D.A. Agr. Hdbk. No. 528. 102 pp. (Supt. Of Doc., U.S. Gov�t Printing Office, Washington, DC 20402).
Peck, E. C.
1962. Drying 4/4 red oak by solar heat. Forest Prod. J. 12(30):103-107. (Forest Products Lab., PO Box 5130, Madison WI 53705).
Rasmussen, E. F.
1965. Seasoning small quantities of lumber. U.S.D.A. Forest Serv. Res. Note FPL-089. (Forest Products Lab., P.O. Box 5130, Madison, WI 53705).
Reitz, R. C.
1971. Air drying of lumber. U.S.D.A. Agr. Hdbk. No. 402. 110 pp. (Supt. of Doc., U.S. Gov�t. Printing Office, Washington, DC 20402).
Wengert, E. M.
1971. Improvements in solar dry kiln design. U.S.D.A. Forest Serv. Res. Note FPL-0212. (Forest Products Lab., PO Box 5130, Madison, WI 53705).
Wengert, E. M.
1980. Solar heated lumber dryer for the small business. Cooperative Extension Service, Renewable Natural Resources MT#20C. Dept. of Forest Products, Va. Tech (Blacksburg, VA 24061). 16 p.
(2) Complete design plans and operating instructions for a 1500 bd.ft. solar heated dryer are available at no cost (S.A.S. long envelope-please) from Dr. Wengert, Va. Tech, Department of Forest Products, Blacksburg, VA 24061.
Dr. Wengert is Professor Emeritus in Wood Processing, Department of Forestry, at the University of Wisconsin (Madison).