Message Thread:
Exterior Wood Door Questions
7/23/17
 Website: http://www.johnrussell.com
Hi all, I've been asked to build 16 exterior wood doors. Reason is is that Simpson Door Co. said 12 weeks (they're all different sizes) and that was not going to work with schedule.
I know how to machine stave core and assembly etc. My questions are;
Best exterior wood glue to use?
I'm milling cope and stick with a 1/2" wide groove. What material could I use, similar to spacebars I use in cabinet doors to keep raised panels centered?
I need to install glass in some doors. What is best material to hold glass, Butyl? 16th 32nd?
Any advice and help would be dearly appreciated. I did try to do a search, but didn't get too much info.
http://www.russellwoodworks.com
7/23/17 #2: Exterior Wood Door Questions ...
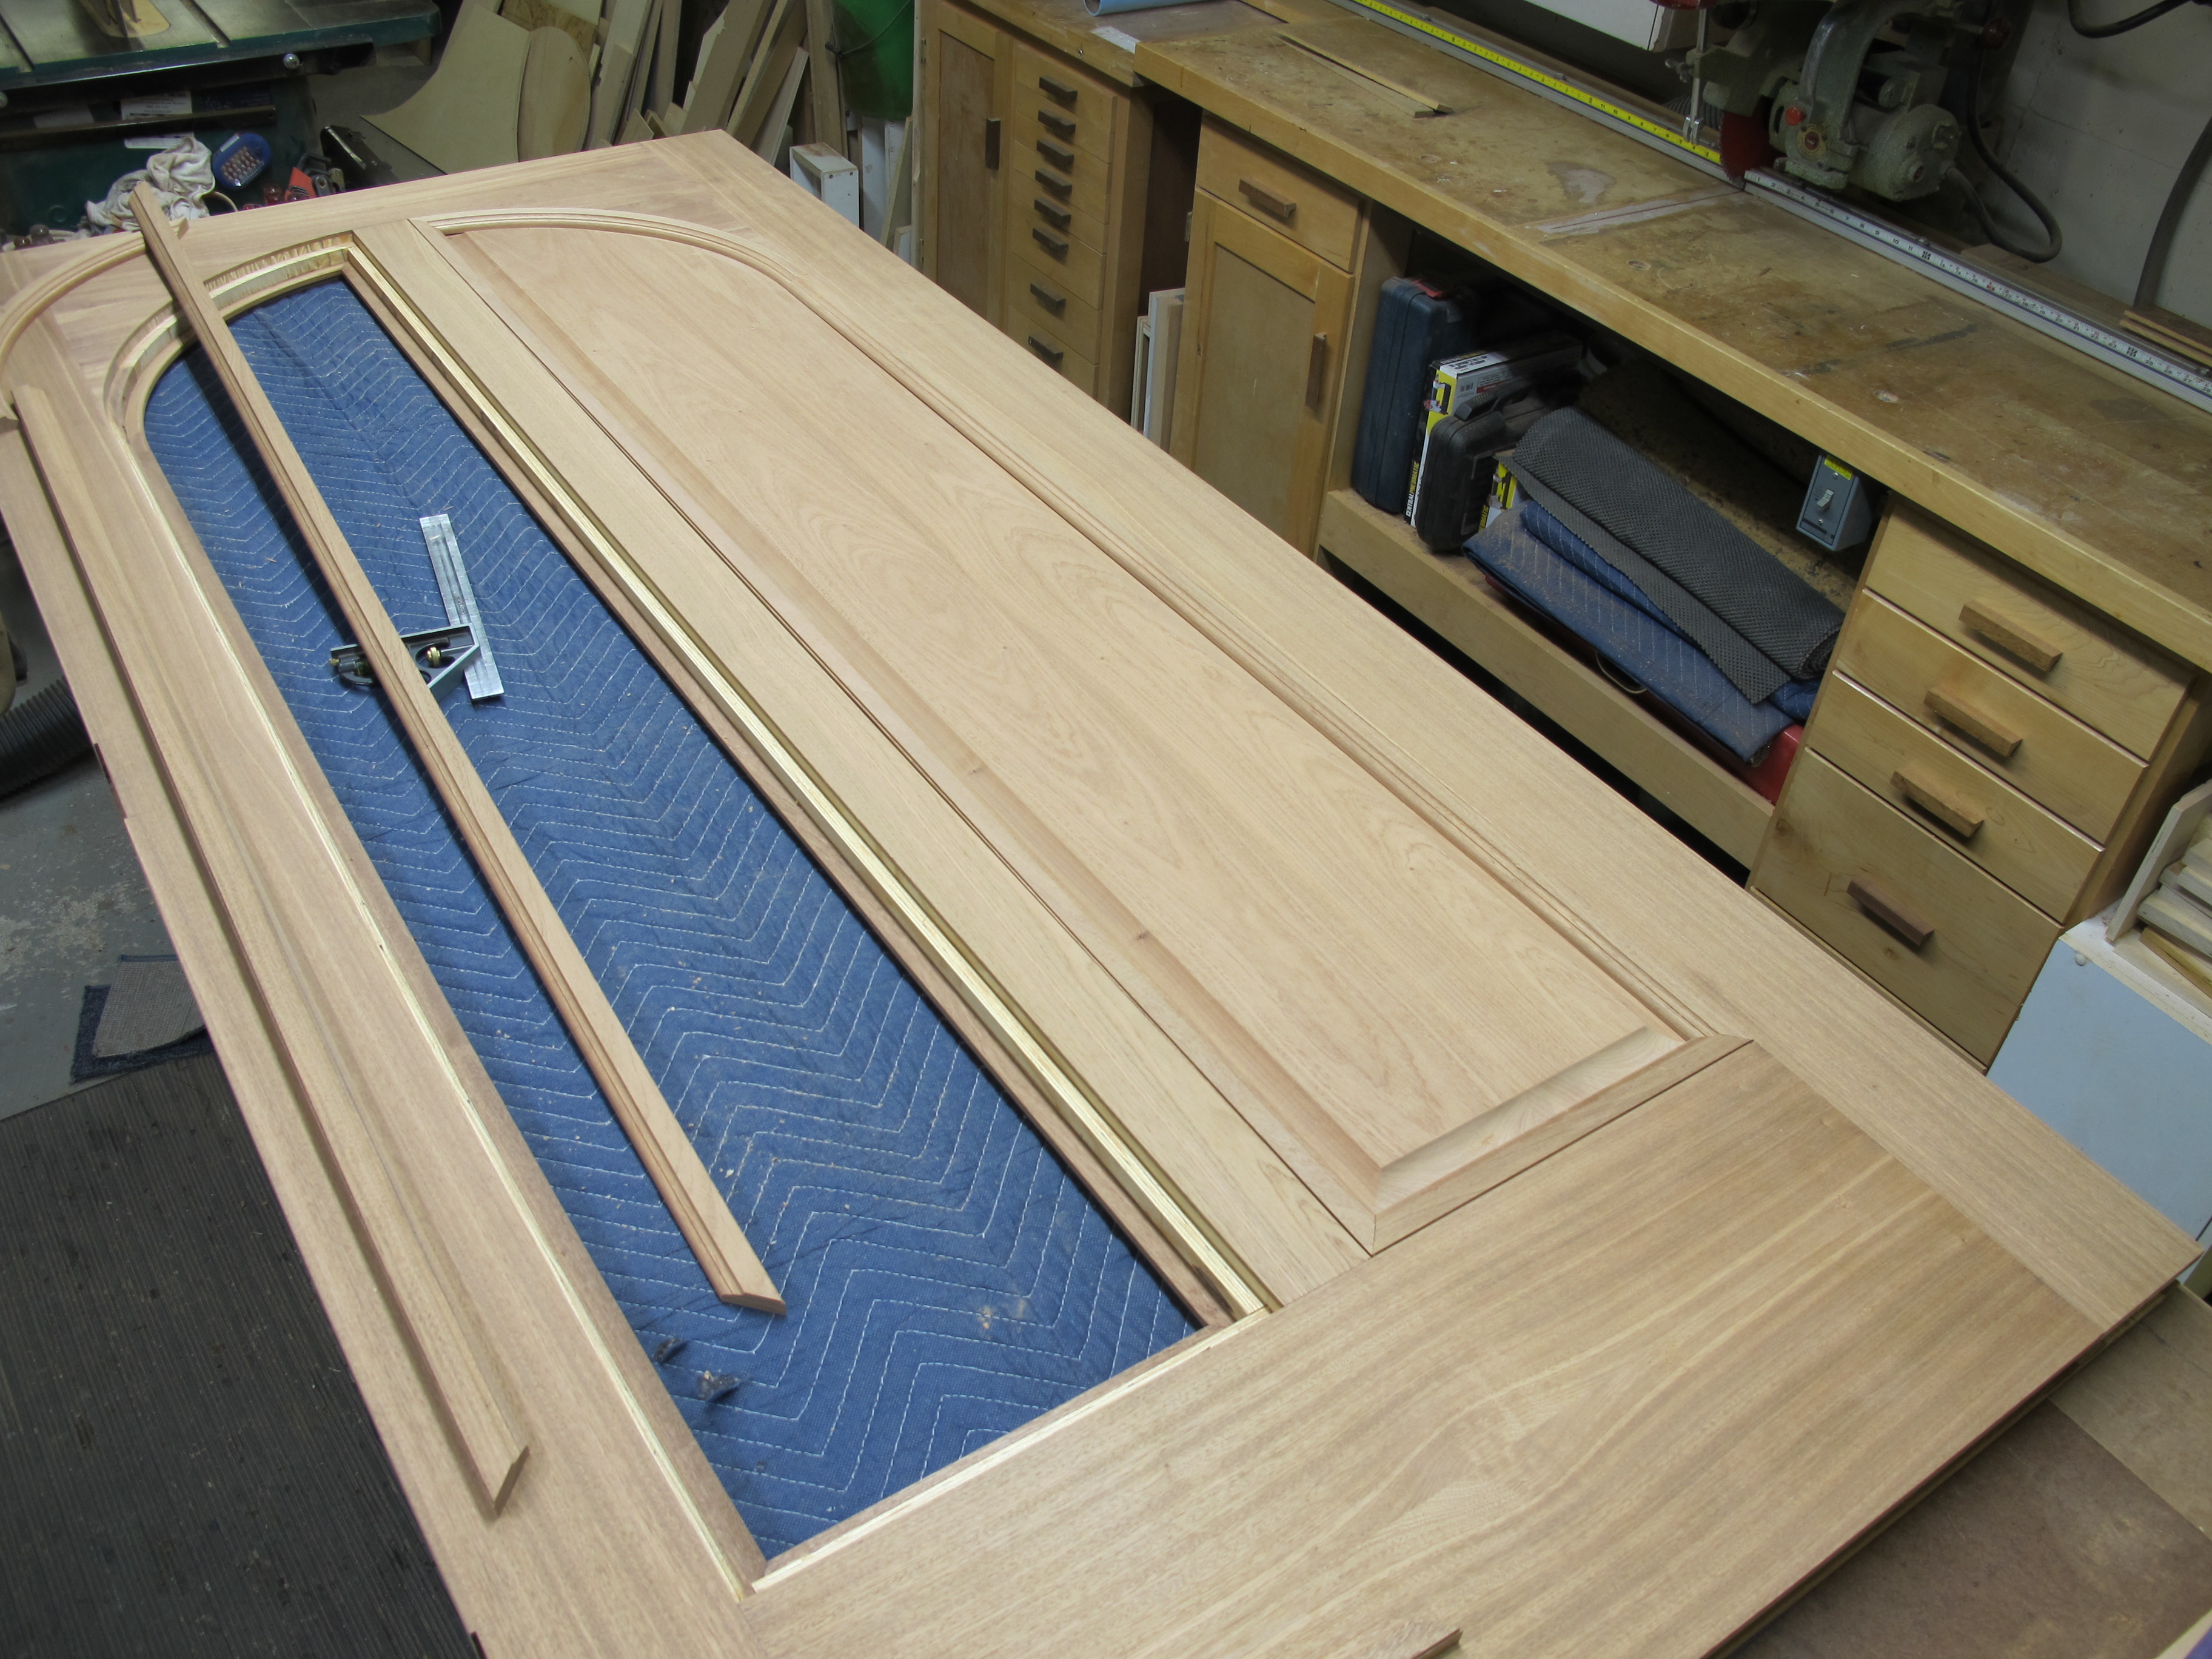
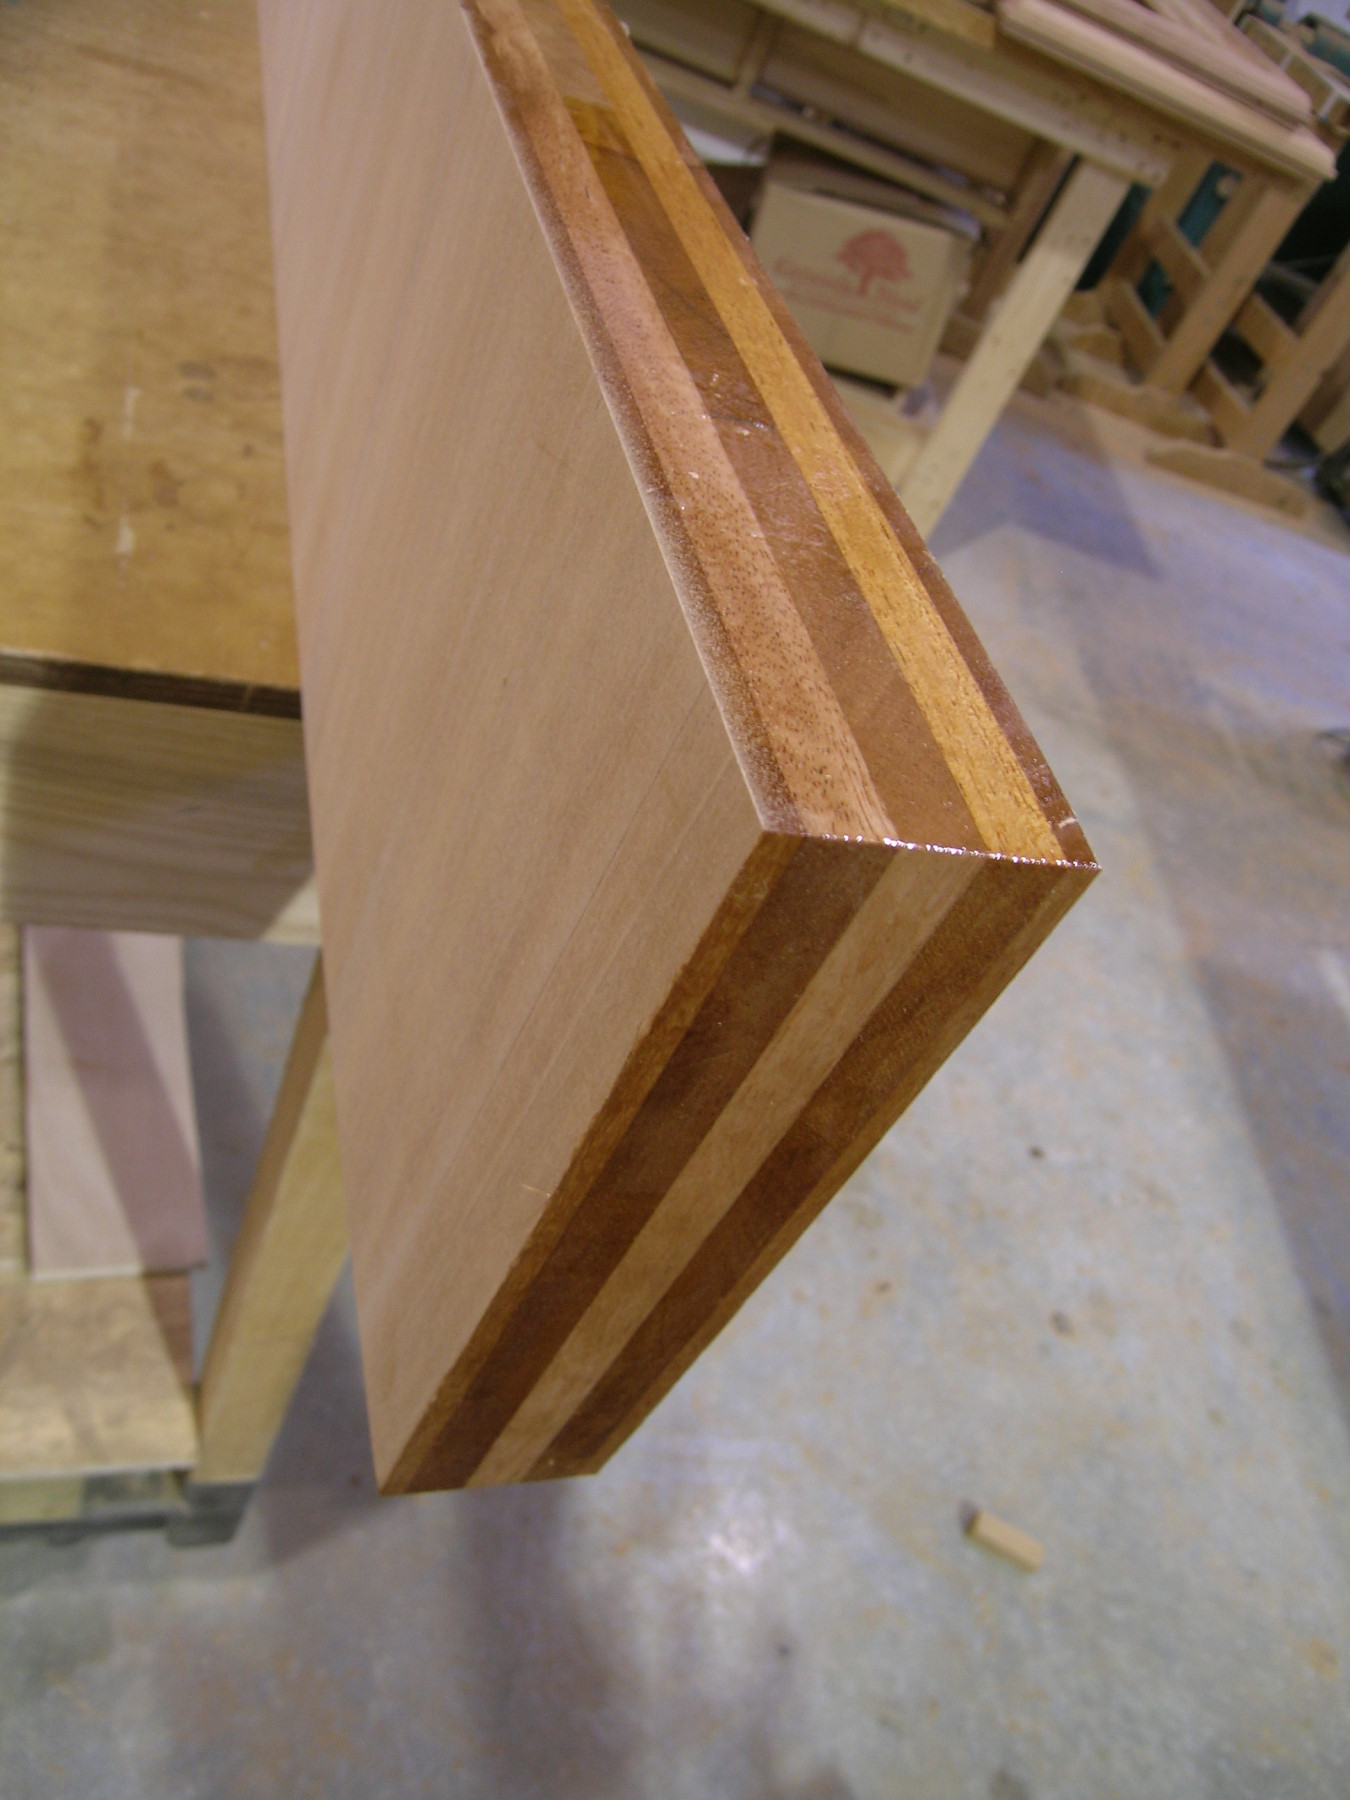
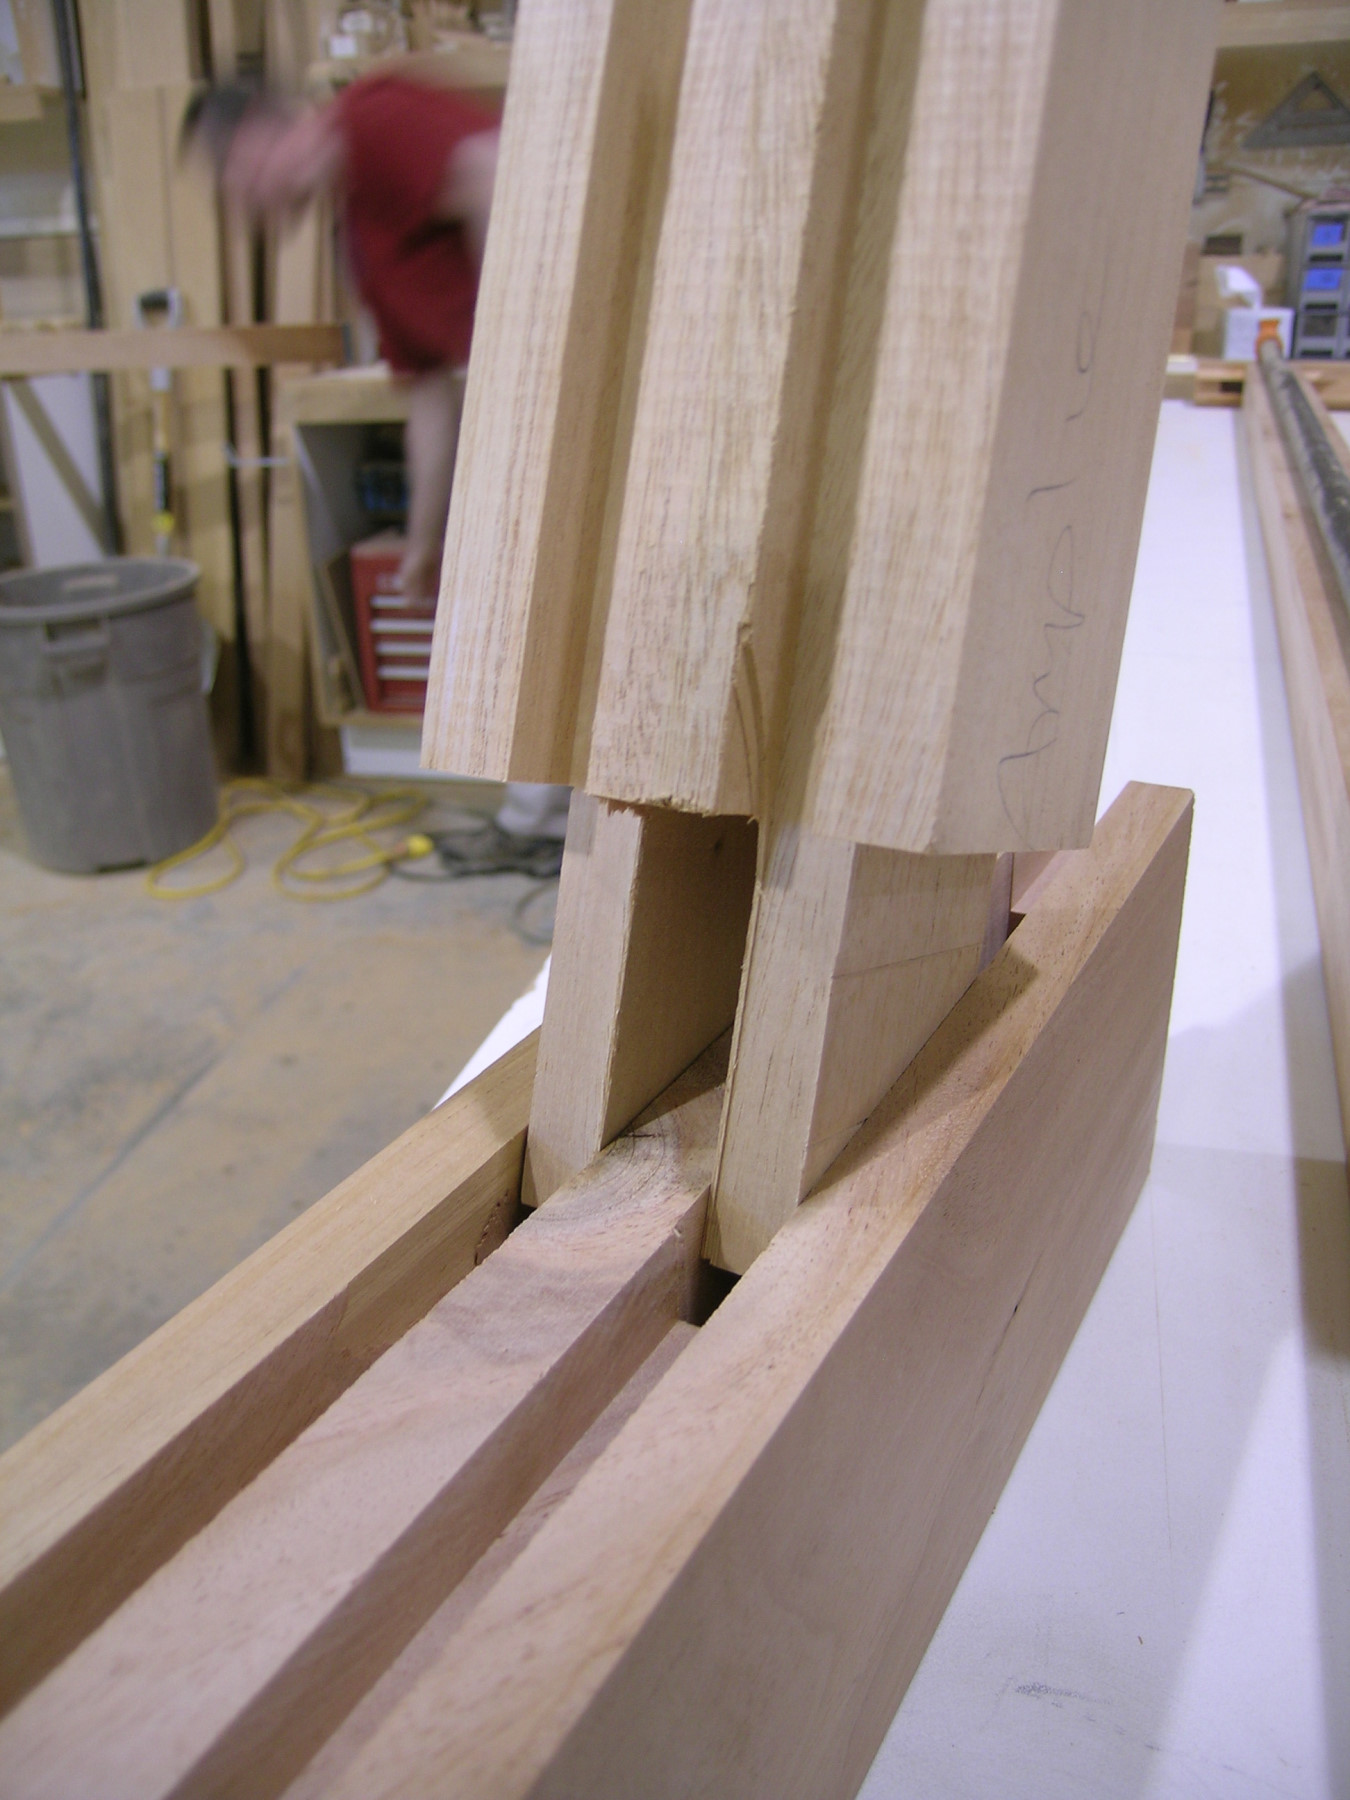
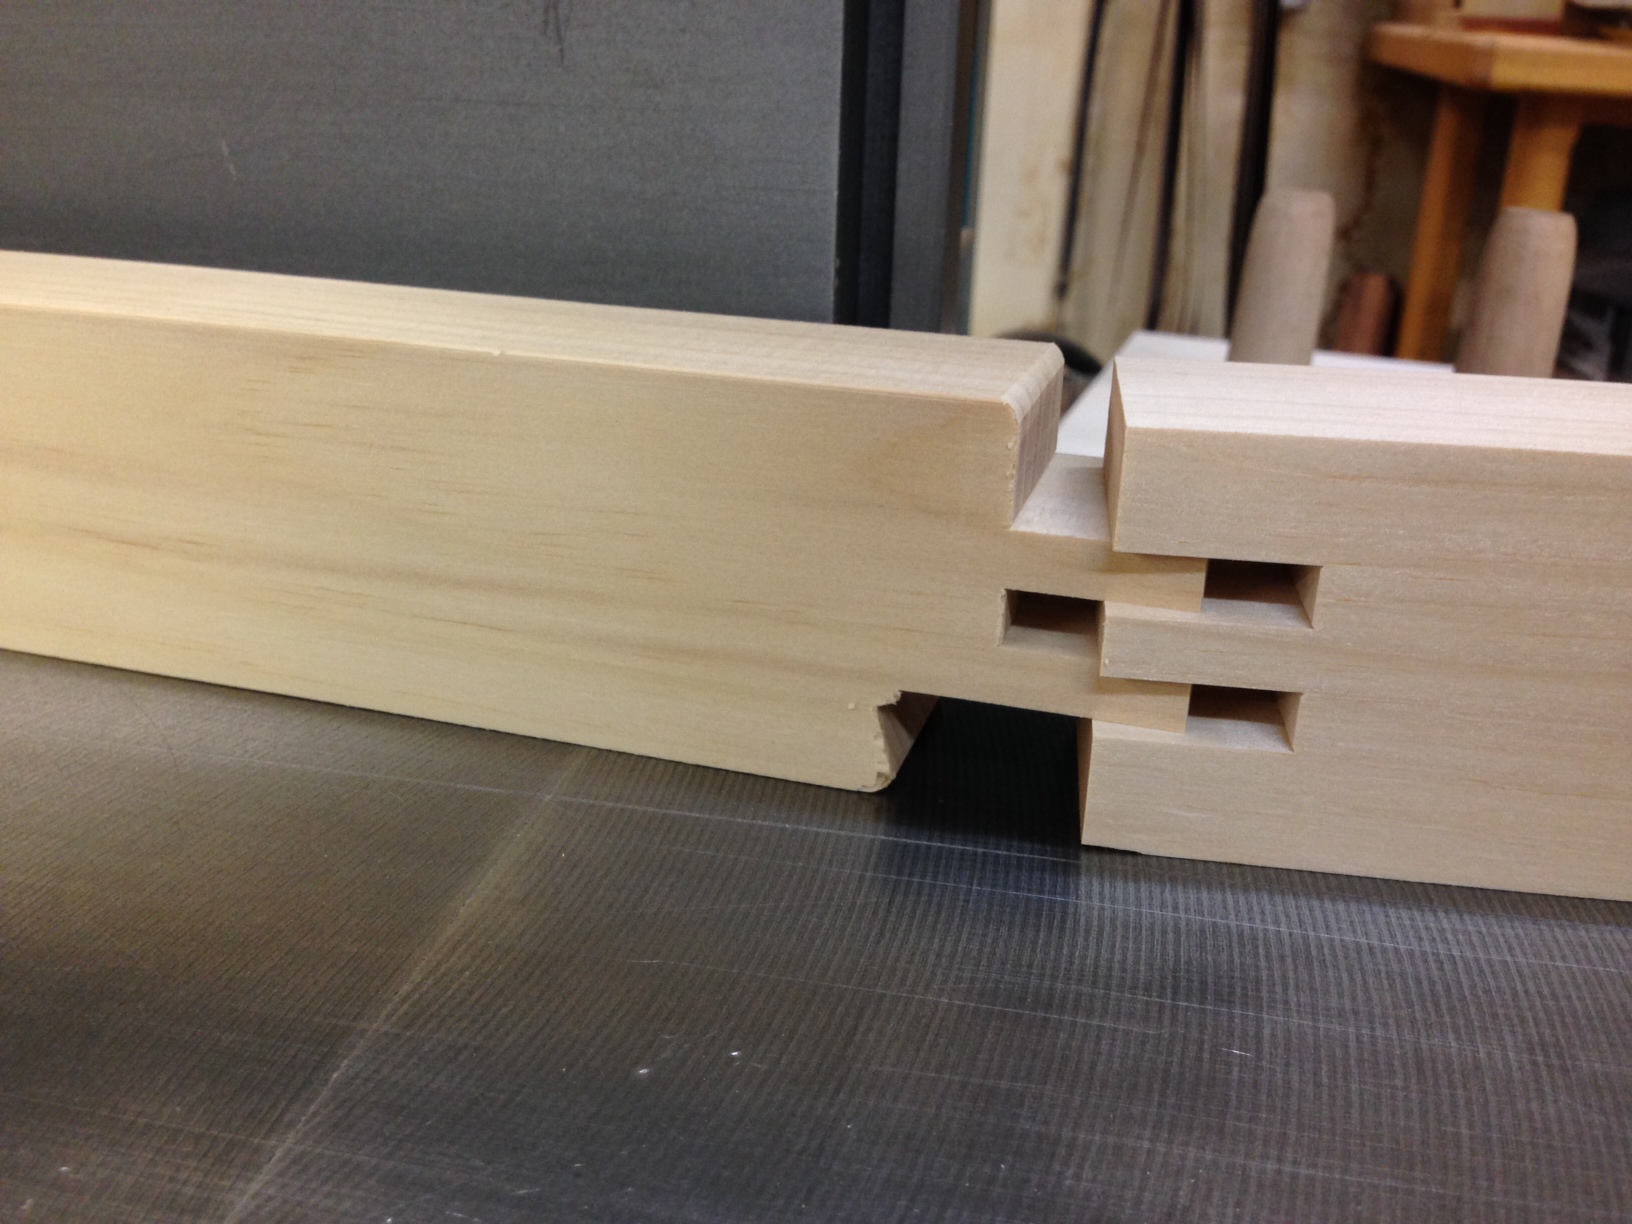
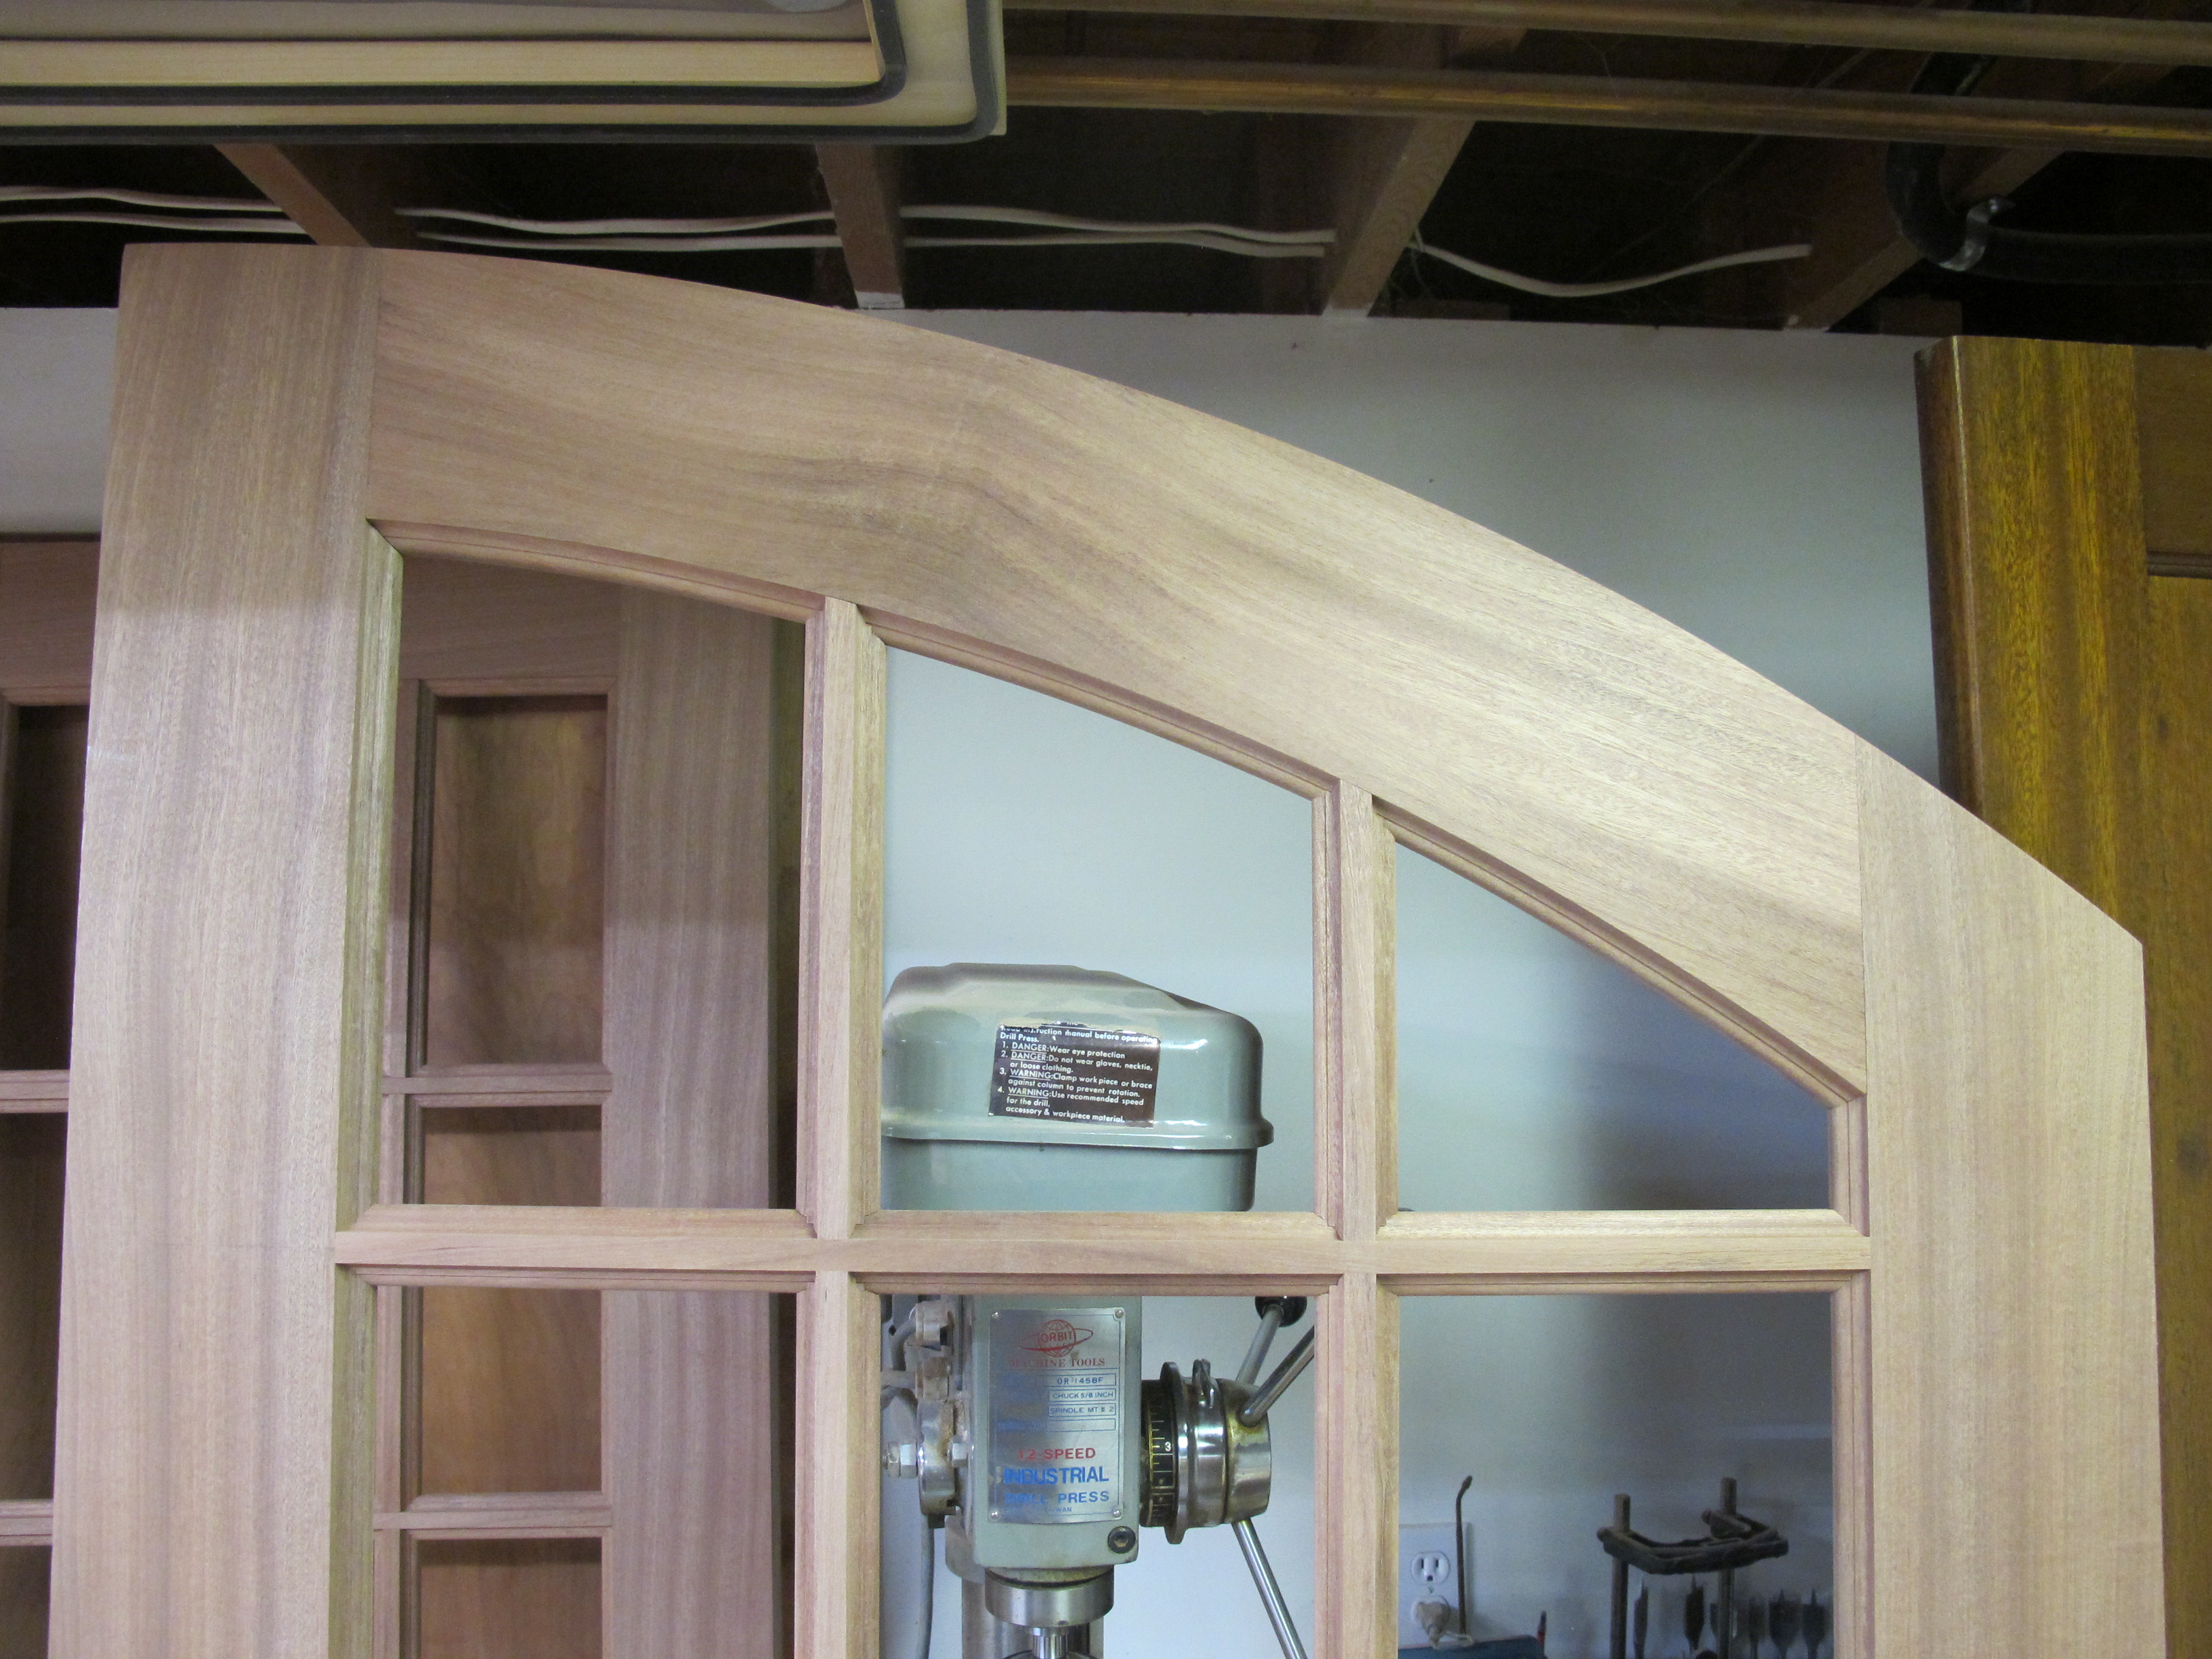
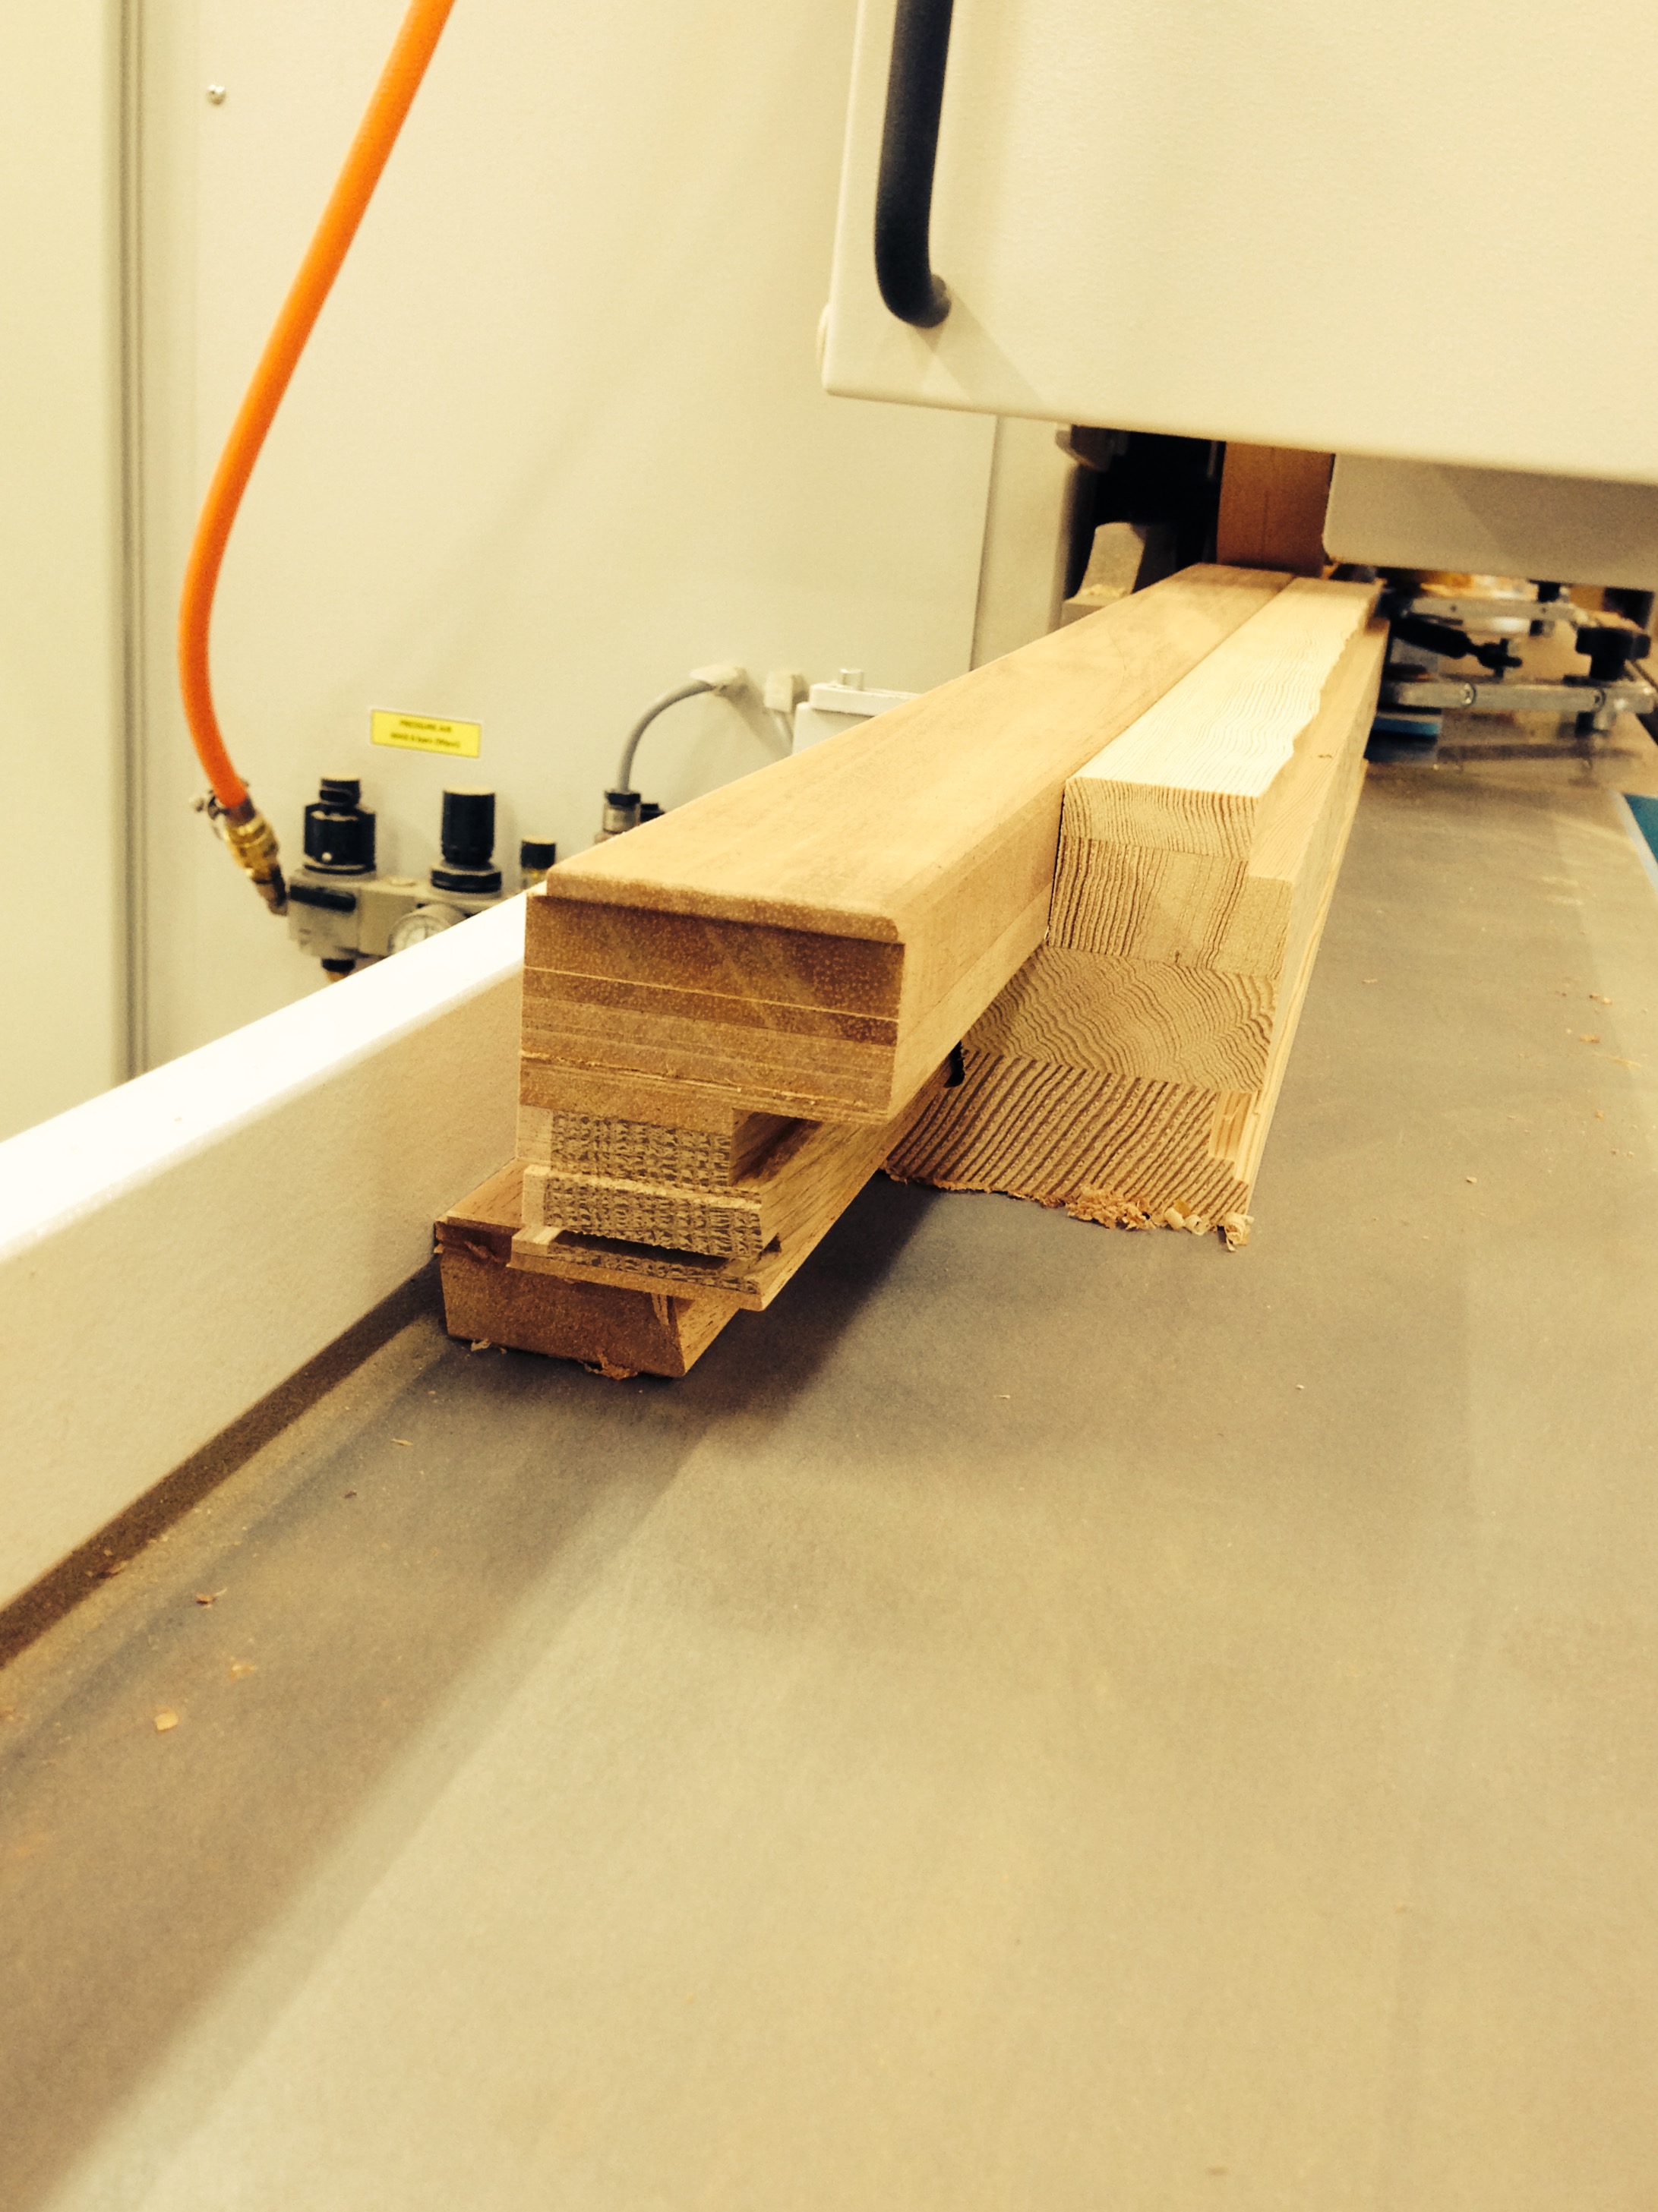
I haven't built many exterior doors, but when I have I've used a different approach, a stub tenon on the stiles and a mating mortise in the end of the rails. The inner edges of the stiles also have a rabbet on both sides to produce a matching stub tenon as on the stiles. It looks like this - see photo. The frame can be glued up with any exterior rated glue. I use T-88 Epoxy, but a guy I know who has made 100's of doors for every one I have uses TB III. I use LVL stave cores for the doors with 3/16" thick veneer glued on with Weldwood Plastic Resin glue in a vacuum bag. There are many woods you could use for exterior doors, from Douglas Fir, to mahagony, to white oak, to the Sapele I used for this door. I use loose tenons to reinforce the stile/rail joint, but dowels are much faster and work just as well.
You capture the panel with moldings glued into those rabbets on both sides of the door. The panels are undersized just like you would for any frame and panel door. I use foam backer rod to hold the panels in the openings, just like space balls are used. This door has solid wood panels, back to back 3/4" panels, so the inside and outside panel can move independently, but you can install insulated glass panels the same way.
John
View higher quality, full size image (3648 X 2736)
7/24/17 #3: Exterior Wood Door Questions ...
Glue? Do not use TBIII as it fails in temps as low as 170 F degrees. If the doors get a dark finish and direct sun, the skins will bubble, and even the stave joints can fail. I suggest Plastic Resin or epoxy.
Panels? If your panels are so loose they need spacers to locate them, then water will pass thru the panel/rail to the inside of the door, or just to the inside of the plow. Make the panels accurately and as a force fit into the stiles and rails, centered as you assemble. We like a very slight taper on our panel raising profiles to help get the panel in, then tighten as it goes into the groove. The length of the panels is just a few thousandths less that the vertical rail to help lock the panel in place. If there are no vertical rails, the rails above and below the panel are clamped up to tighten against the centered panel.
Glass? Talk to your IGU vendor.
I have taught about 12-15 people how to build doors over the last 45 years. It takes a good man 2 years just to learn the basics of all the custom variables. 5 years and they are capable to good. Beyond that they can be great.
Also, the method that John describes can be used on interior doors, but may not weather well on exterior doors. I have seen all those nice pieces 10 years down the road, after each has moved a bit, gotten wet, etc. Even the pins will rust, letting loose. Miters open, butt joints shift.
Think of that center 'stub tenon' as being integral and machines as part of the rail or stile. This will stop one part from moving, one major source of leaks.
It is always best to build doors with as few parts as possible - integral tenons, integral sticking, etc. This makes for fewer parts to fail, and everything will work to prevent water intrusion.
One never knows how exterior doors are to be used. Some are 15' under a porch roof and will never see rain or snow or sunlight. A door maker has more options open in that case than if the door is on the East side, no overhang, no shade, getting full sun and all weather. That door can hardly be warranted, and maintenance will be frequent.
View higher quality, full size image (1800 X 1477)
View higher quality, full size image (1800 X 1478)
View higher quality, full size image (1800 X 1478)
7/24/17 #4: Exterior Wood Door Questions ...
I hardly speak with the voice of vast experience, but the guy who taught me that method has built thousands of doors and claims to never have had a failure. I can't vouch for that, but he's sold and installed a lot of doors and he's given me no reason to doubt him.
Let me clarify a few things. I said TB III can be used to glue the door together because that's what he does. I use T-88 epoxy for assembly. The door skins are glued on to the LVL stave cores with plastic resin glue. Interestingly, he told me that a major door manufacturer uses nothing more than silicone caulking, which was shocking but, again, I have no reason to doubt him though I'd never consider doing it. The point is all the glue is doing is holding the parts together. The load is carried by the joinery, be it dowels, tenons, whatever. As such, there just isn't much load on those joints. You would never see 170�F on a door unless it was behind a storm door with direct sun exposure, in which case you are going to have all kinds of problems anyway.
The backer rod I use to hold the panels in place is used like space balls. The panels still fit snugly into the pocket created by the glued in moldings, no different then in a cope and stick door. It's just a different way of getting to the same end for a shop without a big shaper. All the backer rod does is keep the panel centered laterally in the door frame. I use solid spacers at the bottom to keep the panels at constant elevation.
Glued in moldings are no different than cope and stick if you believe glue is as strong as wood. I use T-88 epoxy to glue them in and clamp the moldings in place w/o pin nails, etc. It will last as long as any other construction.
The cheapest source of glass panels is to find one you like already used in a commercial door and order a replacement.
With no disrespect intended, building a durable door is no different than learning to build other wood structures. Learn from someone who's been there/done that, study current and historic practices to understand what works and what doesn't, use the best materials you can source and follow good workshop practices.
What I do works for me; larger shops couldn't afford the extra steps and time it takes for me to build doors. But the end product is just as durable, and likely better than some of the commercial doors I've studied and repaired. I offered the approach to the OP because he sounds like a smaller shop that doesn't build a lot of doors. He can take from it what he will.
John
7/25/17 #5: Exterior Wood Door Questions ...
Fortunately, door building, like most of woodworking, has lots of options and paths to follow. With some awareness and diligence, many methods will work successfully. Materials, glues, methods, joinery are all variables that can intimidate even seasoned door makers.
We probably use about 6-8 different base construction types that we have developed over the years and know how to do, and can rely on some predictable outcomes. Only when we are done with a project, do we know 100% what we should have done - you know the story.
But we stick with the base methods because of their predictable results and known methods. Rail sizes, panel types, stub, offset, haunched or thru tenons, veneered faces, radius heads, all have known methods that make it easier than inventing new process all day, every day.
As a result, we have the confidence to offer a 5 year warranty. We have the confidence to jump in and cut up some expensive wood and come out with a good product at the other end. And some money in the pocket and the bank.
I don't know the OP, but he asks some good questions, and some that give me some concern. I don't think making exterior passage doors is like making cabinet doors. It is not a simple process, and should not be underestimated.
View higher quality, full size image (1350 X 1800)
View higher quality, full size image (1350 X 1800)
7/26/17 #6: Exterior Wood Door Questions ...
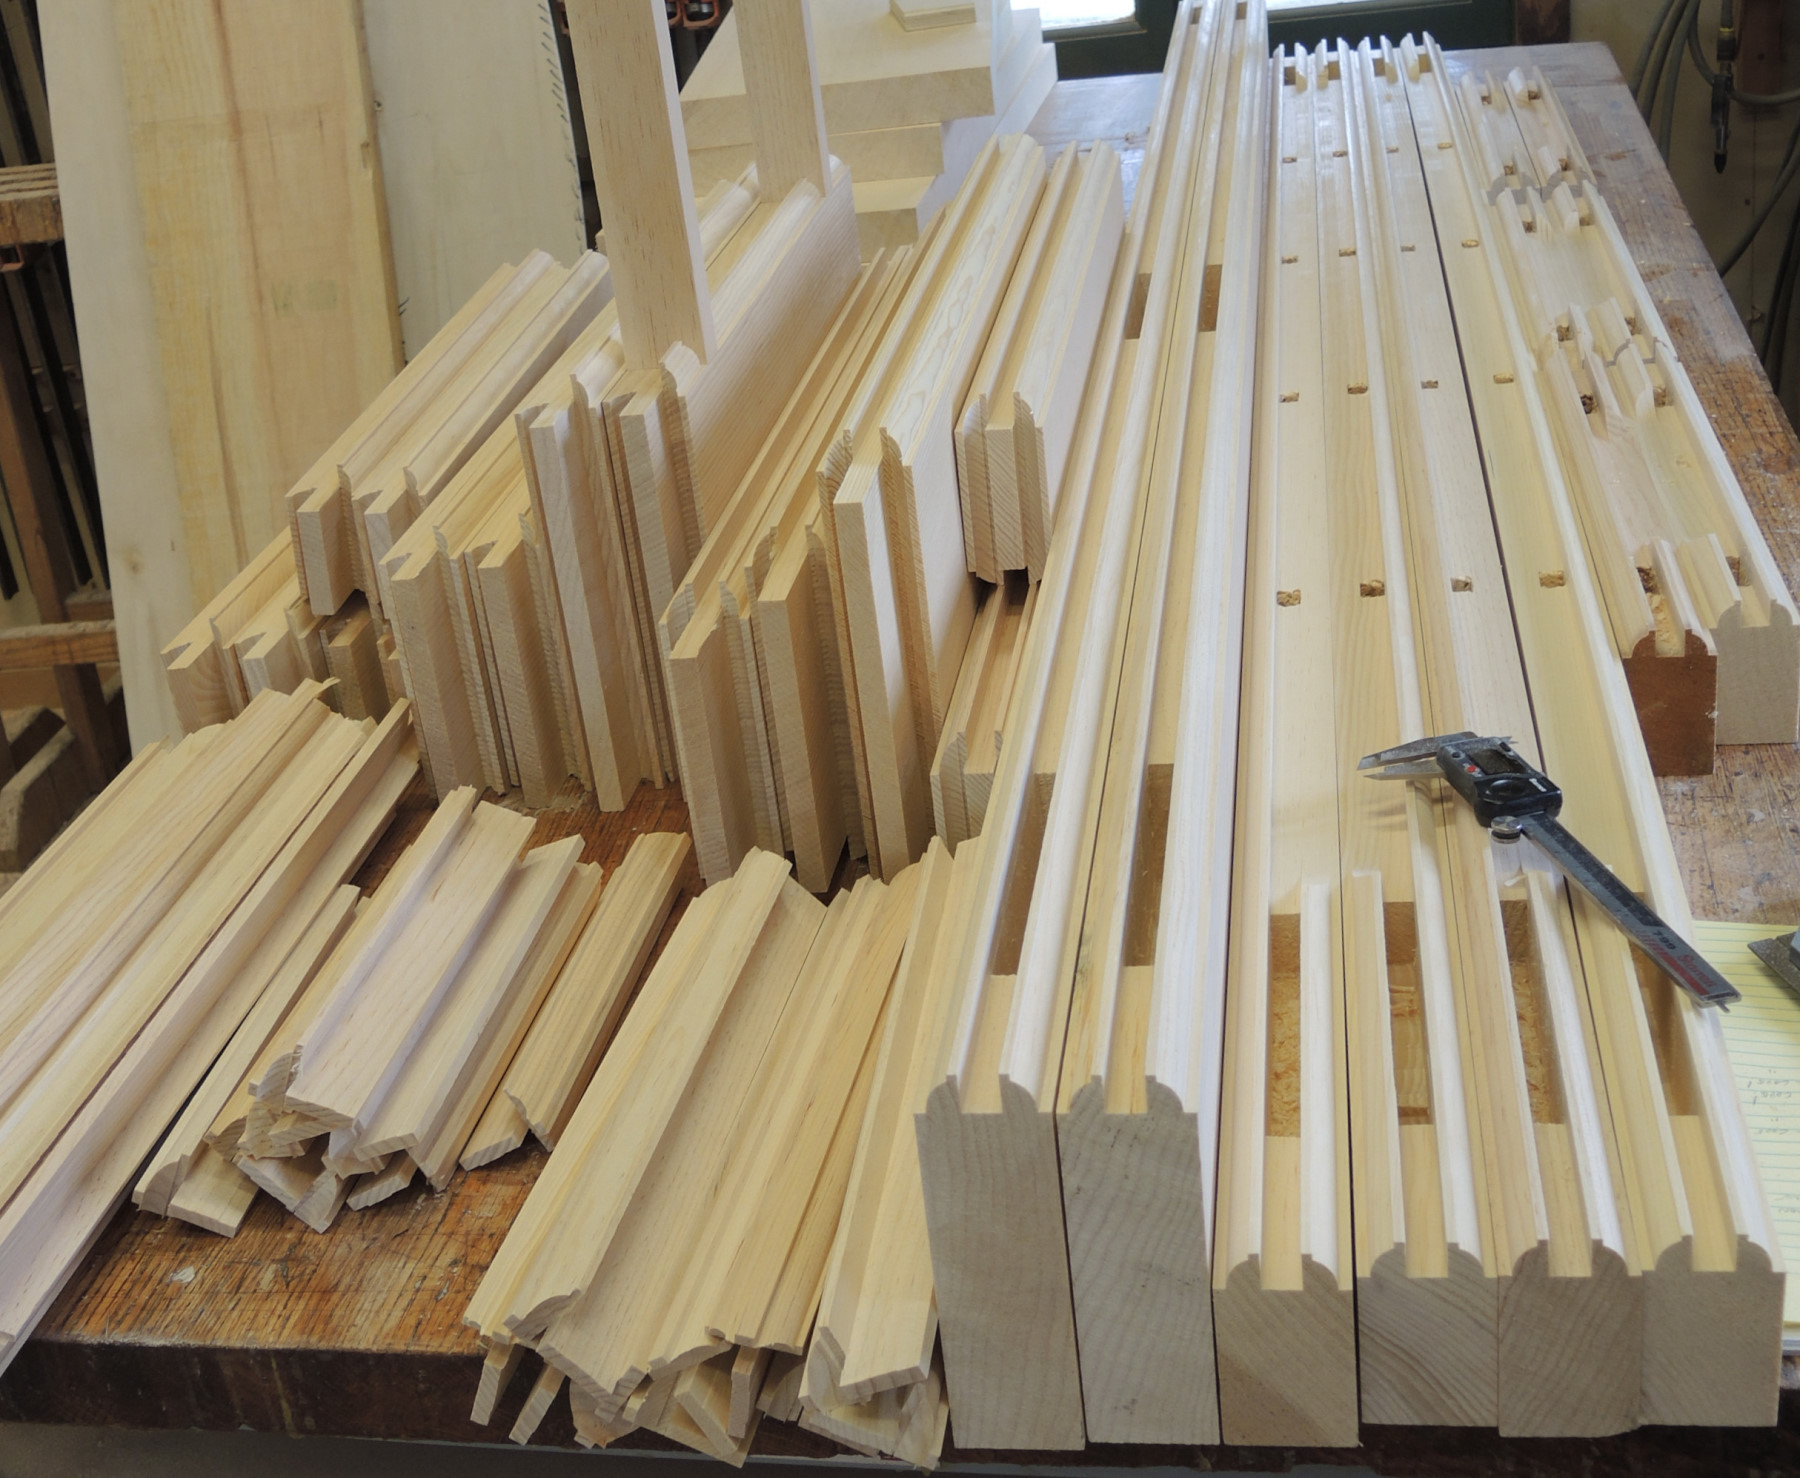
David,
I love the picture of all the muntions, stiles and rails. That looks sweet. I am wondering if you would have a picture of the setup that you use for running those muntions? We are struggling to run those currently.
7/27/17 #7: Exterior Wood Door Questions ...
Karin -
The muntins are the devil hisself. I have made changes over the years, and nearly everyone I have worked with has developed their preferred way. They all have their pros and cons. Safety and accuracy are the two paramount factors. Below is what we have evolved to.
Since they have to be cut to length and coped first, one often not only has narrow sticks, but short ones also.
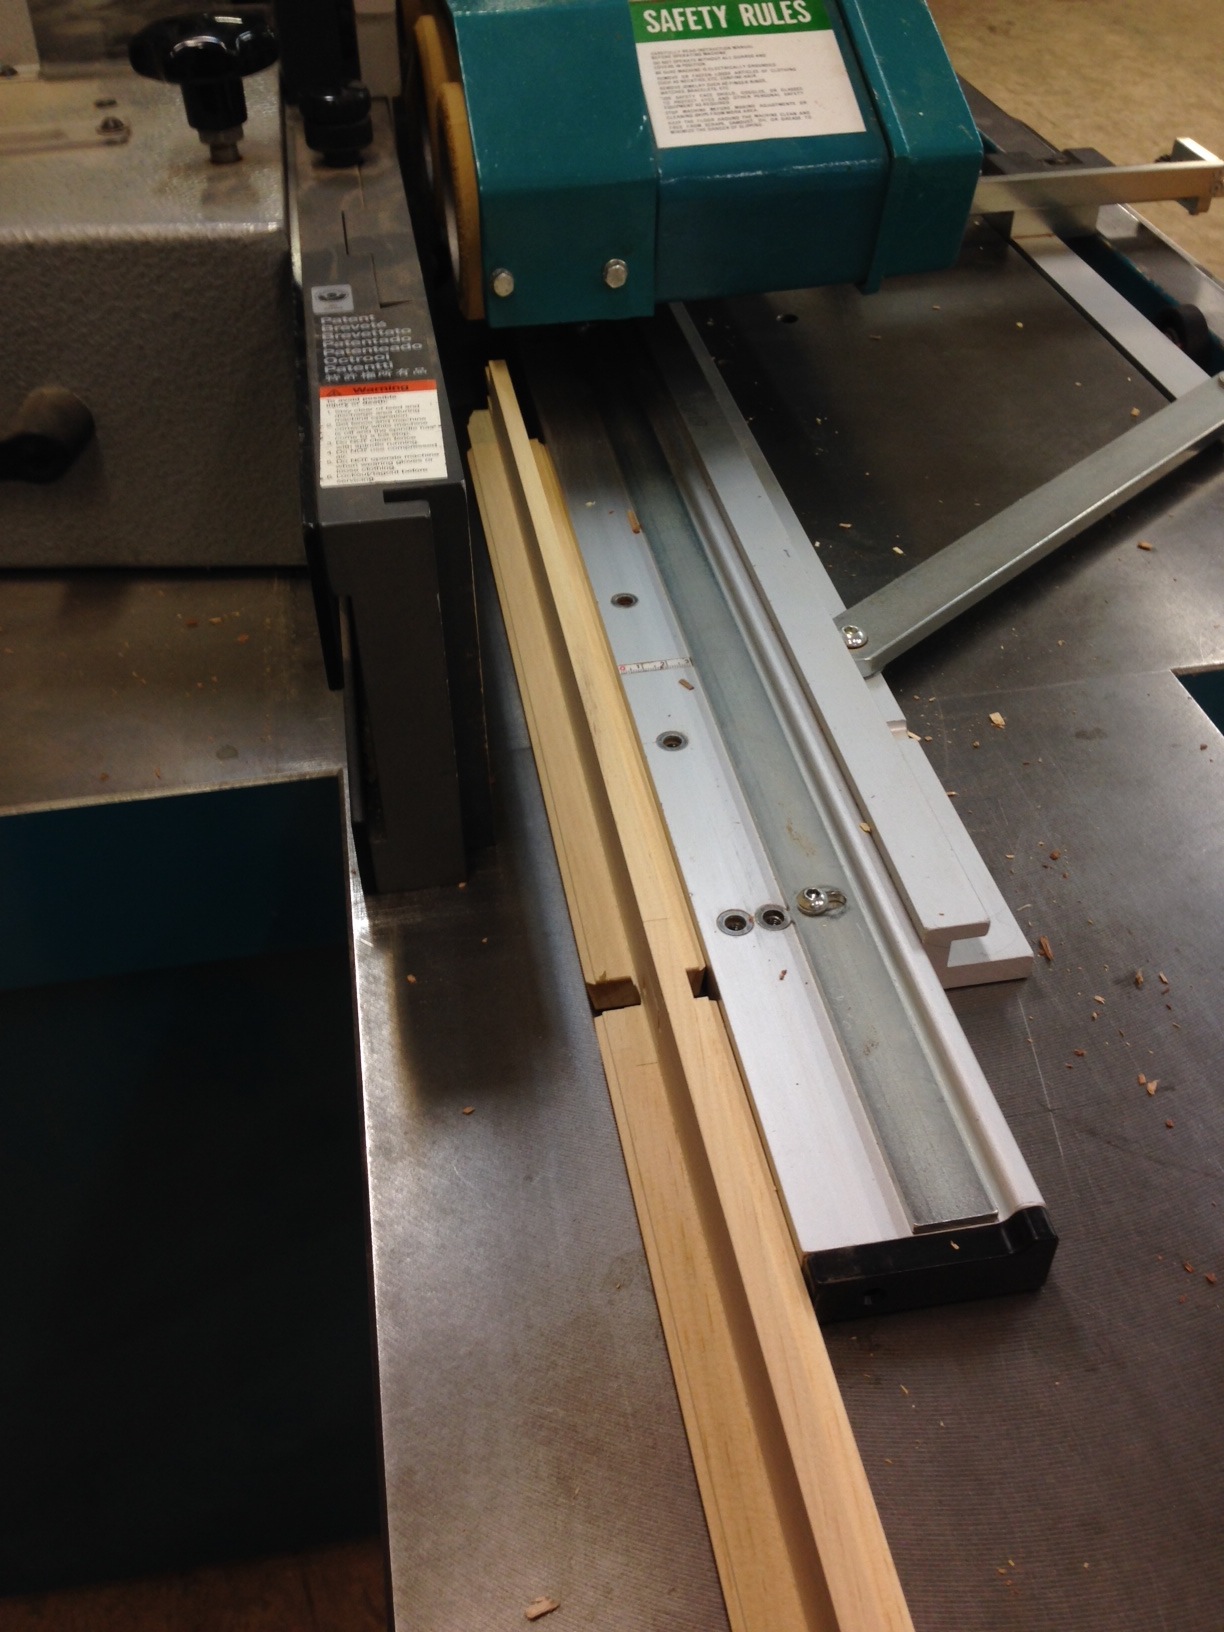
We do not remove all the wood in one cut. While that can be done for massive stiles and rails, the muntins could explode or deflect or....whatever as 1/3 or more of their mass is removed in one cut. Scary stuff.
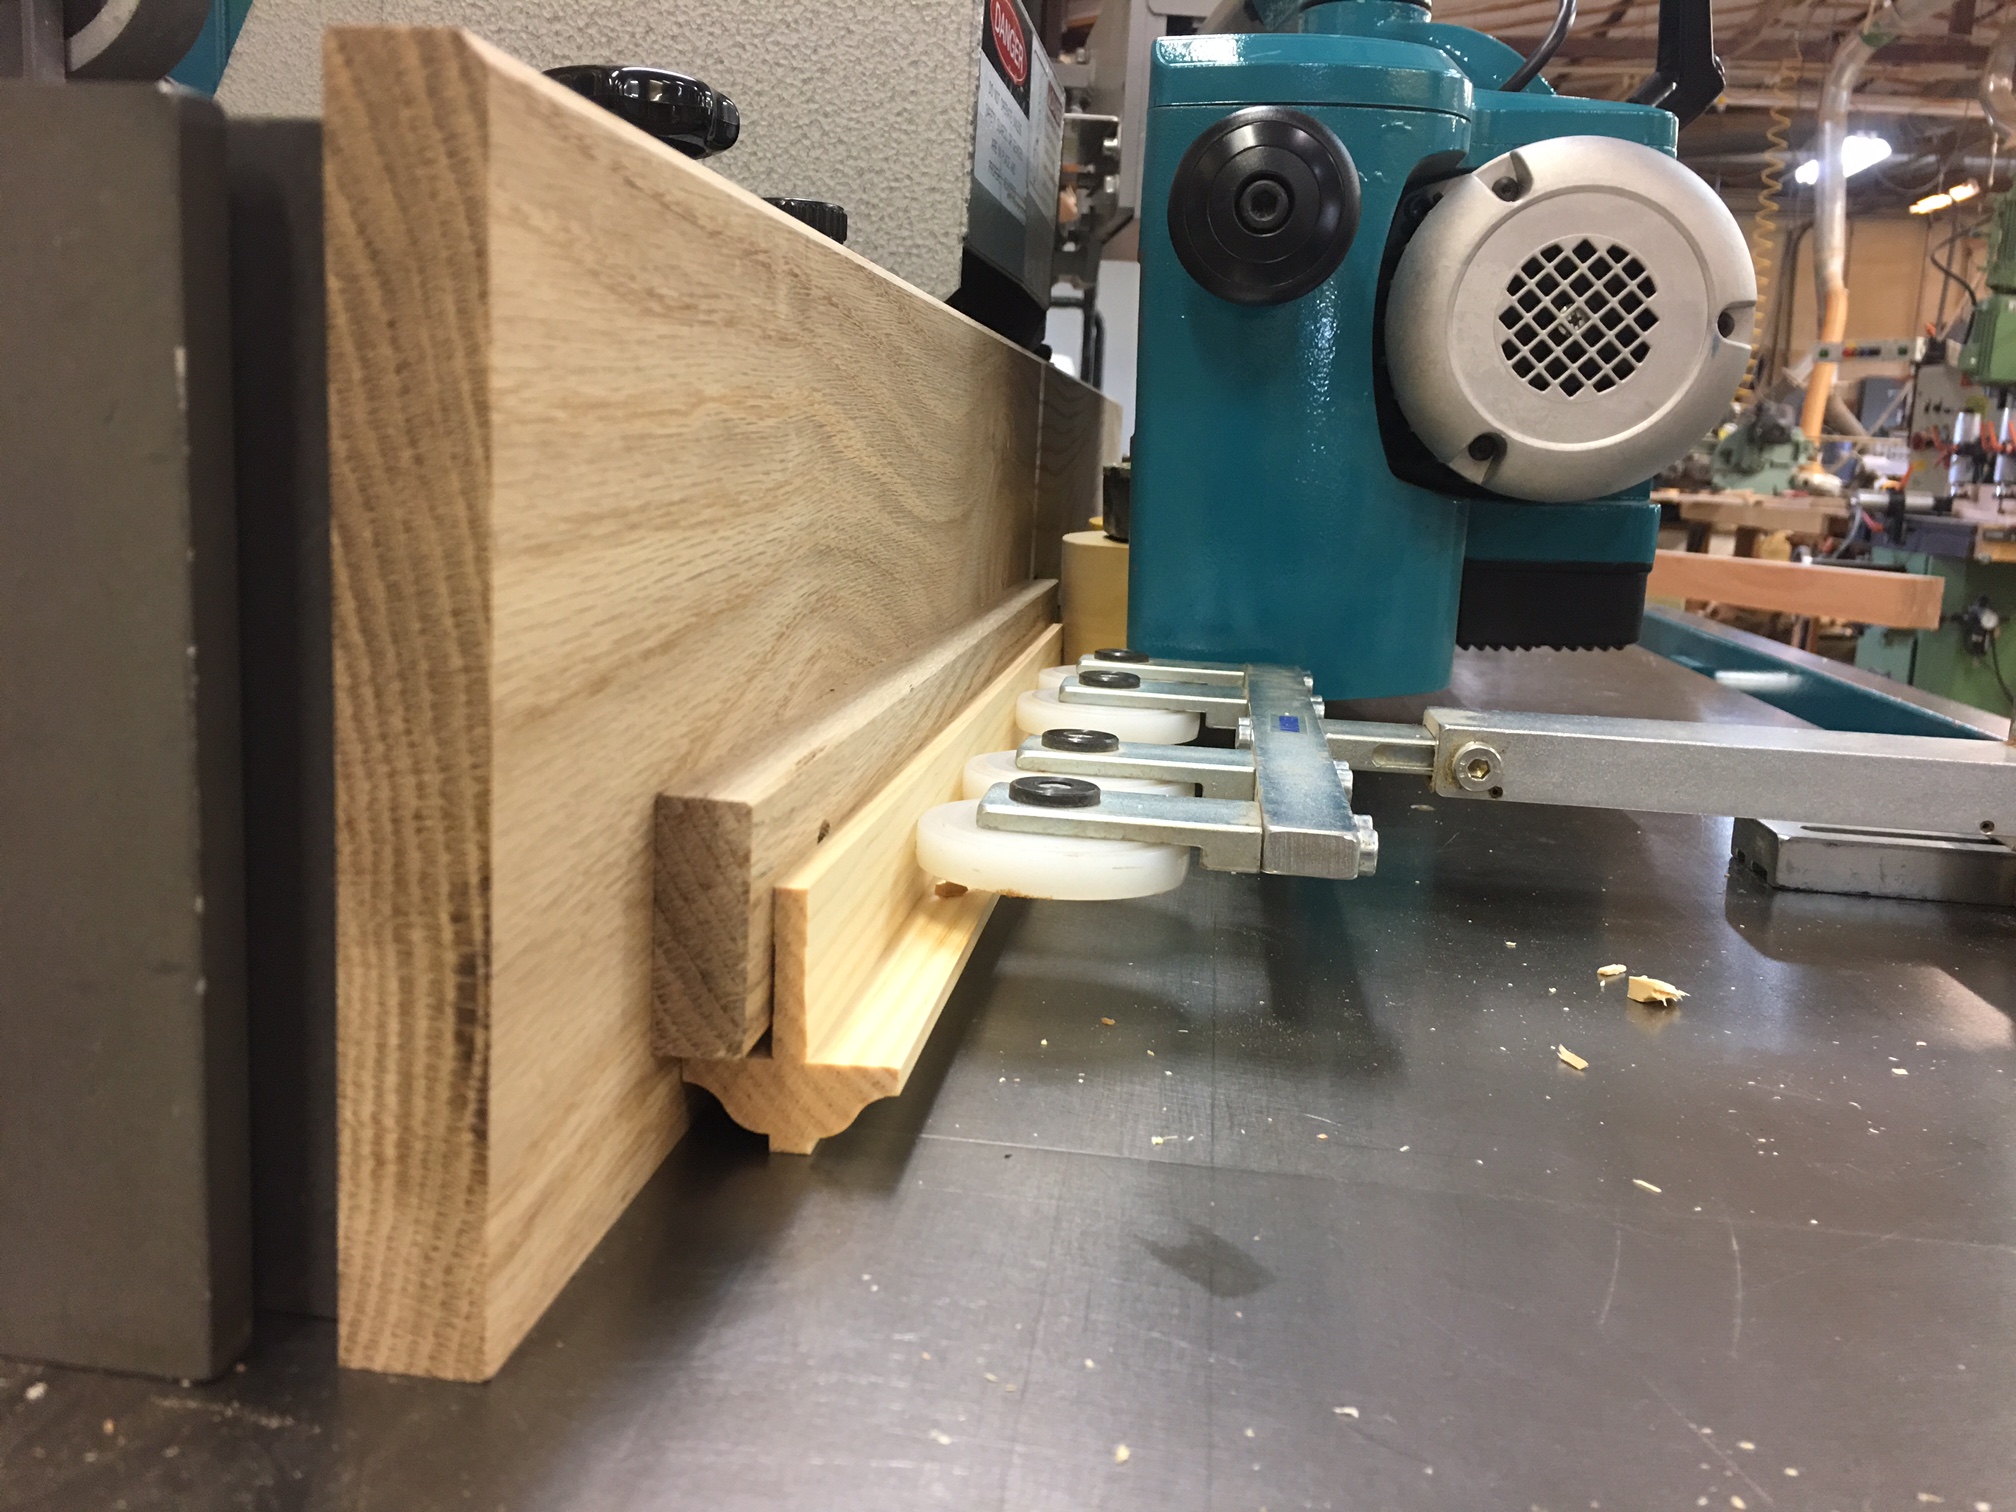
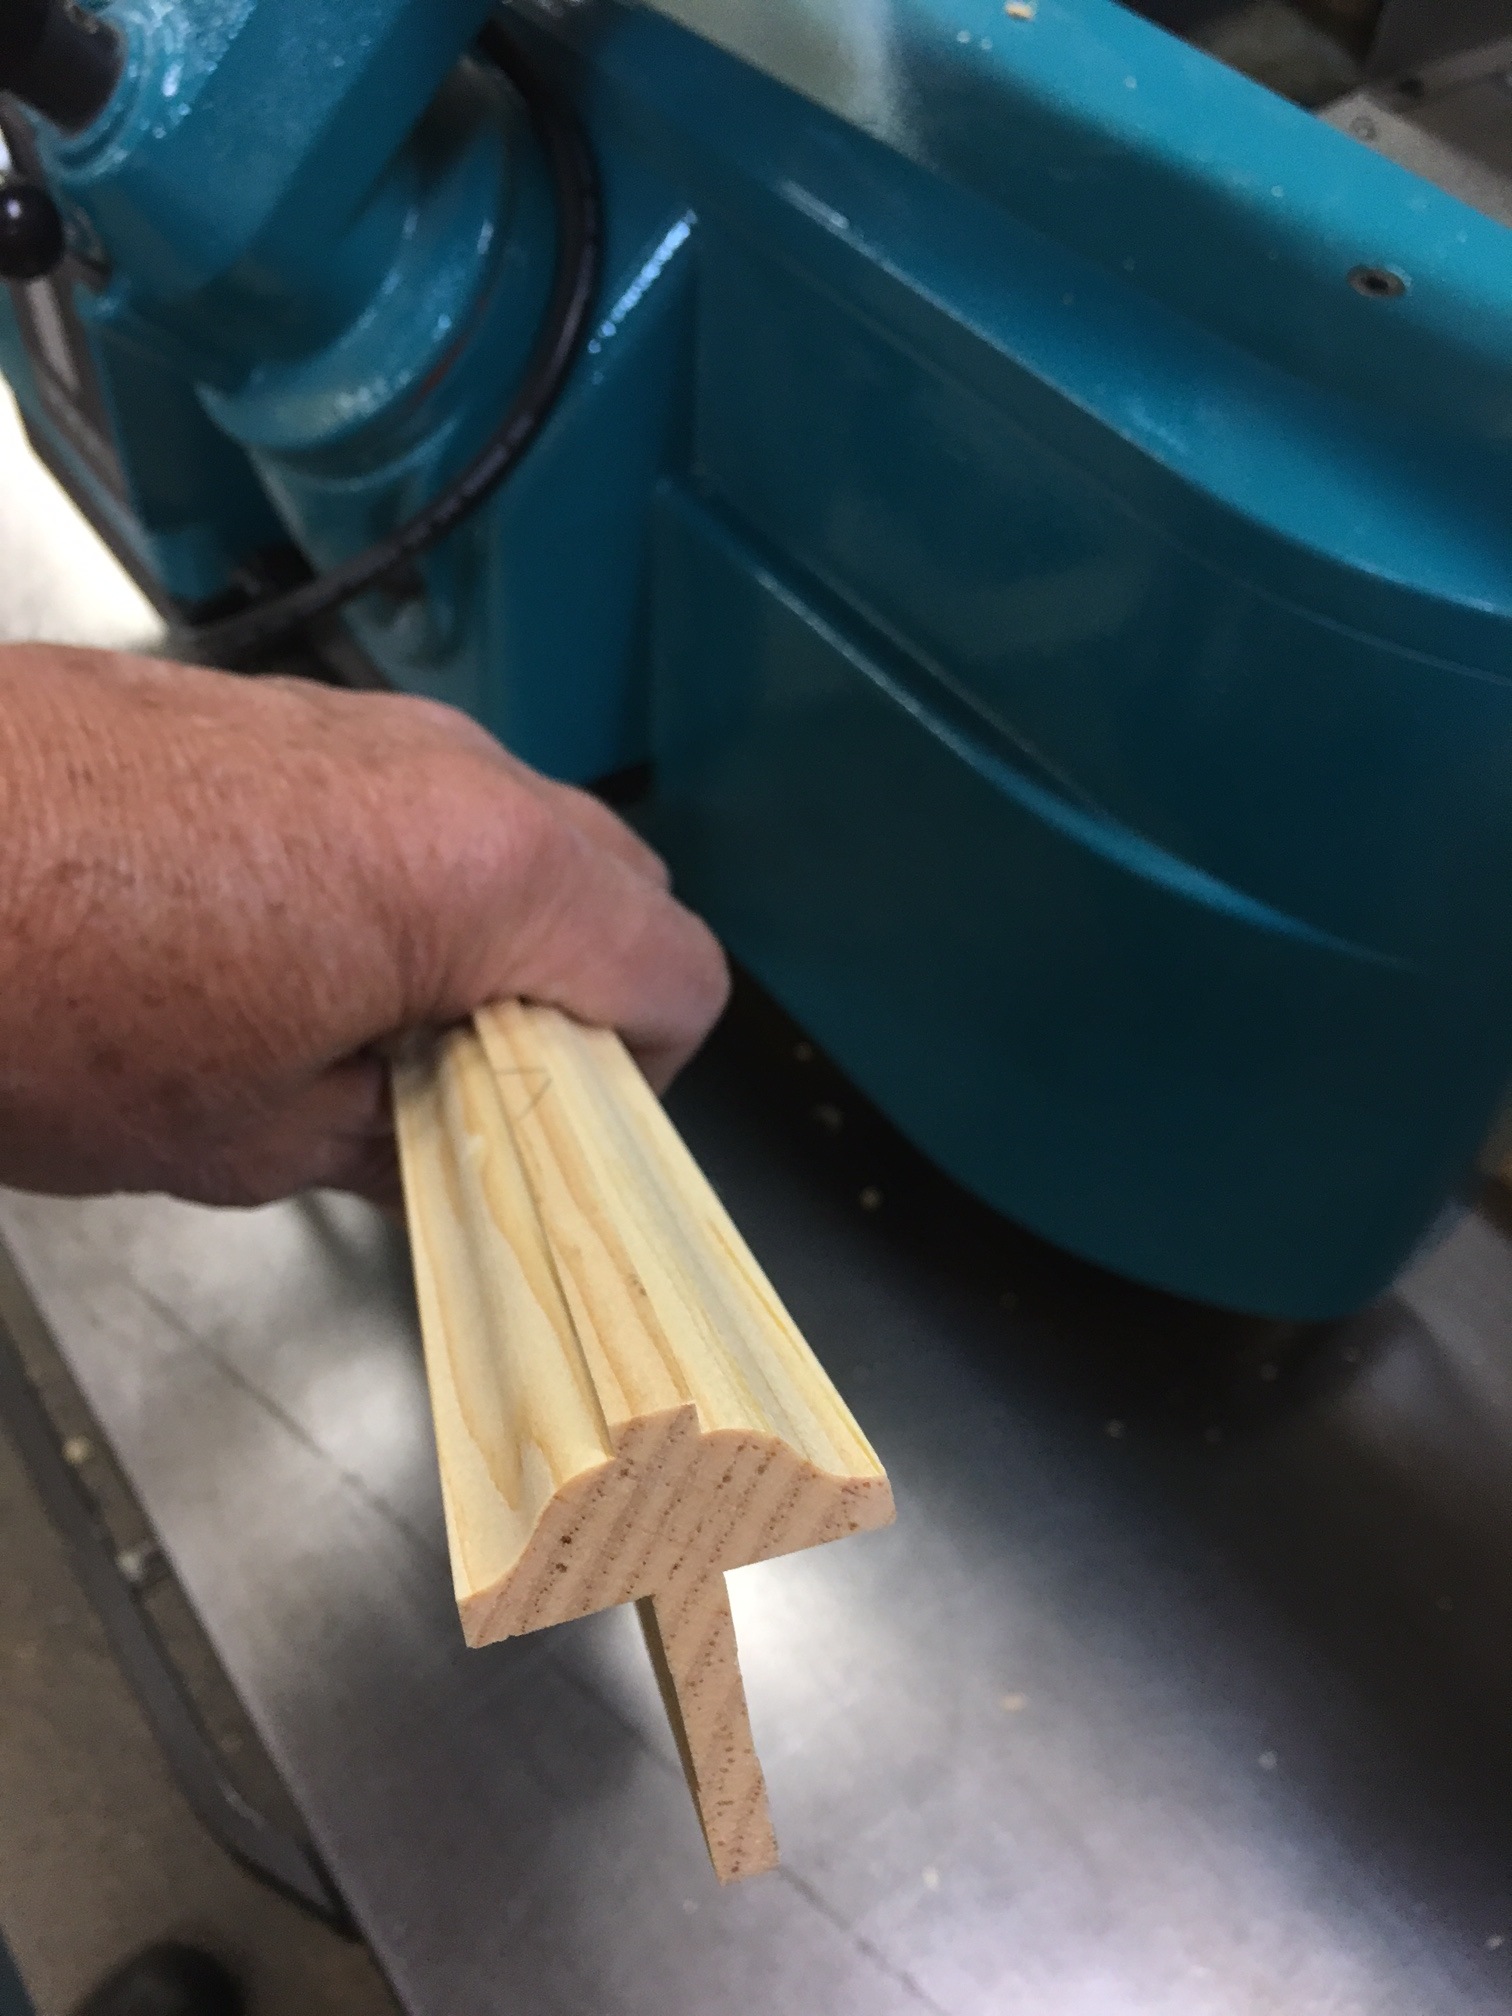
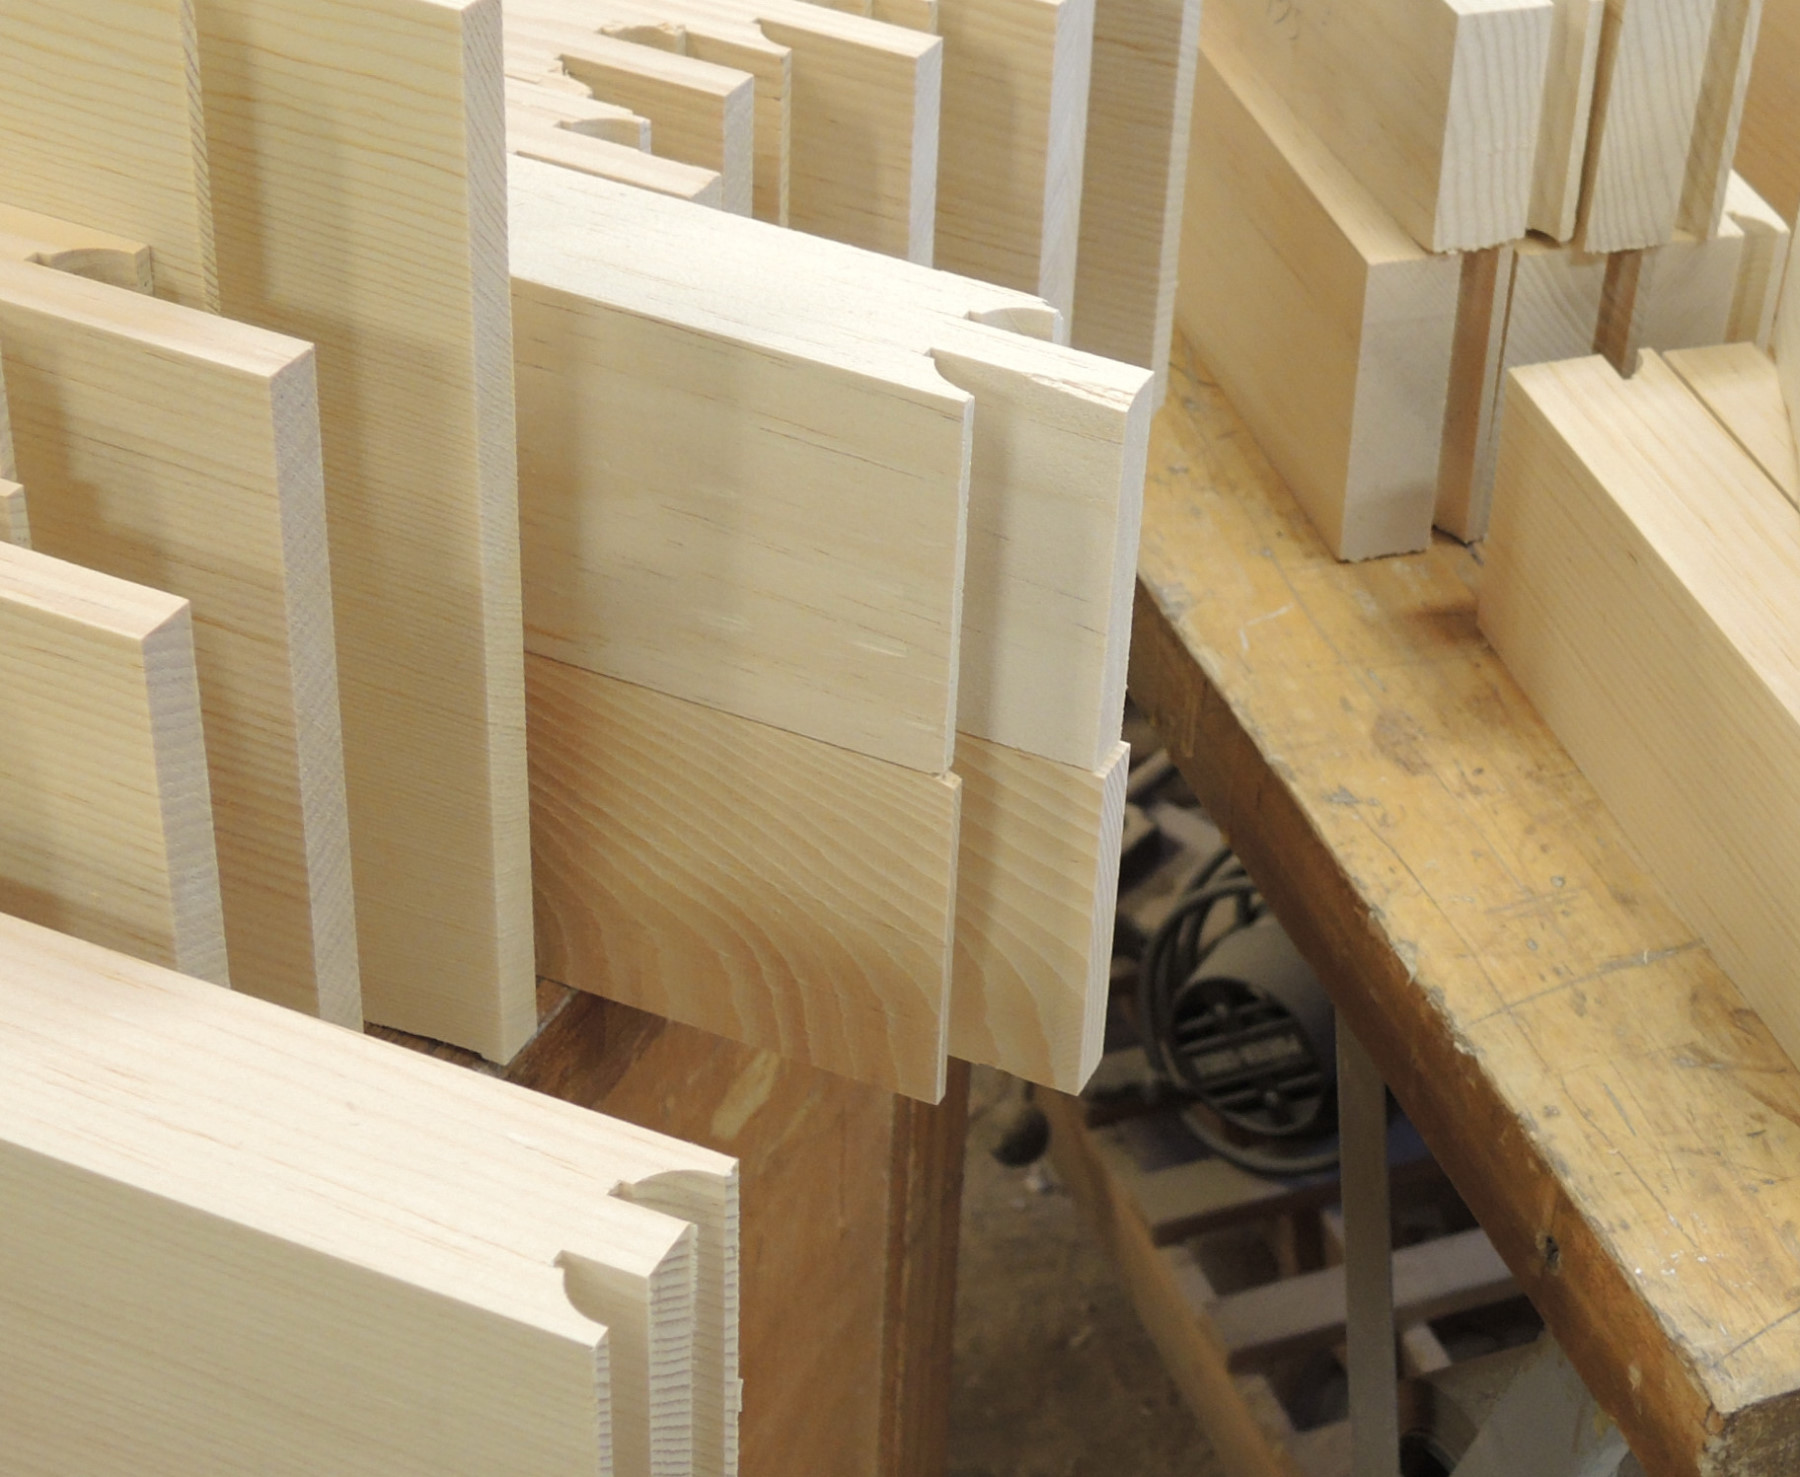
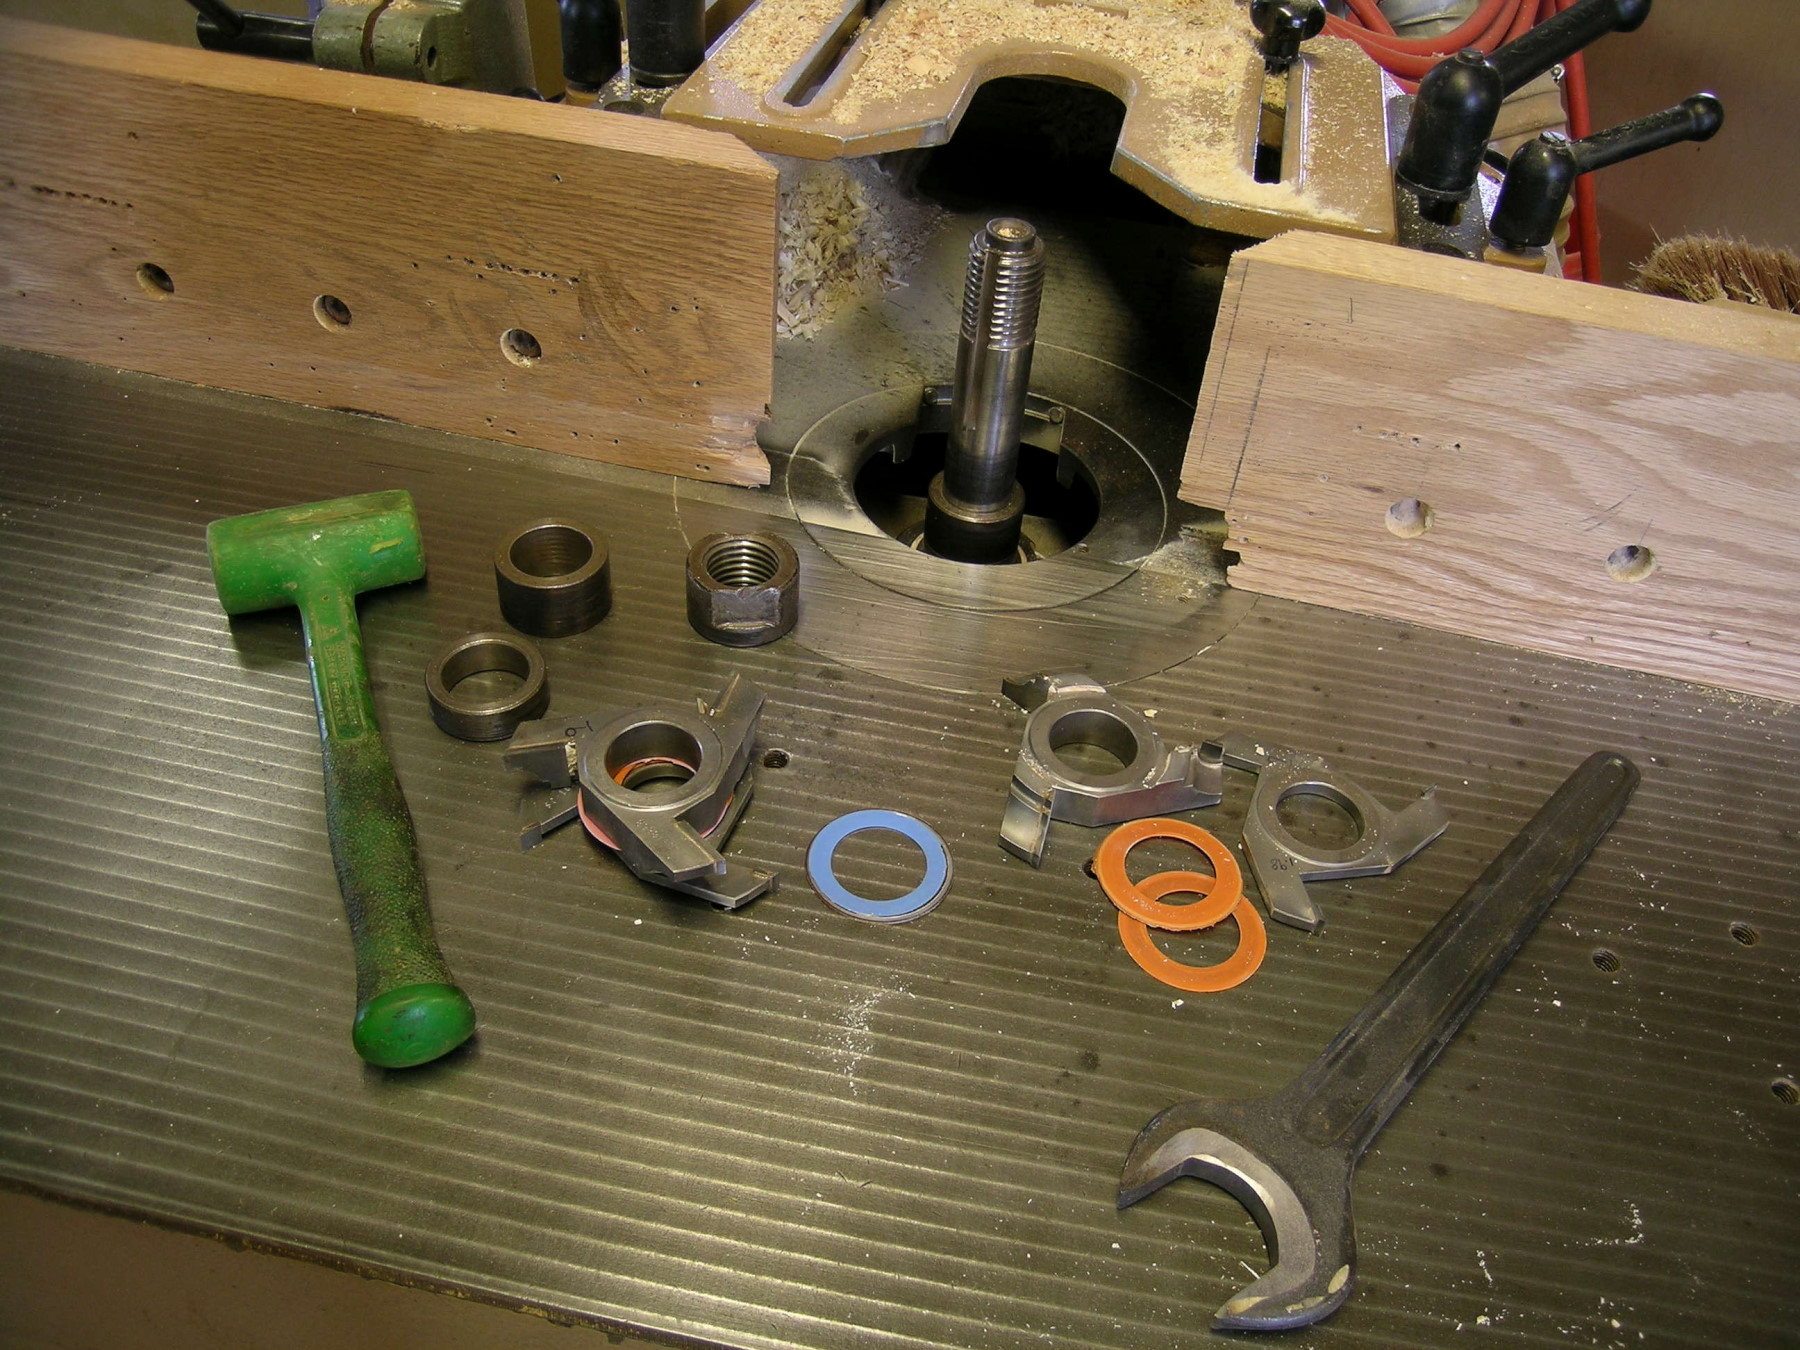
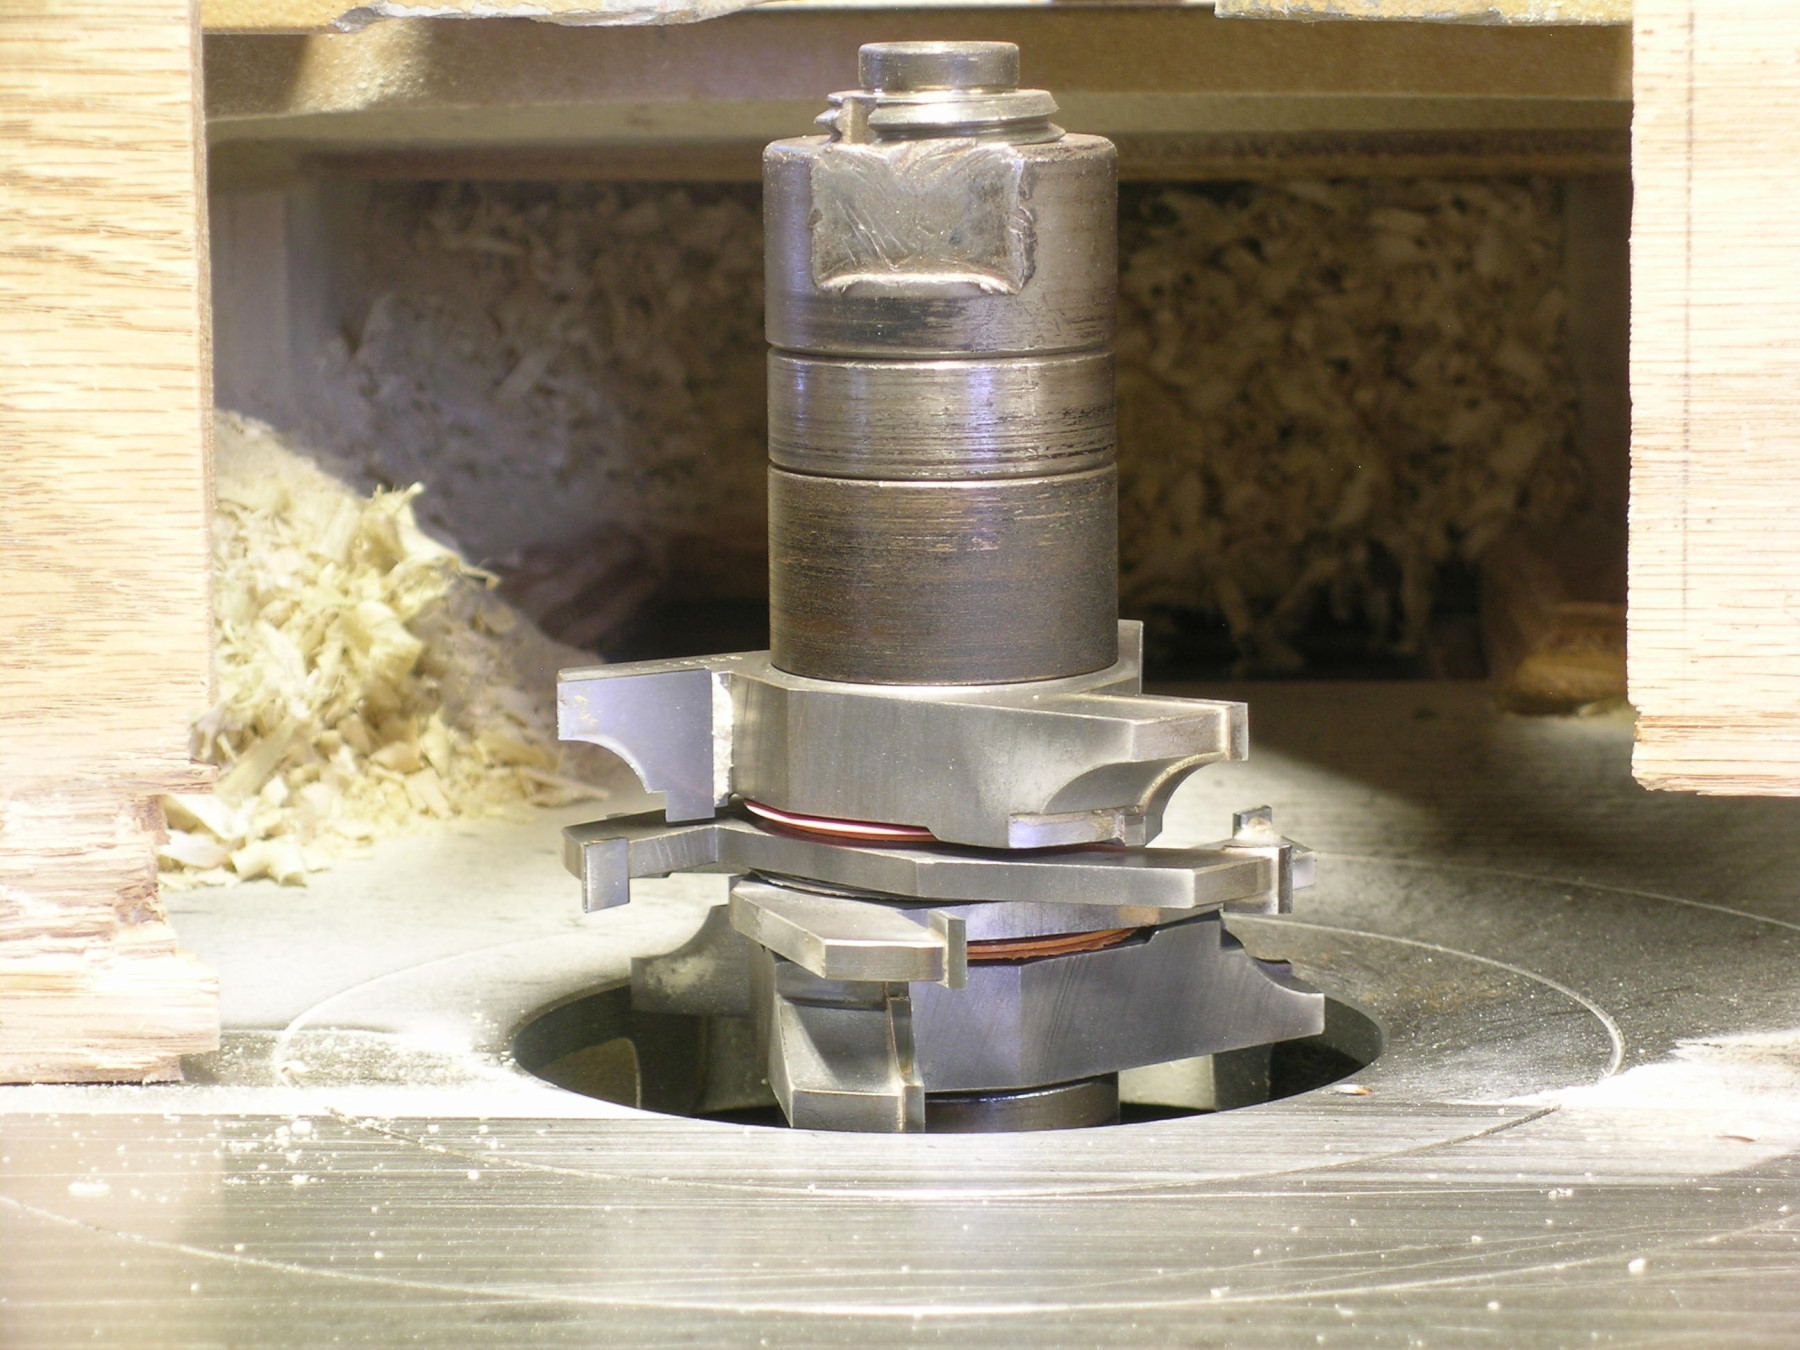
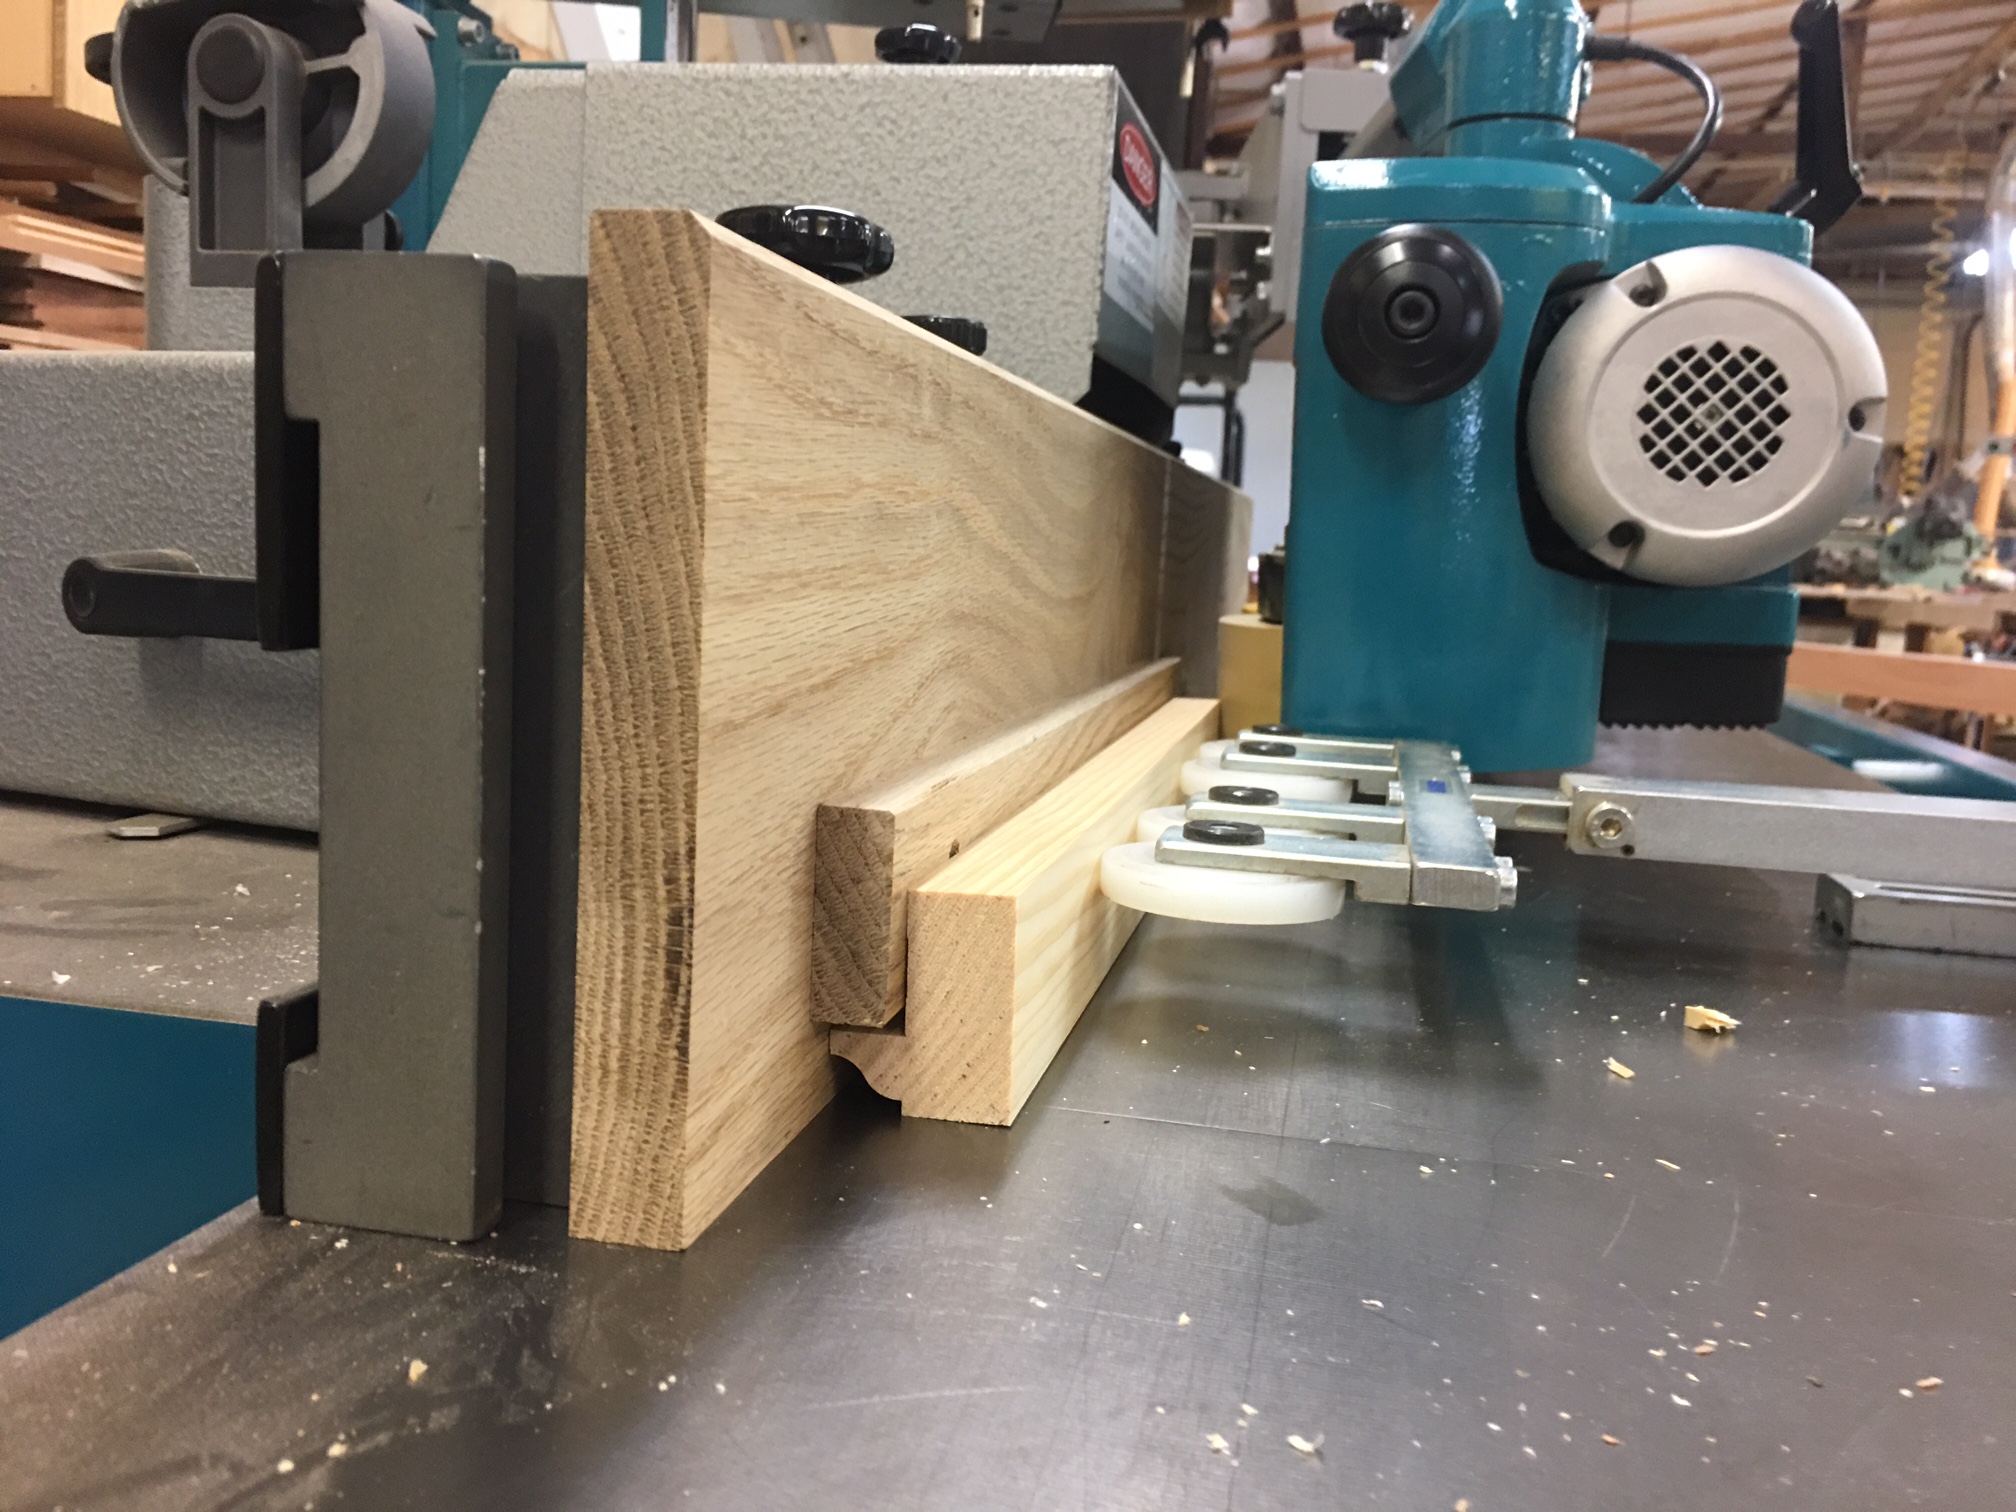
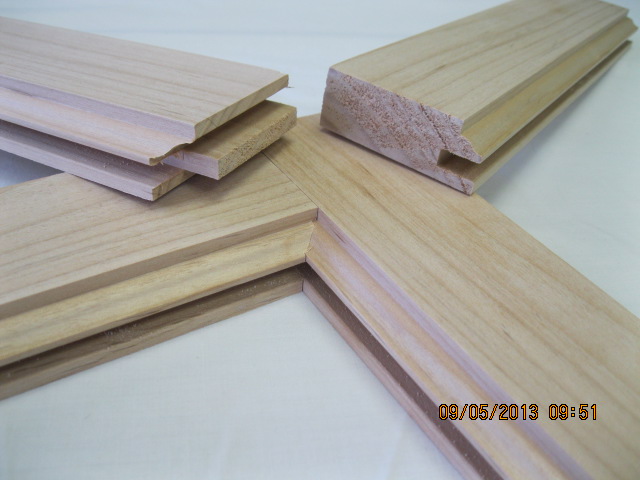
Our 9/16" Ovolo tooling (in the photos) is set up to remove 1/16" on a full thickness cut with top and bottom ovolos and a 1/2" wide x 9/16" deep (per one type of sticking) plow in one pass. The shaper fences are offset by 1/16" to support the cut. The cutters (brazed, by CG G Schmidt, designed by Acorn) are a set that can also do a glass rabbet or plows of different sizes. Confusing as a set of 7, but they make sense in that you have much more versatility than a single head. We have the complement in cope cutters, also. The photos show both set up and as parts. The color-codeded spacers and digital calipers are necessary.
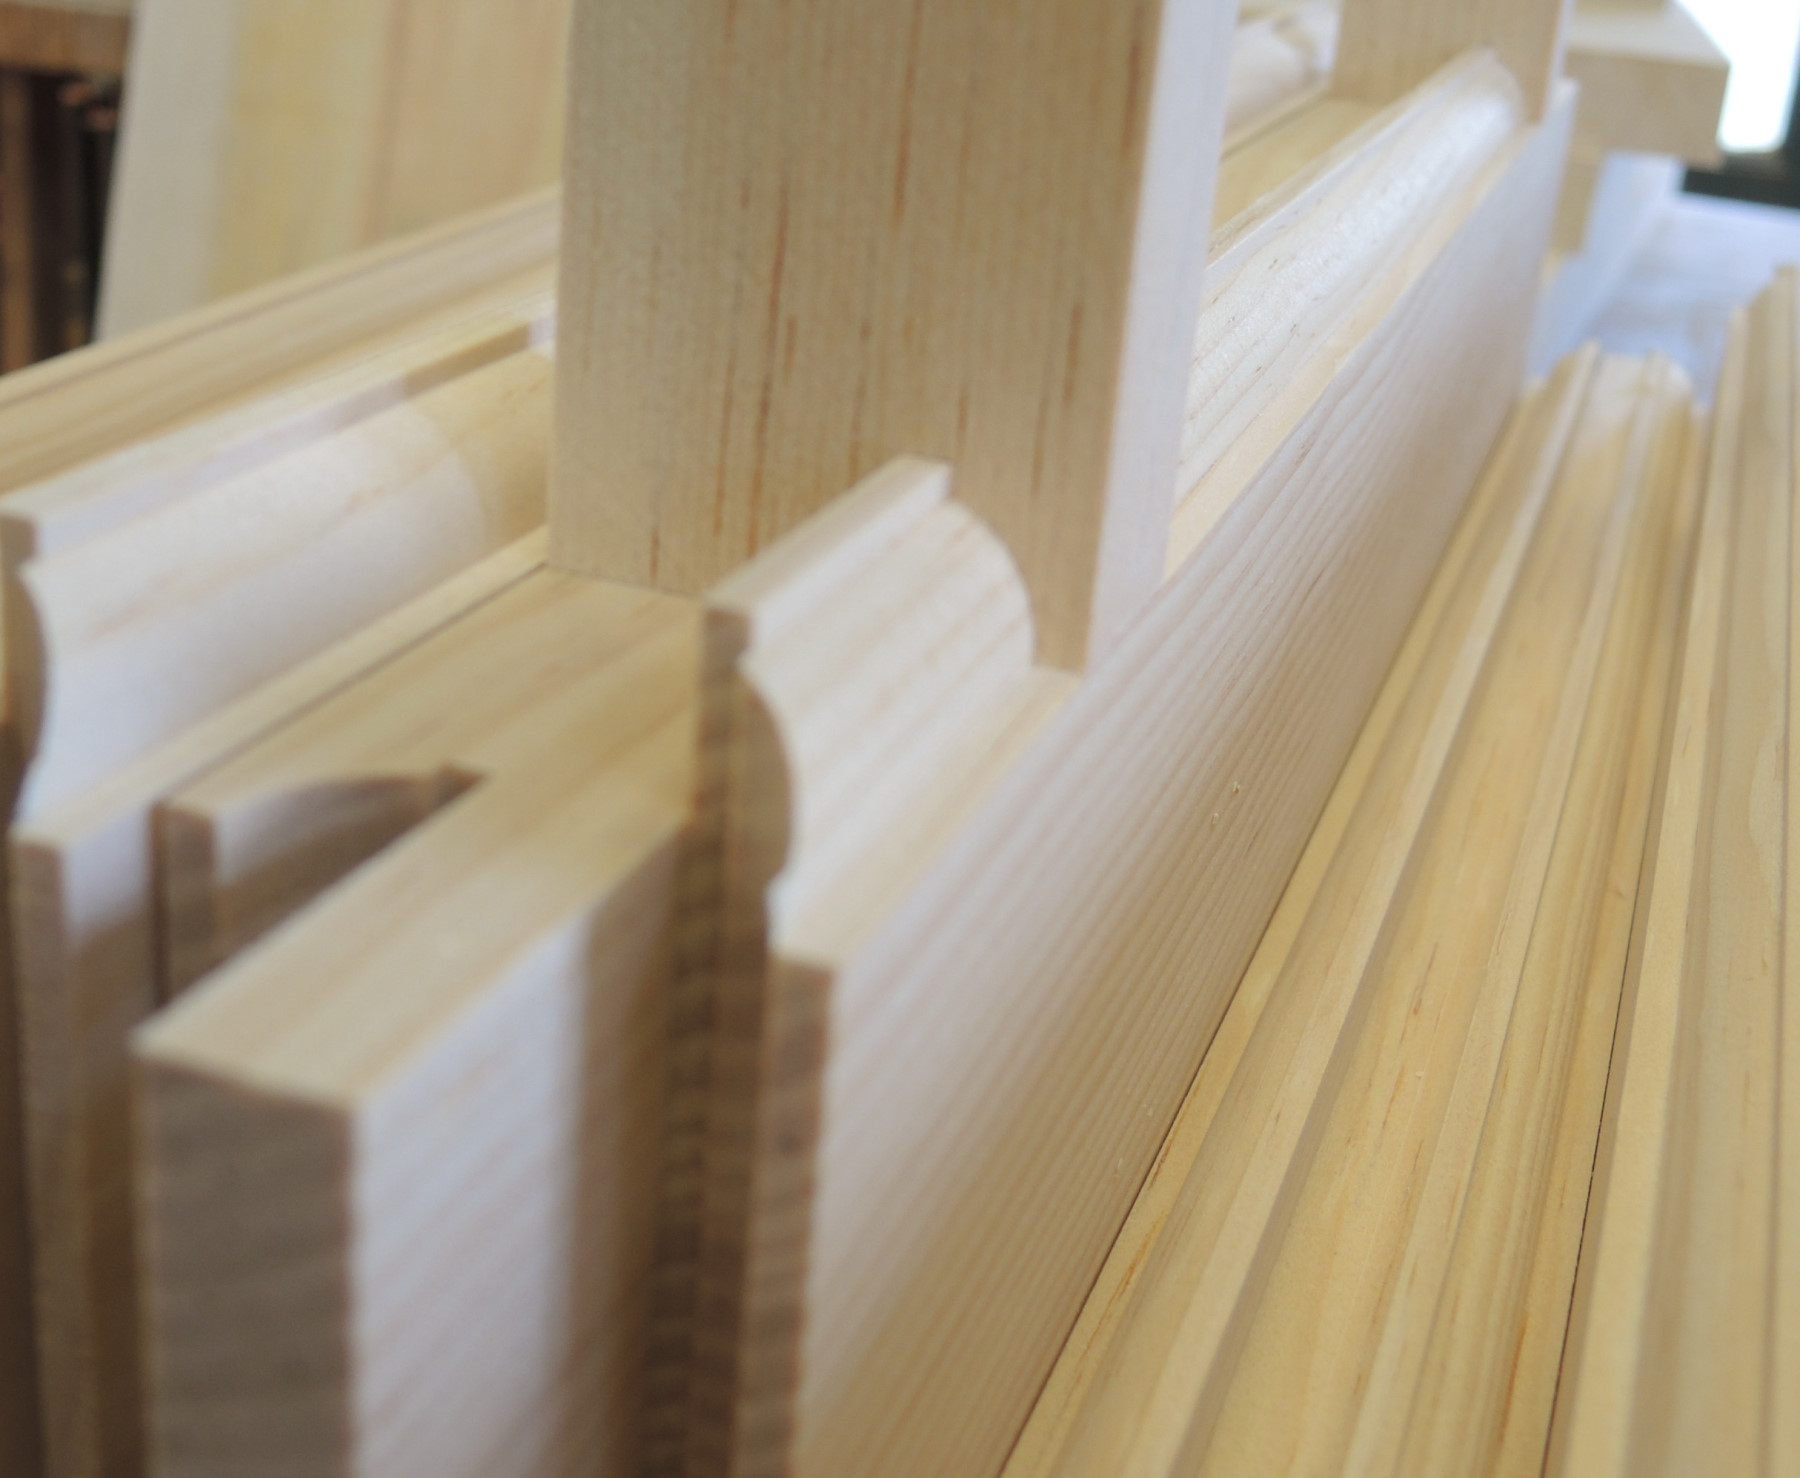
For the muntins, we set up for a top ovolo, a 1/4" wide plow, then spacers to the bottom of the muntin and another 1/4" plow. The muntin is 1/8" wider than finish dimension going in, and coming out. If anything is less that 14" long or shorter, I like to run a 1/4" x 1/2" batten nailed to the fences that the uncut portion of the muntin can ride on. This prevents the dreaded overcut, or the little 4" ones from getting disappeared up the pipe. Even without the auxiliary fence, if a mutt creeps away from the fence, it can be run again. They can't be over cut, or undersized. Both sides get profiled. We use a power feeder for all that we can, and can make other holding apparatus as needed at the shaper.
Then the mutts are taken to the table saw and the waste is sawn out accurately. Side feather boards are used for the first cut, with the waste falling out left of the blade. The second cut is a bit tippy and hard to hold with feather boards, so we have a special fence we use to let the muntin ride on. The surface created in the first rip rides on the special fence - we call it a rabbet fence - to set the final thickness (critical) of the muntin blade. The sticking is just a hair above the rabbet fence, out of the way. We use good push sticks at every saw operation with muntins. And feather boards again. Be sure to save the cut-offs for spacing at assembly. If you don't now see the purpose of it, you will when you get to assembly.
View higher quality, full size image (1800 X 1350)
View higher quality, full size image (1800 X 1350)
7/28/17 #8: Exterior Wood Door Questions ...
We do these a couple different ways.
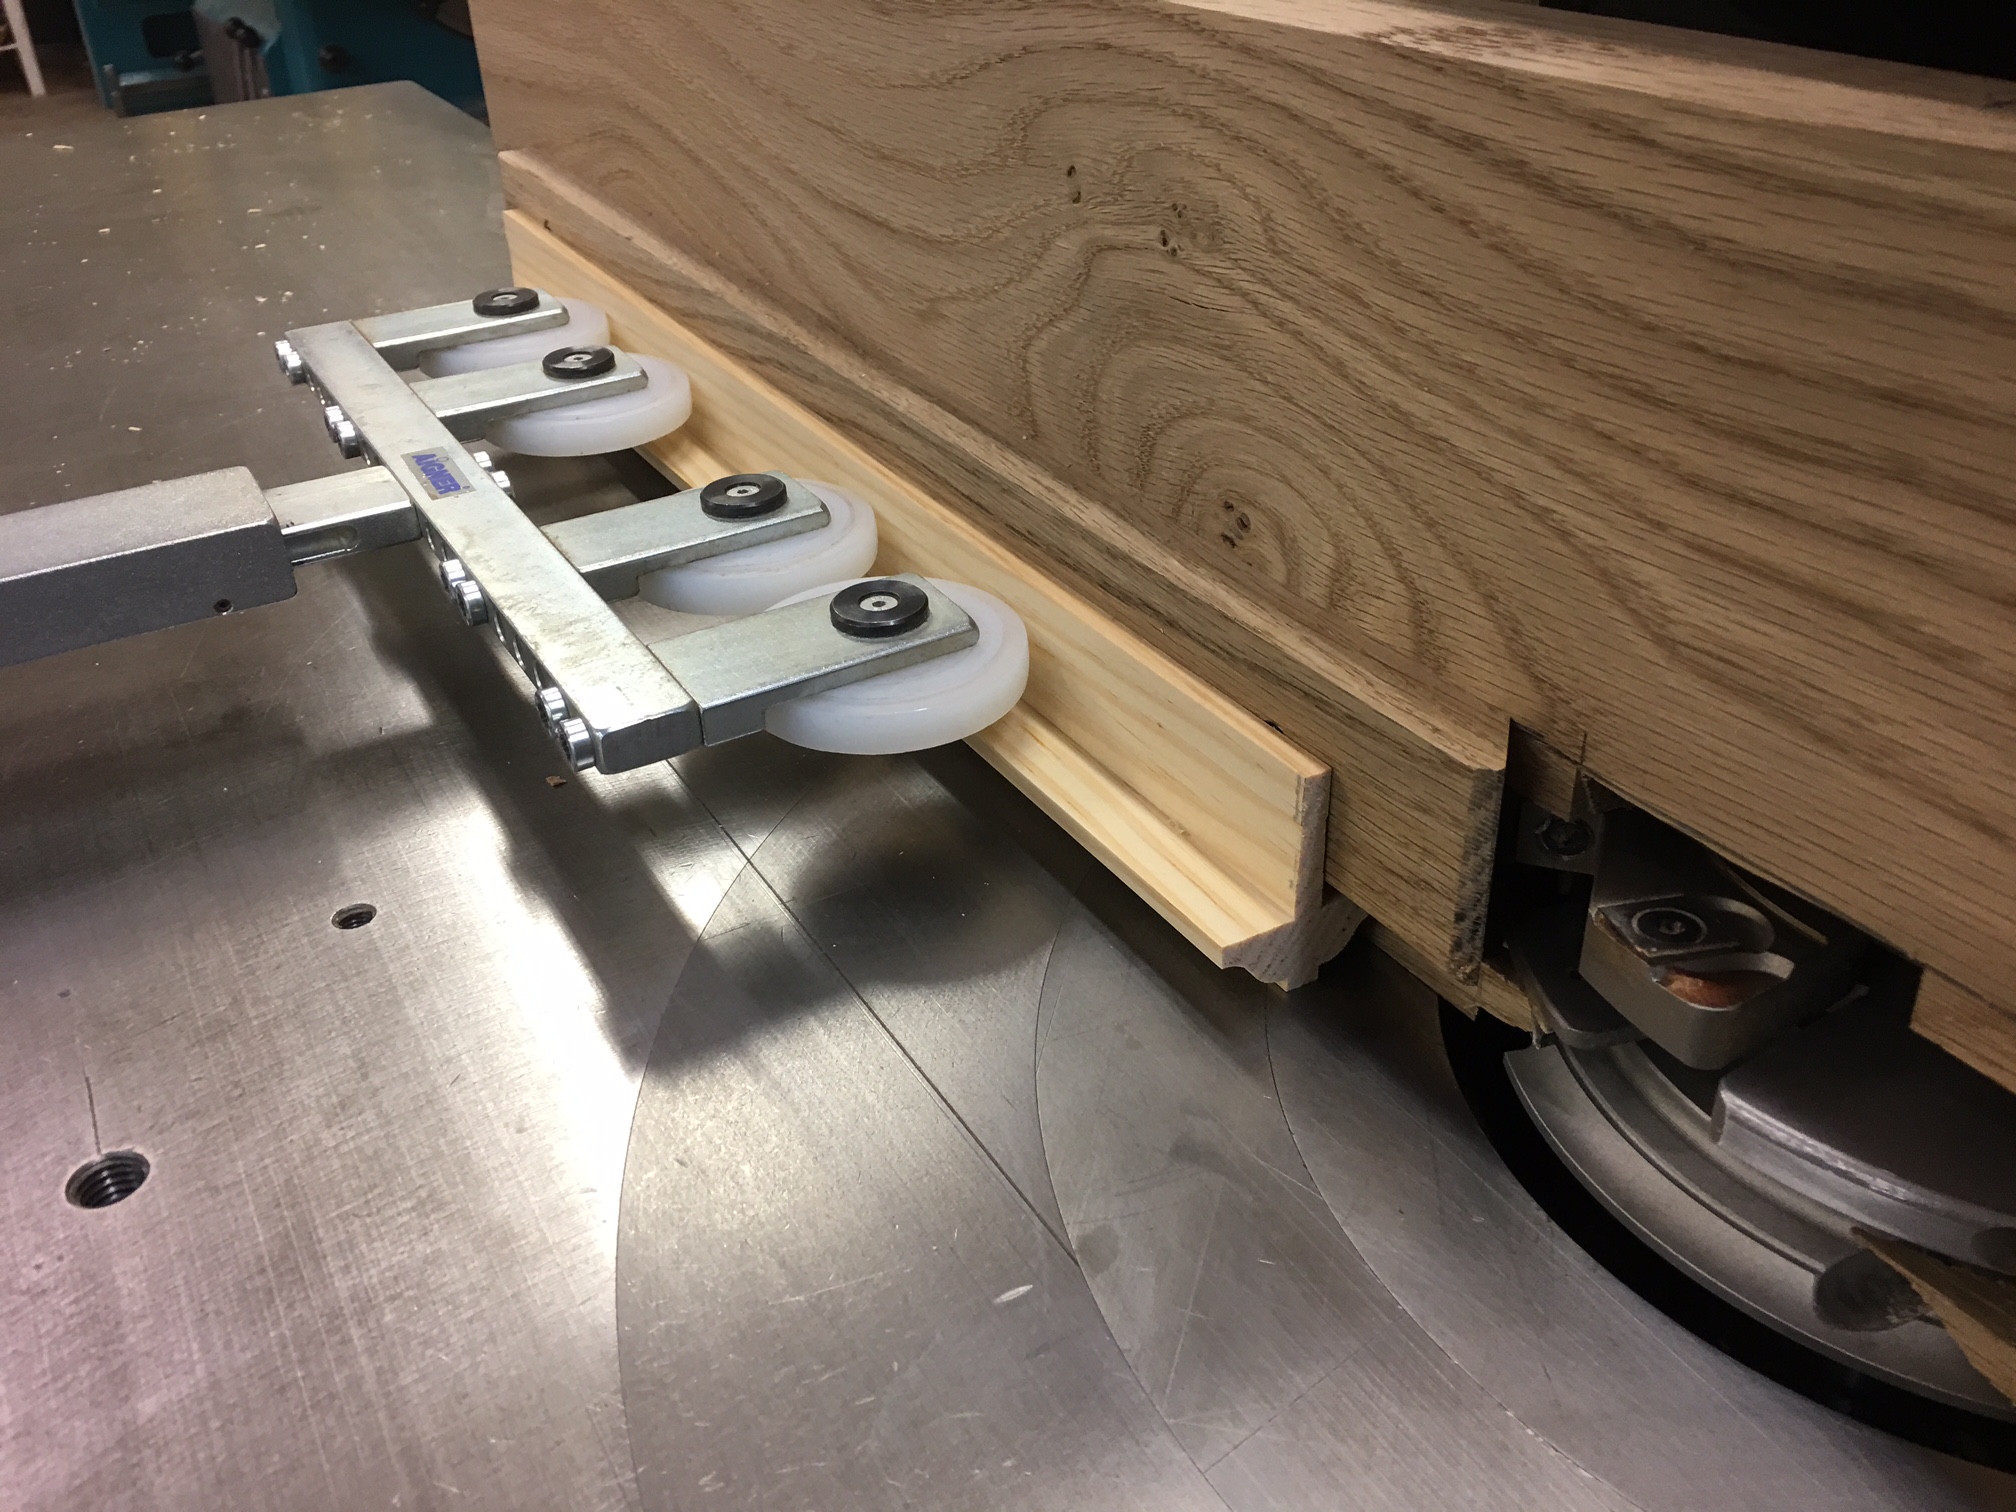
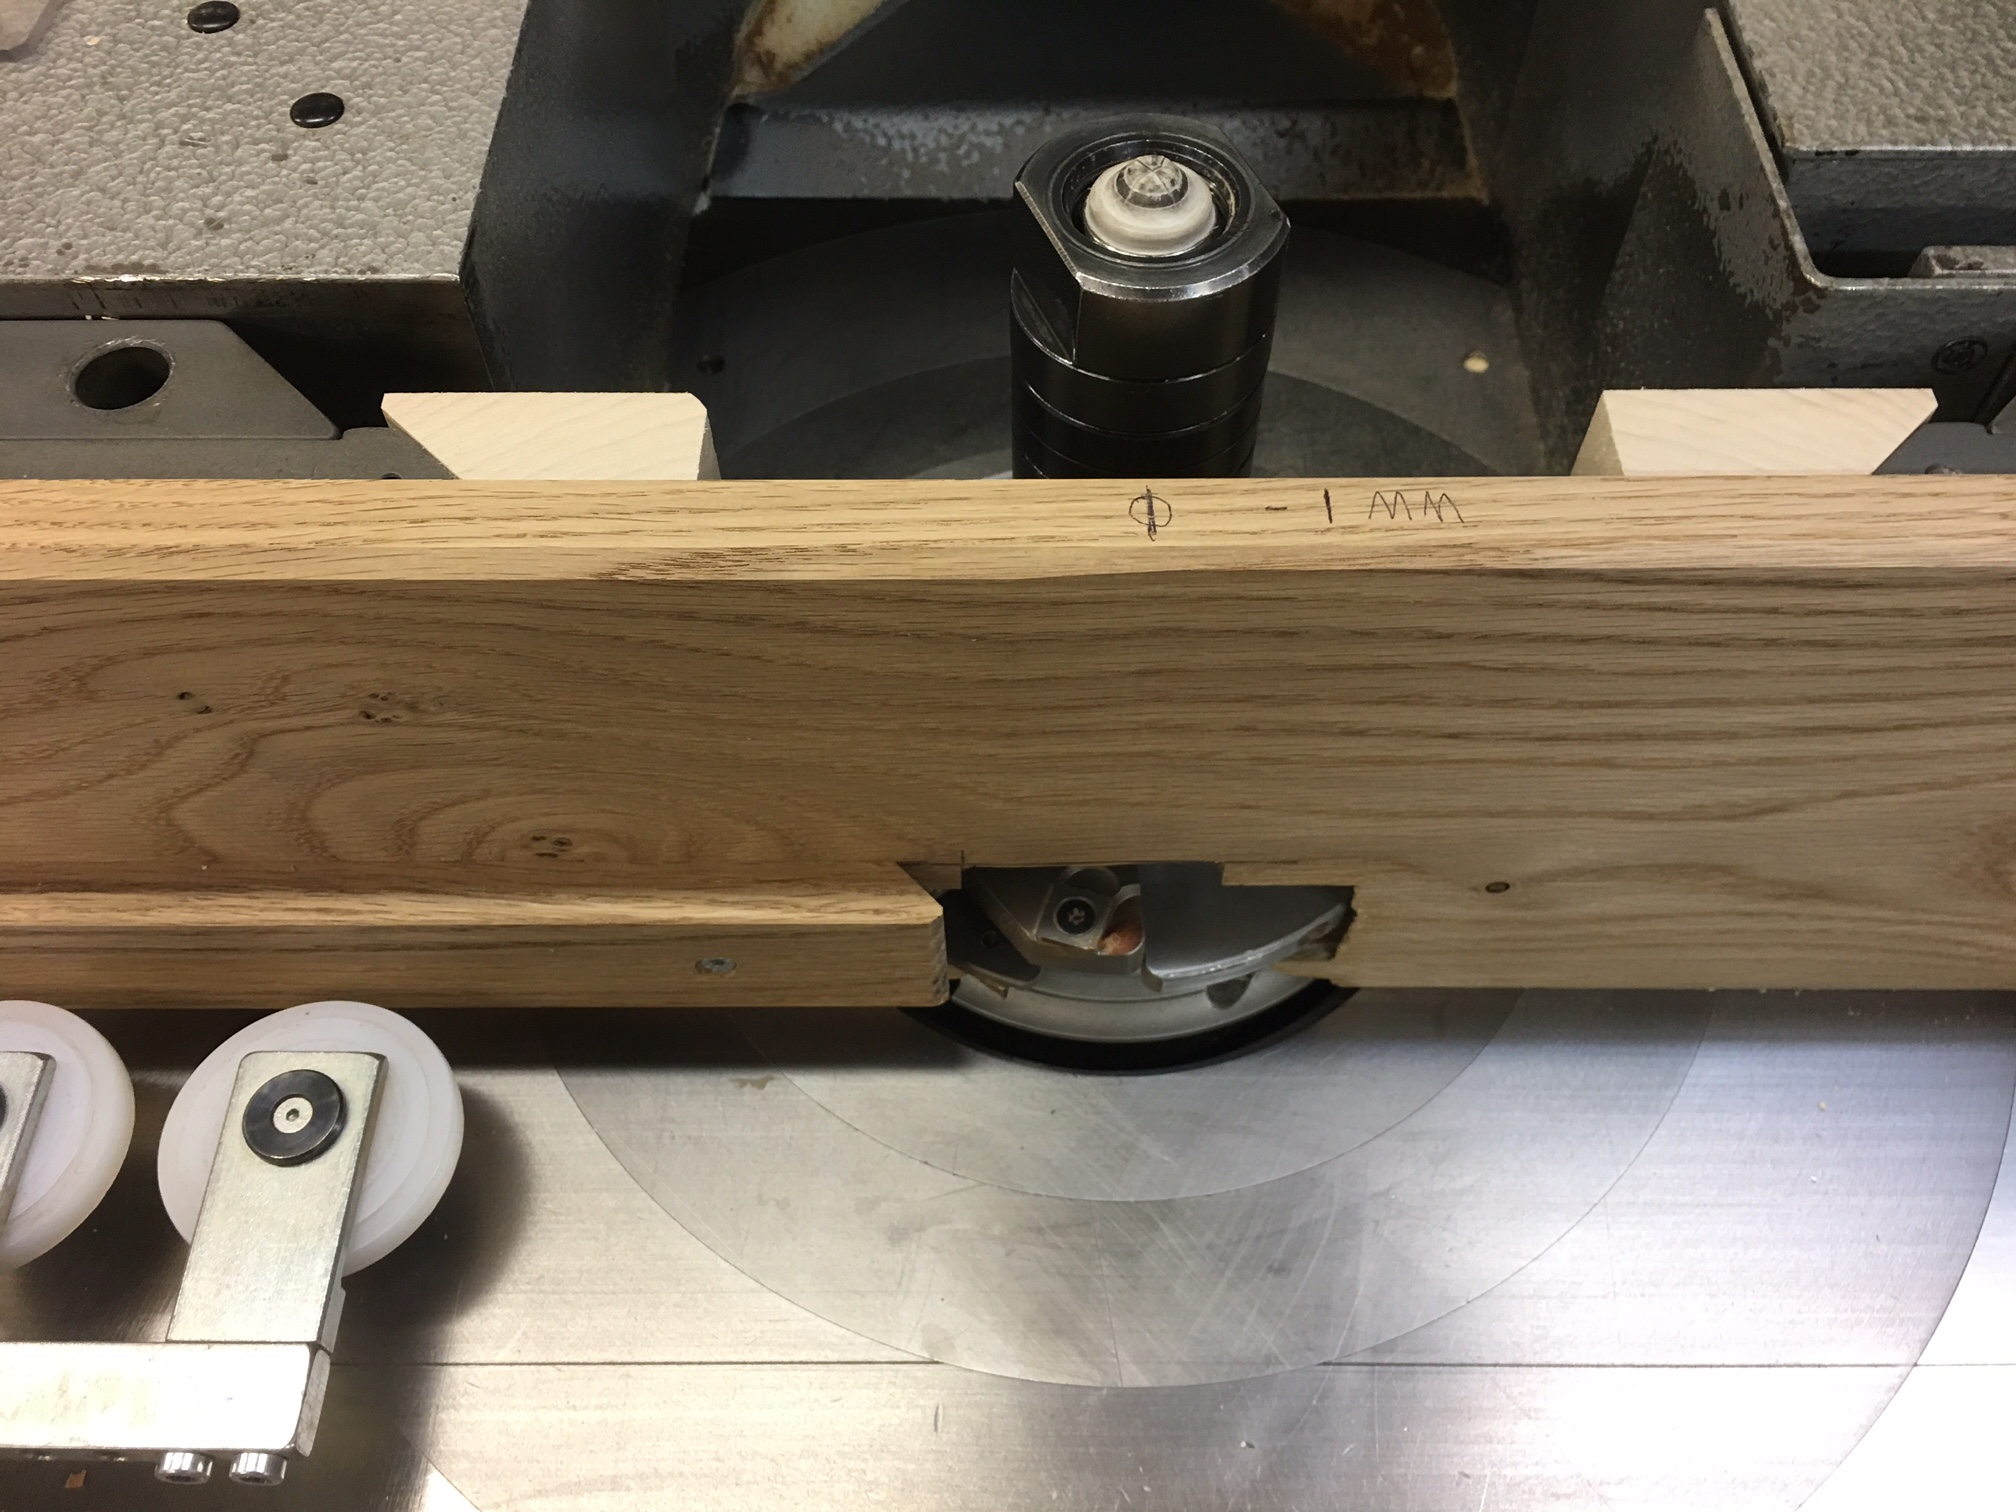
Using the outboard fence we run one side taking the full cut and removing 1mm from the edge. Second cut we make 2 passes because the piece is getting thin. These are cut to length and tenoned or coped first. For short pieces we connect and make a train using slotted pieces between. If coped we dowel the joint and use dowels to connect.
I have seen shops run these on a moulder in lengths and tenon or cope after. It requires a good counter backup with clamp pressure against the workpiece.
View higher quality, full size image (1224 X 1632)
View higher quality, full size image (1632 X 1224)
View higher quality, full size image (1632 X 1224)
7/28/17 #9: Exterior Wood Door Questions ...
Another method that works good on narrow mulls with 1/4" or less wide on the inside is to make it in 2 pieces. We cross lap the profile if square edge or cope and dowel if profiled. The flat piece is cross lap at the center joints and just butts to the stiles and rails. These can be tenoned if you want but I figure with the glass bead in and captured in the profile groove they are not going anywhere.
View higher quality, full size image (2016 X 1512)
7/28/17 #10: Exterior Wood Door Questions ...
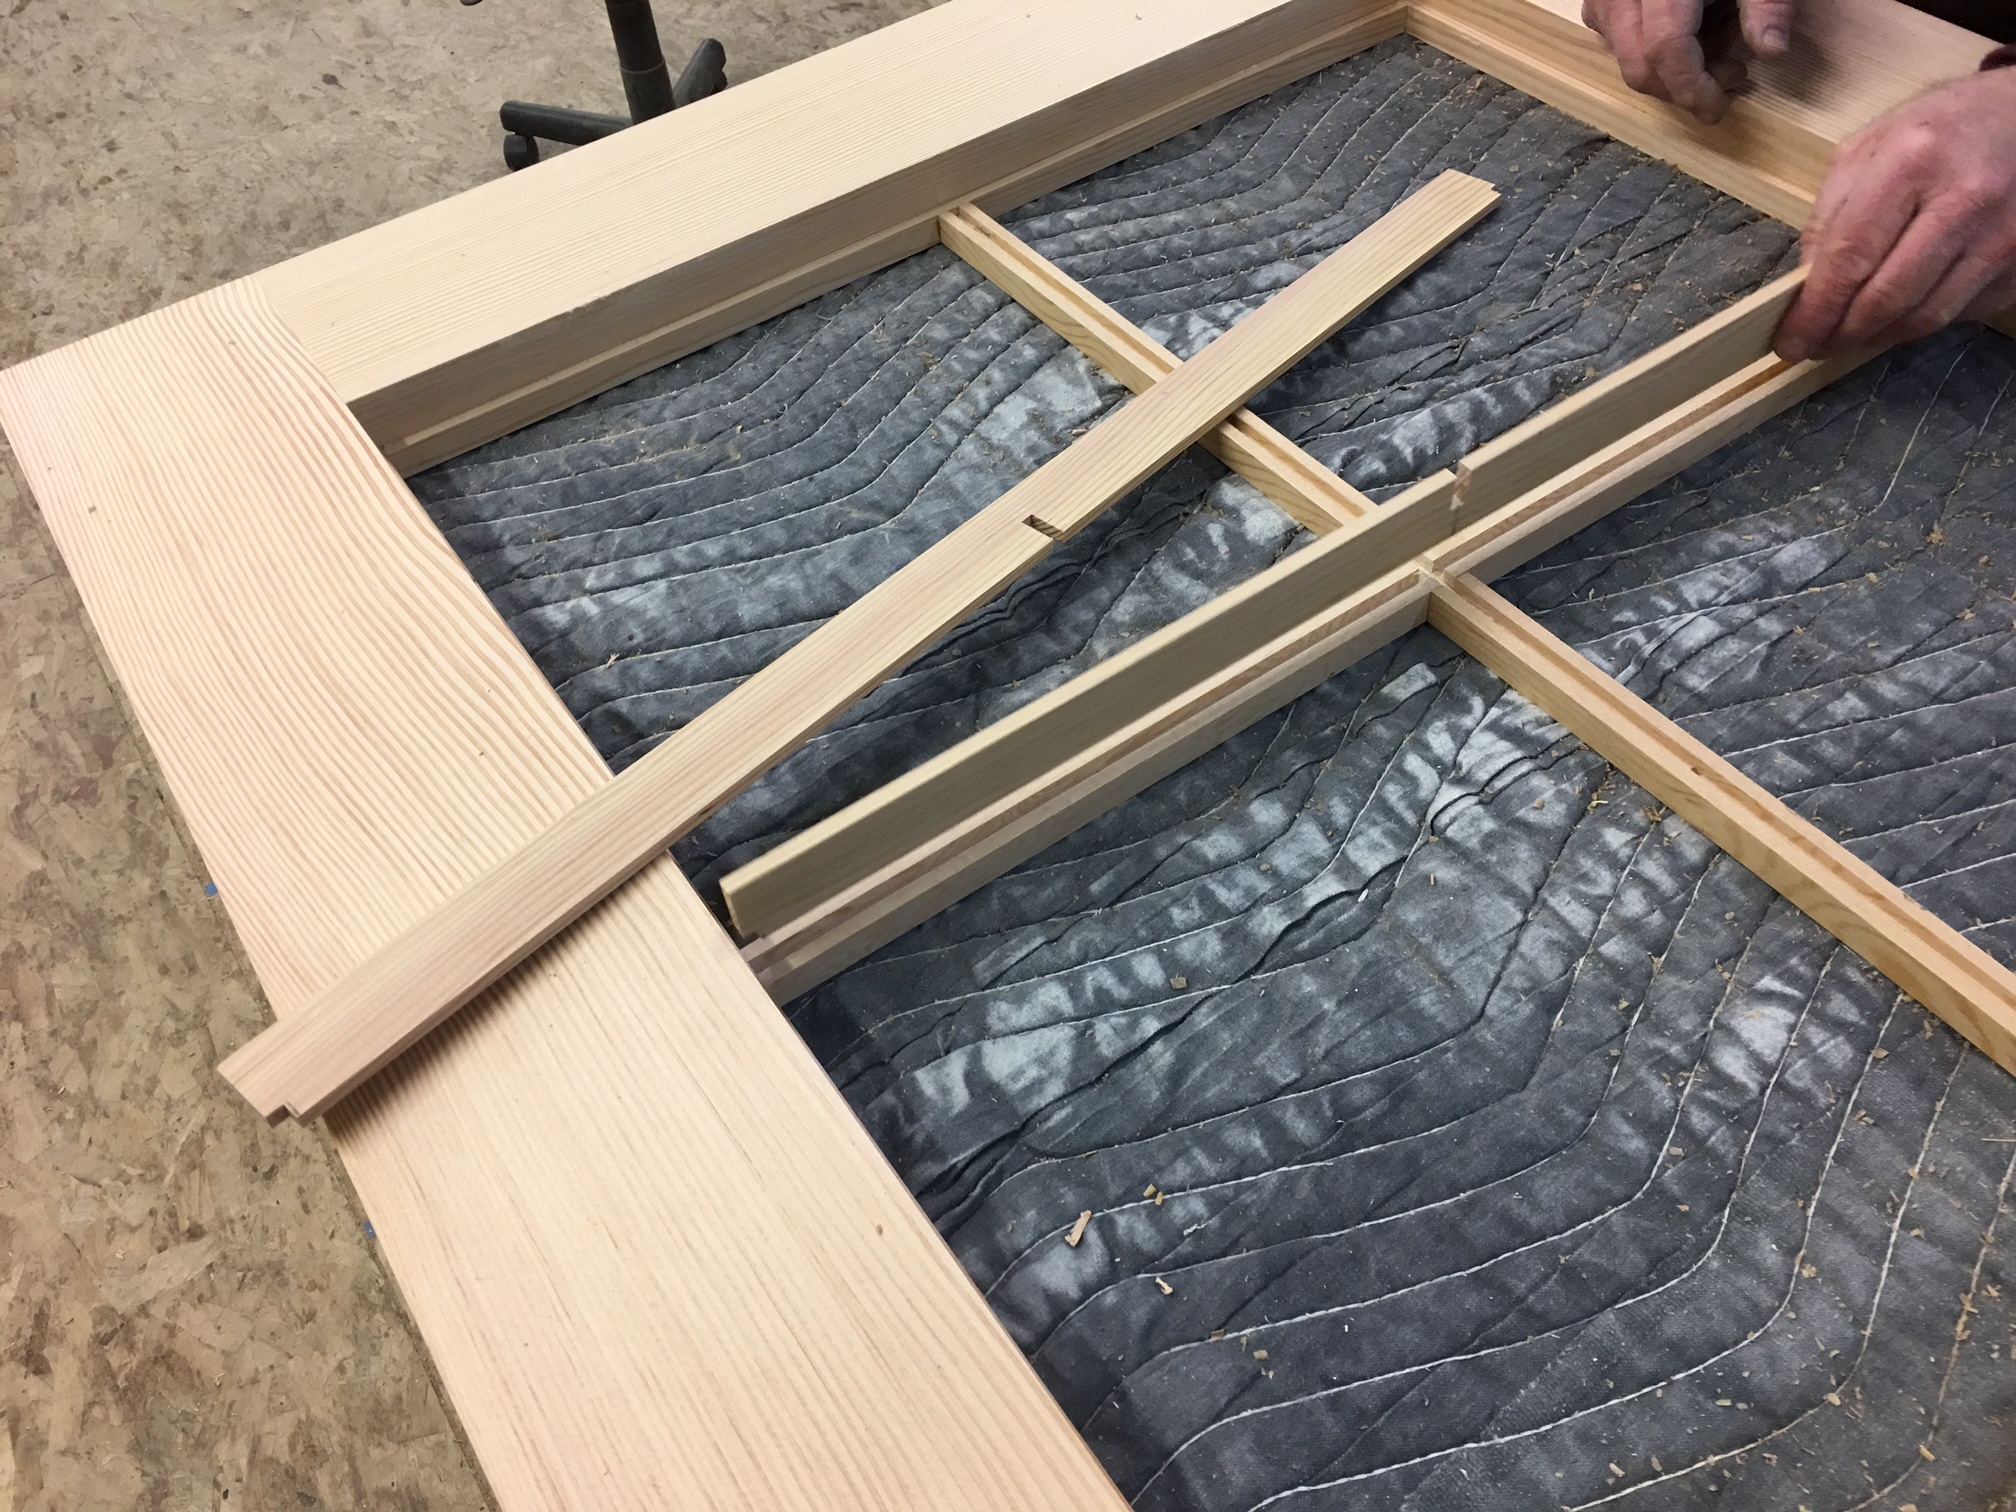
I use the same two piece construction for divided light doors. This is an interior door, but it's the same process regardless. The rectangular frame is cross lapped, and the ends of the muntins have a tenon that fit into shallow mortises in the stiles/rails. The molded top pieces are full length in one direction, usually horizontally, and coped in the other. They are dado-ed on the bottom to fit over the lower frame, and are glued with no pins, dowels, etc.
This is all done on a router table as I have no shaper. The process works equally well on arched doors.
John
View higher quality, full size image (3648 X 2736)
7/28/17 #11: Exterior Wood Door Questions ...
As David mentioned there are many methods to making the skinny short muntins.
I did my first 3 years in a 6 man arch millwork shop. The boss was a very smart skilled old school guy. Doing custom highend doors was a big part of our work. We would do whole houses. 5000sq/ft plus int/ext doors & windows.
Back in the early 90's we had several big jobs doing divided light double insulated glass. I had 20 SA mahogany 15 lights a piece. That is a pile of muntins.
I started with wide short things that looked like rails. 10" wide 5" long roughly. Coped the ends on the sled. Ripped them 1/8" wider than finish width. Then I made two guides with followers. The first is 3" x 36" square edged. The 2nd is made by running a 3" x 36" that is coped on the edge not the end. You fasten a block on the end so nothing gets kicked out the back. Both pieces are fastened to a piece of ply. You now have two accurately made push block/sleds. You run the parts with one then the other. In both operations the part is fully trapped. It cannot move. The feeder thinks its running a stile.
My boss was very impressed. The jigs pumped out parts with a 99% success rate.
We used those for years.I'm not at the shop, so I've got no pics of those specific jigs.
7/28/17 #12: Exterior Wood Door Questions ...
I can't seem to post more than one picture. What's the secret double handshake?
John
7/31/17 #13: Exterior Wood Door Questions ...
I like Joe's and John's two part muntin solution. A good example of problem solving.
I have thought of it a time or two, but opt for keeping things less complicated, fewer parts. If I can do it safely.
My mentor aways smiled and said "You want less parts, not more parts".
7/31/17 #14: Exterior Wood Door Questions ...
The advantage with our method is there are no changes to the head. The ability to hold onto the small part after the first profile cut is the key to the whole operation. The first time I pushed the part into the fully coped sled was a memorable moment. It holds the part so tightly that the cutter head never pulls it out.
We had tried to profile long sticks then cope them, but the reject rate was incredibly high. The guys had been using a small box with push sticks before I invented our profiling sled.
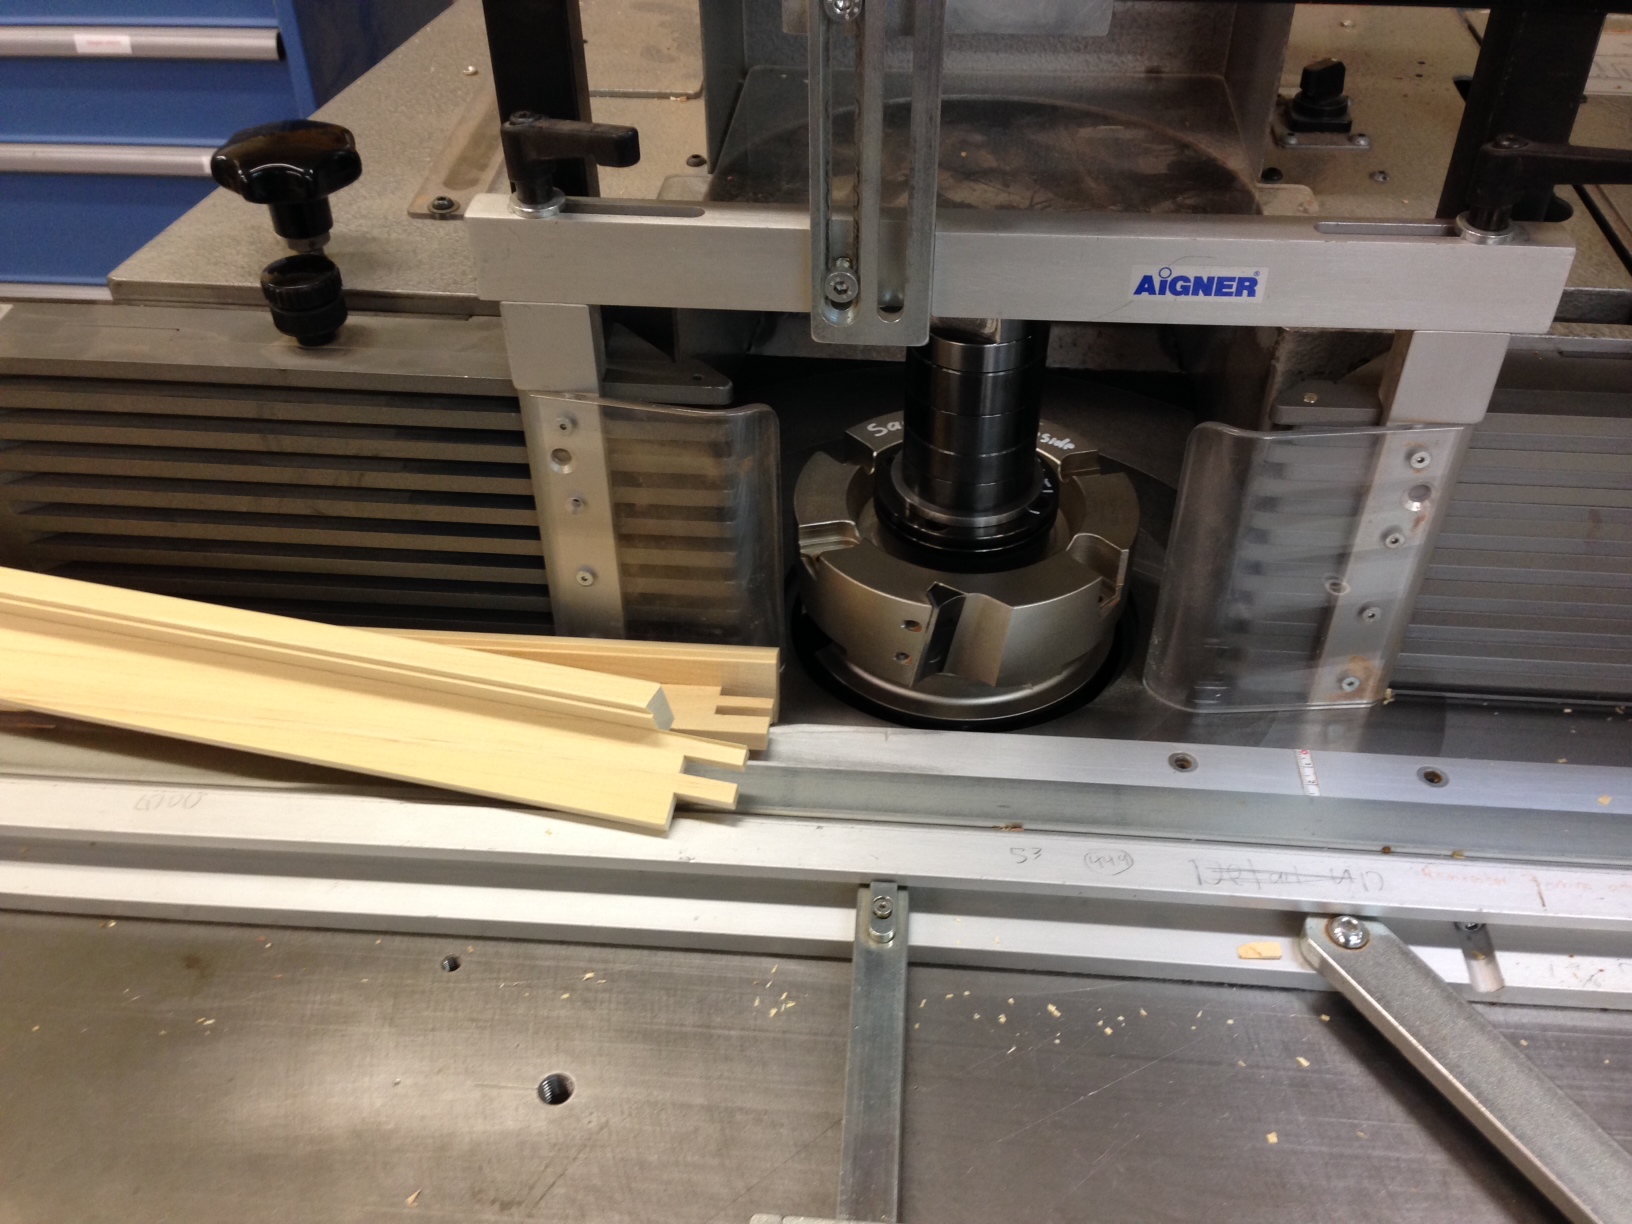
8/10/17 #15: Exterior Wood Door Questions ...
This discussion inspired me to try something I have been thinking about for a while. Now that we have a feeder that quickly changes to feeding against the fence I think it is workable and only requires 2 passes with no jigs. Stegherr uses a similar setup on their shaper attachment for running TDL and SDL. Its sort of the reverse of Adam's method.
The add on zero fence removes 1mm from the edge. Made by running through the planer and droping the bed halfway through. I added a block the same depth as the rebate. 15mm in this case. It worked well.
The true test will be running short butted pieces and 2 1/4" thick material with the tall center of T.
First pass as always is no problem. Second pass I found worked better with 3 wheels feeding and going slower. I put the Aigner rollers on for more support but don't think they are needed. No snipe or tearout at the end. The only change in setup is moving the feed in closer for second passage.
View higher quality, full size image (2016 X 1512)
View higher quality, full size image (2016 X 1512)
View higher quality, full size image (2016 X 1512)
8/11/17 #17: Exterior Wood Door Questions ...
Joe - That looks very good, with a nice set up of holddowns. I used to do 1-3/4" thick muntins that way, and it worked pretty well. The short parts were the ones that always gave us trouble. We just made about 50% extra.
But the 2-1/4" muntins were just too much. For me, if not the machine. That is a lot of wood being removed - 30% in our case. The shorter the worser. A larger machine, heavier fences, and a good feeder tipped over would work for us. We use a SCM T130 with a 4 wheel Maggi. It is hard to tip that thing on its side.
8/15/17 #18: Exterior Wood Door Questions ...
Hi Dave,
I am excited to try this on a real job. I think keeping constant pressure and backup on all parts of the mullion is the key to this. I think Adam's method does the same.
We don't do a lot of small grills or TDL except for historic work and that is usually only a couple doors or a few windows. We did have one large historic job for a ranch on the Santa Fe Trail. We ended up using the outboard fence with a lot of additional hold downs and backing blocks to get through that. Doweling or slotting and tenoning the small parts together we get almost no rejects.
I think a lot of small time door makers are faced with this and cannot justify owning the Stegherr type equipment to make the job easy. The biggest problem we had on the New Mexico job was IG. Whe had to send back over half the units because of sloppy edges. Wish I had known about Green Mountain Glass at the time.
View higher quality, full size image (1536 X 2048)
8/16/17 #19: Exterior Wood Door Questions ...
I think this thread should be added to the knowledge base.
Joe, those Aigner rollers are a nice piece of kit.
We like most shops rarely do the true divided light doors & windows. Its mostly restoration work or one entrance door. The accuracy is by the 1/64" when doing a 15 lite door. It adds up really quickly. Definitely caliper work. Multiply that by 20 doors and you are talking big dollars if it goes sideways. Especially in sa mahogany like we used in the 1990's.
Next time you are making a door without the little mullions/mutins try coping a dummy 2' stile. Then pattern a normal stile. They stick together like the big time. No glue required. This is how my sled works for the little guys.
8/16/17 #20: Exterior Wood Door Questions ...
Adam,
I don't quite grasp your method with the 3" thick material and plywood, but thinking it might be similar to the picture below with a stop block added at the tail to keep the workpiece from kicking out.
We use this method for narrow pre squared window parts on the angle machine to keep from tipping.
View higher quality, full size image (2183 X 2913)
8/17/17 #21: Exterior Wood Door Questions ...
Don't mean to hijack, but on those narrow mullions and muntins, how would you use IGUs without seeing the black sealant around the perimeter? I ask because I currently have three doors like this in the shop, mullions are 1" wide. I typically prefer to have 1/2" or so flat for the window to set in, but these I only have 5/16".
8/18/17 #22: Exterior Wood Door Questions ...
Joe,
Yes its essentially the same thing you've got in the pic.
I didn't describe the jig dimensions properly.
1 3/4 door. You take a 1 3/4" x 3" x 24" fake stile. Instead of patterning it. You cope the long edge. You then screw the thing to a piece of 3/4" ply. Screw a block on the end to keep it from throwing the parts. The feeder thinks this jig is a regular stile so its runs well. The part sits on the sled and is completely jambed into a coped edge. It cannot move.
9/7/17 #23: Exterior Wood Door Questions ...
Website: https://www.comfu.furniture/
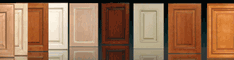
The method of focusing your search begins with the cabinet's door frame and the way the frame fits together, two ways to get involved in four pieces of the frame is called corn and stick and merging. To illustrate the difference, it is more informative to show pictures of these connecting methods. Here is a picture of a coop and stick frame before the assembly. We are also dealing in hotel furniture and hotel fit out.
View higher quality, full size image (640 X 480)
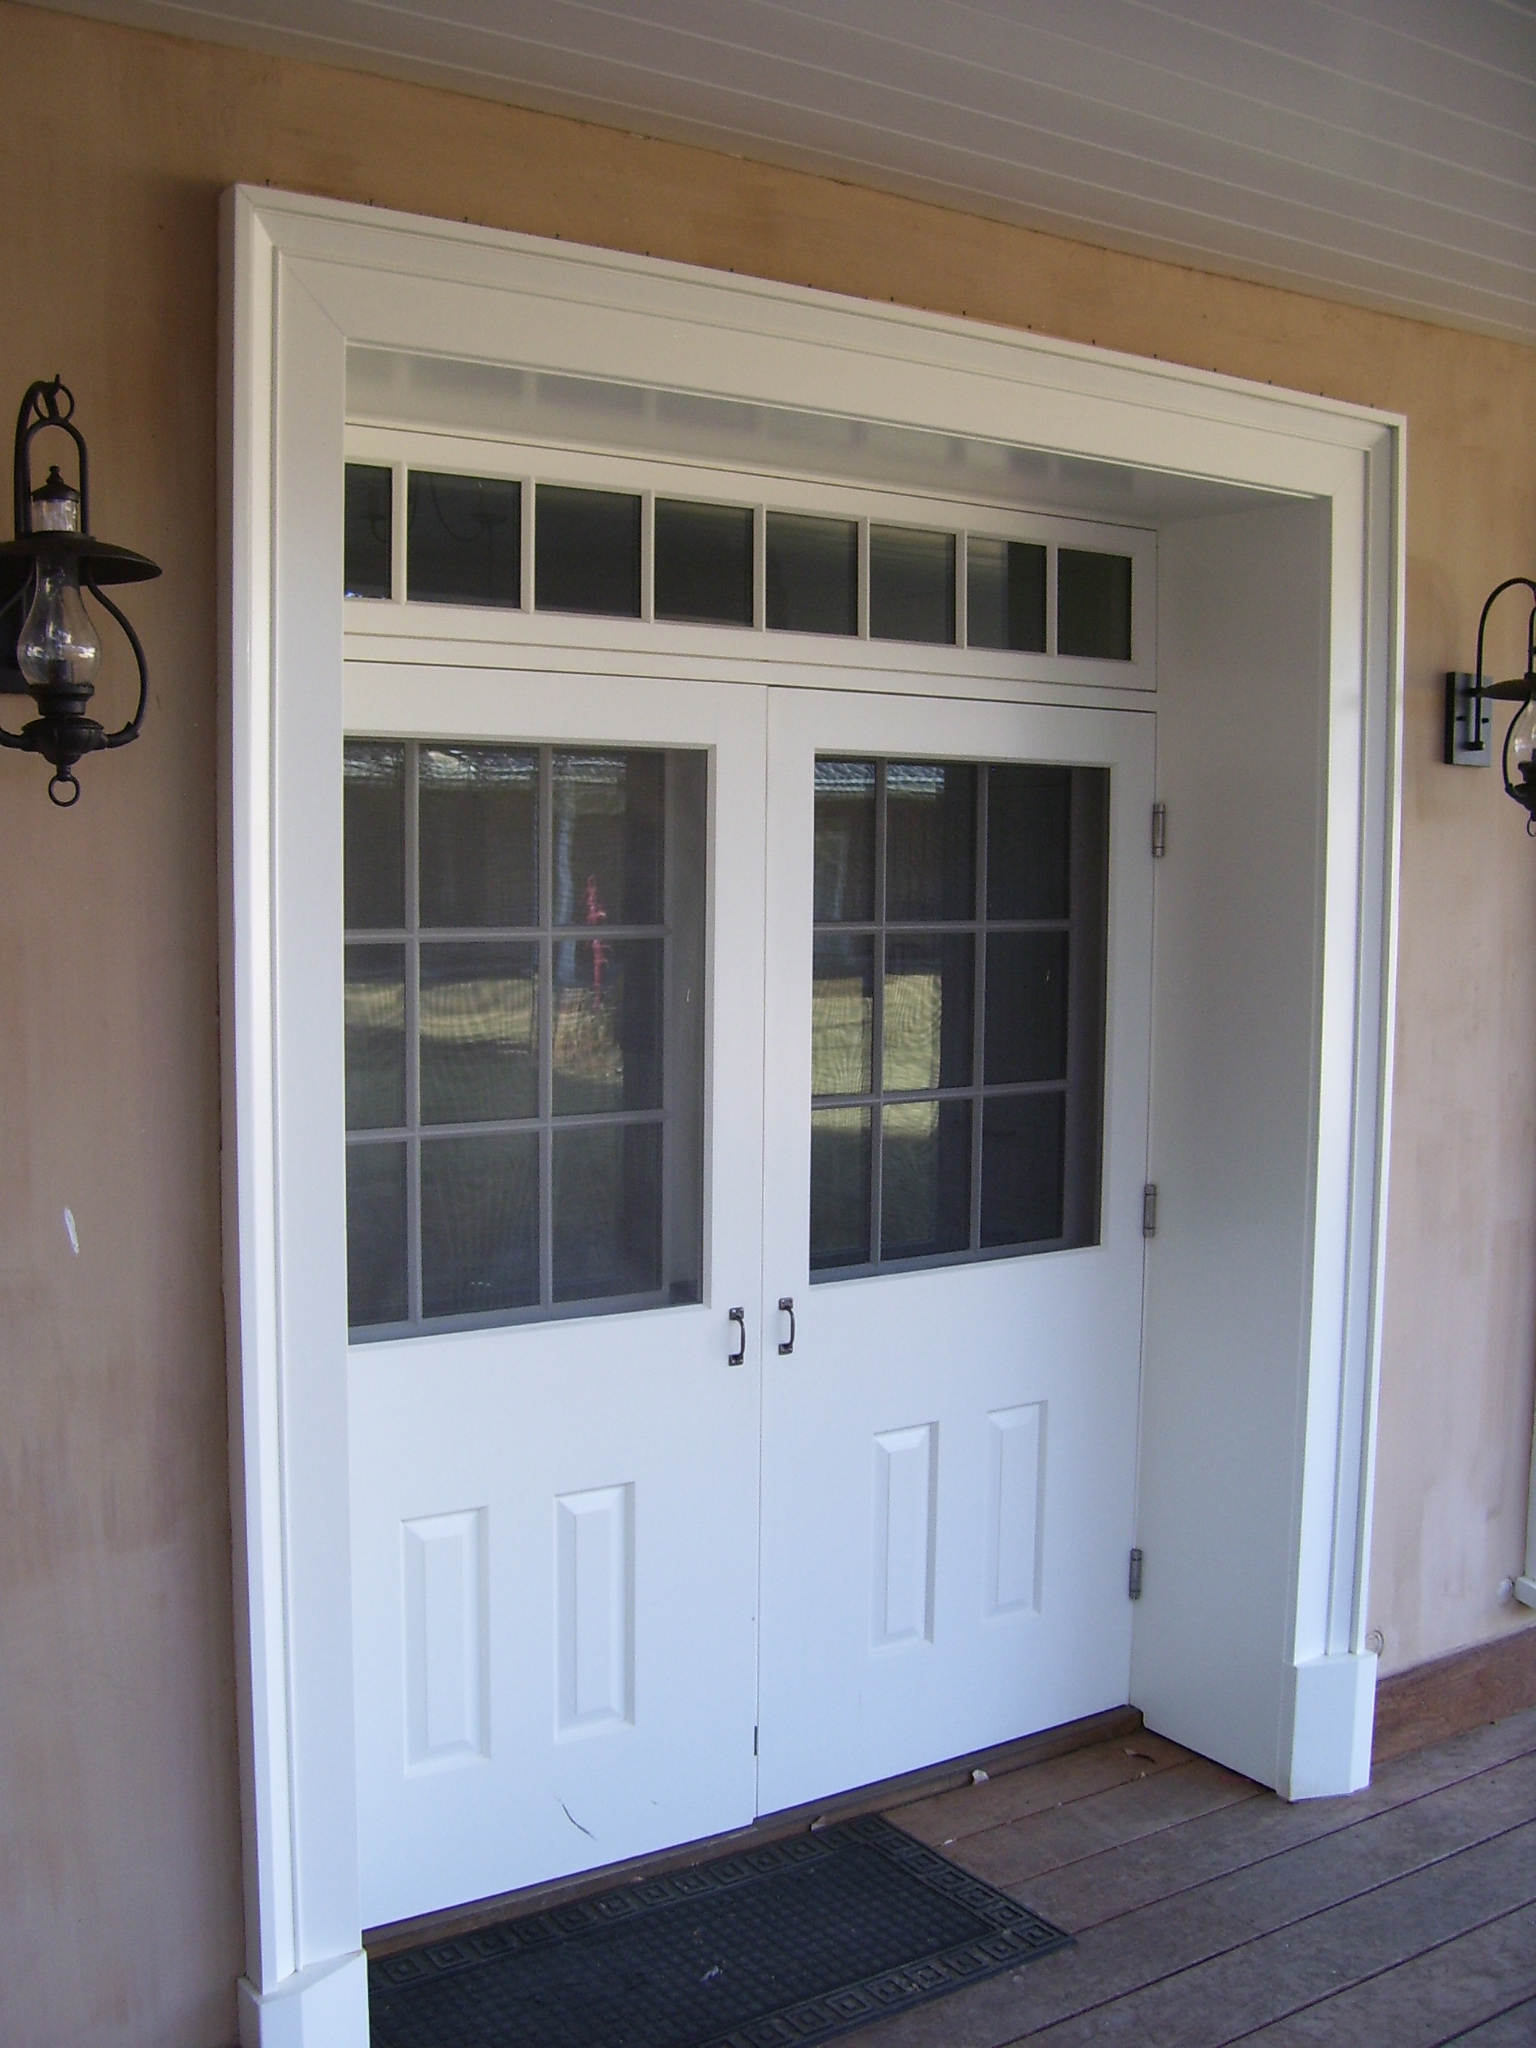
9/12/18 #25: Exterior Wood Door Questions ...
Website: http://www.prodoorbuilder.com
Nice finished product.
Paul
Www.prodoorbuilder.com
|