Architectural Woodworking

You are not logged in. [ Login ] Why log in
(NOTE: Login is not required to post)

entry door builders - how would you handle?

8/21/14       
the google

we built this door about a year and a half ago. stave-core construction with 1/8" skins. all components are sapele mahogany. we used titebond 2 and vacuum bagged our parts. stiles and rails have 5.5" dowels to connect them. we have an interior and exterior raised panel with foam in between. all molding is applied. the door operates very smoothly. also, the door is on the side of a covered porch. it gets wind driven rain and a lot of sun.

the owner called us to have us replace the molding on the bottom panels and to epoxy some split panels because they didn't maintain the one coat of epifanes their contractor applied (bad stuff, i know). anyways, we replaced the molding and did our epoxy work yesterday and i just wanted to know how others would treat the potential for water to get behind the molding. obviously, we cannot simply glue it to the panel, but would they be best served to silicone the gap between the molding and panel, and molding and stiles/rails? we did finish the back of the molding this time but were honest in our sales and warranty process about keeping up with the finish to protect the door.

how would you handle this? are situations like these why a lot of door guys don't do finish work on their doors?


View higher quality, full size image (1920 X 2560)

8/21/14       #2: entry door builders - how would you ...
Geoff

I am going to assume that you built these doors with molding stops. So the molding is glued a piece of wood that is independent from the panel. Given that, I would have applied the molding to the outside of the door, put down a bead of caulk and put in the panels.Basically the same as your glass, except that you have insulation and another panel. The panels are narrow enough that seasonal movement will be small.I have done this in the past with small solid wood panels and on bigger panels that were laminated to reduce seasonal movement. I should also mention that sometimes seal the backside of the molding with epoxy after it has been applied to the door.

You obviously know what you are doing and I hope this post is helpful and not insulting to your understanding of millwork

8/22/14       #3: entry door builders - how would you ...
the google

geoff - thanks for your reply. my skin is pretty thick and i'm often oblivious to insults (insult? what insult?).

we did as you said and originally glued them to the stiles and rails, but didn't do anything against the panel for fear of preventing it from expanding and contracting. this time around we silicone-d under the molding and instructed the homeowner, who is now doing their own finish work, to silicone around the molding on the outside (where the molding meets the stiles and rails) and to silicone all the way around on the inside (where the panel meets the molding). this should keep any water from getting behind the molding.

do you do finish work on doors you build?

8/22/14       #4: entry door builders - how would you ...
David R Sochar Member

I'll first mention some strategies and things I have found over the years. There is no one thing, no absolute (you are used to it by now....), rather a series of strategies that taken together are the best path.

It is good to keep water away from any joint, and then give it a difficult path if it should get into a joint. For doors with molded edges (as opposed to integral sticking), this means a molding with a rabbet. The rabbet gives another layer of barrier, extending onto the face of the door frame. This rabbet needs to be glued at both the frame face and the frame edge. The molding should also be a tight fit in the opening to force the miters (also glued) together and to keep them tight.

We often will miter, spline and assemble some of our larger bolection moldings into a frame, then rabbet on the shaper, then fit into each opening. Sometimes the edge that fits against the door edge gets a 2 degree or so bevel, or a few licks with a rebate plane to ease the fit into the door framing.

Glue needs to squeeze out, and nails can be used, or clamps. But the snug fit is the major strategy. This is what separates custom (overused term) or craftsman built doors from factory work. Glue application and clean up is far too skilled and tedious to give good returns on investment, so they are eliminated.

Moldings that are more than an inch or so should have reinforced miters, hence the technique of assembling frames out of the door. It these are not reinforced, when they do open, they will allow water into everything, as well as daylight.

The idea is to make the exterior molds one with the frame, no movement.

Panels and panel movement discussions are increasingly moving towards the occult as to explain what and why things happen, in my opinion. I advise getting familiar with the Shrinkulator first, and Hoadley's book second, for a good understanding or what is really going on. It is science, not myth or magic, and as such has some predictability and real world application. Remember that absolutes still are rare in this work.

Talking about solid wood panels, most lumber arrives at the shop in a dry condition - in that it is as dry as it will ever be. Especially if it is going into an exterior door. This means the panels are going to expand well before they ever shrink. The next consideration is the width of the panel, and how much one should expect it to move. I see exterior panels in my area (Midwest US) that read about 10-11% after several years outside. Compared to 8% or so at assembly. Those numbers can be plugged into the Shrinkulator to give a real number, with some fluctuation, that helps you know how to size the panel.

I regularly take MC readings on the doors on my house, and I have several 12" wide panels in pattern grade Honduras Mahogany. These panels have not moved enough in 12 years to crack paint on the exterior or varnish on the interior. Species is important. Orientation (flat sawn vs quartered) makes a difference. Honduras does not move. I probably can glue panels of that width in place.

With applied moldings, one has a golden opportunity to do additional things beyond the tight fit moldings to help seal the panel. We use a latex based silicone with high adhesion to flood around the sized panel once it is fit into the opening. This is another barrier.

Integral sticking (molded onto the edge of the rails and stiles) does not give this opportunity, so all on can do is make the panel fit tightly into the plow. Tight enough that it squeaks as the door is clamped and must be centered at assembly, since it cannot be moved to the center of the frame opening once the door is all together.

The tongue faces must be parallel as they enter the plow. It is helpful to have the raise cutters put a slight bevel on the edges to ease fit during a perhaps tense assembly. It is also wise to raise top and bottom faces of the panel at the same pass, with a heavy cutter in a manly shaper. This will give dimensional accuracy need to get and keep the proper fit. Use digital micrometers, and get familiar with them so you can make the proper clearances.

More later.....

8/22/14       #5: entry door builders - how would you ...
the google

david -

good stuff and being familiar with your work and comments - i'm glad you joined the discussion.

we, essentially, did as you directed with our application of the applied molding. we did not spline the miters and i'm not 100% sure if we applied enough glue to have ample squeeze everywhere the molding touched the stiles/rails (too much time as passed and i directed the build but didn't do much of the physical work). i did mention this to our lead, who built the door, but i know he was/is always concerned with the panel being able to move and feel he would have error-ed on using too little glue. he also brad nailed the molding to the stiles/rails.

i'm not sure i follow you 100% with your caulking application. are you caulking the molding to the panel (at, or near where the two come together), or caulking the molding's rabbet? if not at where the molding meets the panel, do you not worry about water getting between the two and wreaking havoc? i think this is what has caused the damage on our door. again, we haven't run into this situation before (and we've built several doors like this) so i cannot say for sure.

8/22/14       #6: entry door builders - how would you ...
David R Sochar Member

Mr Google - We don't put caulk between the panel and the molding since that invites squeezeout that would be too hard to clean up. Yes, that is different from what I said about gluing the rabbets on the bolection moldings. What is life without a little self-contradiction?

Anyway, I'd rather clean glue than caulk.

The panel is laid in place, sometimes with a bit of glue on the panel ends, centered, about 3-6" long, to hold it in place. A brad or two can be used also, but brass or copper is better than steel. Then the caulk is run between the panel edge/end and the rabbet, filling it and a bit more. Special care is reserved for the lower edges on the lower panels. Then the other molding is applied - glued, splined, and clamped in place as to bite down hard on that panel. It can be nailed, but glue and clamps are what should be used to get it right.

By now, several problems have been spotted by those following along at home. Yes, it is the devil to get frame thickness, panel tongue thickness and two molding rabbets all the correct dimensions so the rabbets sit down tight to the frames, squeeze the panel tight, and there are no gaps. A bit of sloppiness can multiply and you find yourself fiddling here, there, and everywhere. Start with accuracy and preserve it as you go.

We calibrate the planer and it is accurate and predictable to a few thousandths. All frame parts are run the same time, the same setting, the same place on the planer's width. It another piece is made, it is micro-metered in to be sure it is a match. The moldings are now made by a shaper, but were once molder run. The stock is sized, the profile is made, then the rabbet is made, referencing from the bottom of the molding for accuracy. This is often climb cut on the shaper, and sometimes done after the mitering and assembly of the frames. At one time, the assembled frames were all sent thru the widebelt to level the backs dead flat, then rabbeted to make for perfect fits to the frame and panel.

The shaper we have can not do the larger raises both sides in one pass, so again, we plane all the panels at the same time, and run a panel head above the tongue. We often do 80% of the cut in one quick go, then the final pass once it is all tuned in. A 4 wheel power feeder is used.

But....there is more. When I can, I'll post a drawing that shows how we solved the problems with wide moldings and such. Be sure to keep tuned in!

8/23/14       #7: entry door builders - how would you ...
David R Sochar Member

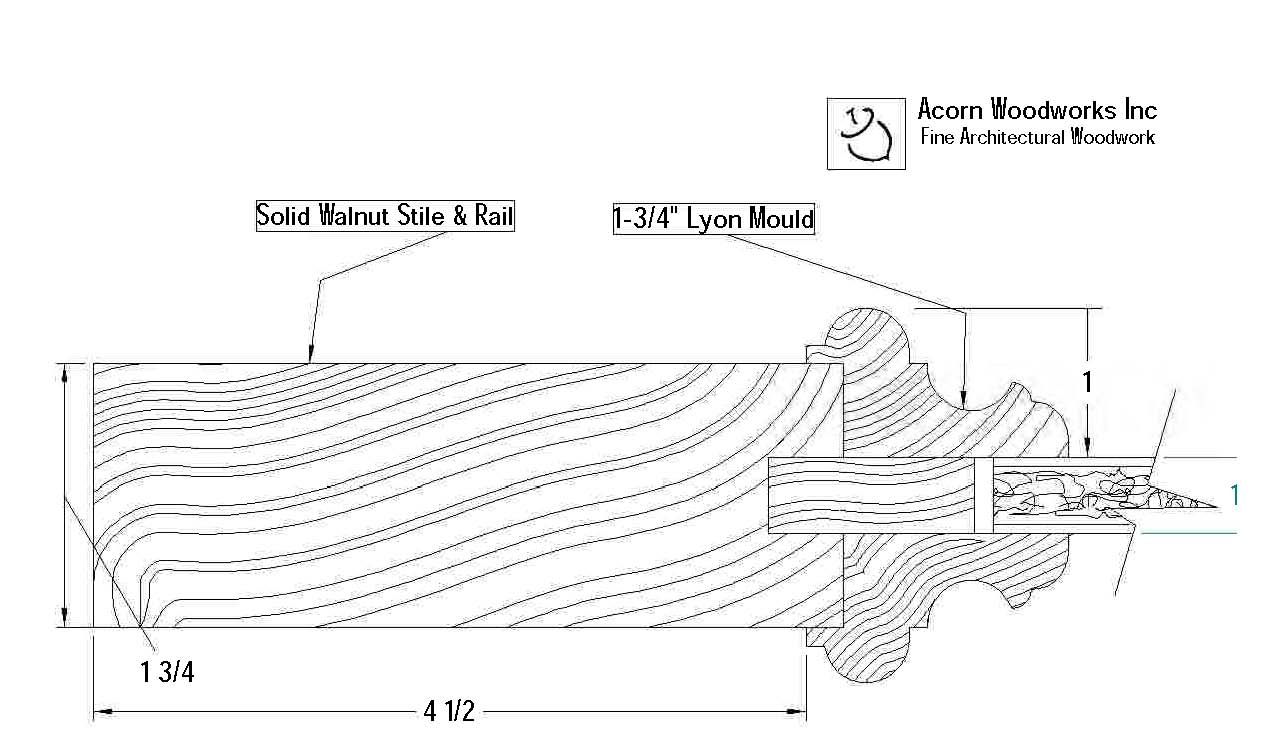
So.... the problem with moldings once they get over 5/8" or so in width is that they offer little surface to glue with, especially in relation to their width or projection away from the door frame. The bulk of the molding is contact with the panel, and that can be used for alignment - to keep the moldings level/square - but the molding cannot be fastened to the panel for the obvious reasons.

This is especially critical if there is no rabbet on the panel molding to serve as a depth gauge. This may leave a 1-1/2" wide molding with as little as 1/2" on its outside edge with which to glue/fasten to the stiles and rails. Not a good situation at all. Especially for an exterior door.

Enter the solution as shown in the section drawing. The drawing shows a typical 1-3/4" door with one of our bolection molding both sides, and a panel of veneered stable board. Note the spline or 'landed' surface as we have termed it. This piece is fixed (glued) into the stile and rail edges and gives a solid, square, and flat surface which the moldings can bear upon. This gives the maker several advantages, the first being increased glue surface. Secondly, it also reinforces the miter effectively enough with most moldings. Thirdly, it helps one stay sane by preventing callbacks.

The landed surface can be sized to provide 1/2" rabbets or whatever coverage is desired for the panels. This landed surface also can be made of a precise thickness so as to help clamp down tightly on the panels. The landed surface is fit into the door at assembly, and is glued into place, with butt joints at the corners. It is sized so that it it tapped into place and the fit is tight enough to hold it where it belongs.

Now the miters can be reinforced, and all the efforts to make good accurate square moldings will work with the landed surface to make for a very tight system that will still allow that dang panel to move.


View higher quality, full size image (1275 X 732)


Post a Response
  • Notify me of responses to this thread
  • Subscribe to email updates on this Forum
  • To receive email notification of additions to this forum thread,
    enter your name and email address, and then click the
    "Keep Me Posted" button below.

    Please Note: If you have posted a message or response,
    do not submit this request ... you are already signed up
    to receive notification!

    Your Name:
    E-Mail Address:
    Enter the correct numbers into the field below:
     

    Date of your Birth:


    Return to top of page

    Buy & Sell Exchanges | Forums | Galleries | Site Map

    FORUM GUIDELINES: Please review the guidelines below before posting at WOODWEB's Interactive Message Boards (return to top)

  • WOODWEB is a professional industrial woodworking site. Hobbyist and homeowner woodworking questions are inappropriate.
  • Messages should be kept reasonably short and on topic, relating to the focus of the forum. Responses should relate to the original question.
  • A valid email return address must be included with each message.
  • Advertising is inappropriate. The only exceptions are the Classified Ads Exchange, Machinery Exchange, Lumber Exchange, and Job Opportunities and Services Exchange. When posting listings in these areas, review the posting instructions carefully.
  • Subject lines may be edited for length and clarity.
  • "Cross posting" is not permitted. Choose the best forum for your question, and post your question at one forum only.
  • Messages requesting private responses will be removed - Forums are designed to provide information and assistance for all of our visitors. Private response requests are appropriate at WOODWEB's Exchanges and Job Opportunities and Services.
  • Messages that accuse businesses or individuals of alleged negative actions or behavior are inappropriate since WOODWEB is unable to verify or substantiate the claims.
  • Posts with the intent of soliciting answers to surveys are not appropriate. Contact WOODWEB for more information on initiating a survey.
  • Excessive forum participation by an individual upsets the balance of a healthy forum atmosphere. Individuals who excessively post responses containing marginal content will be considered repeat forum abusers.
  • Responses that initiate or support inappropriate and off-topic discussion of general politics detract from the professional woodworking focus of WOODWEB, and will be removed.
  • Participants are encouraged to use their real name when posting. Intentionally using another persons name is prohibited, and posts of this nature will be removed at WOODWEB's discretion.
  • Comments, questions, or criticisms regarding Forum policies should be directed to WOODWEB's Systems Administrator
    (return to top).

    Carefully review your message before clicking on the "Send Message" button - you will not be able to revise the message once it has been sent.

    You will be notified of responses to the message(s) you posted via email. Be sure to enter your email address correctly.

    WOODWEB's forums are a highly regarded resource for professional woodworkers. Messages and responses that are crafted in a professional and civil manner strengthen this resource. Messages that do not reflect a professional tone reduce the value of our forums.

    Messages are inappropriate when their content: is deemed libelous in nature or is based on rumor, fails to meet basic standards of decorum, contains blatant advertising or inappropriate emphasis on self promotion (return to top).

    Libel:   Posts which defame an individual or organization, or employ a tone which can be viewed as malicious in nature. Words, pictures, or cartoons which expose a person or organization to public hatred, shame, disgrace, or ridicule, or induce an ill opinion of a person or organization, are libelous.

    Improper Decorum:   Posts which are profane, inciting, disrespectful or uncivil in tone, or maliciously worded. This also includes the venting of unsubstantiated opinions. Such messages do little to illuminate a given topic, and often have the opposite effect. Constructive criticism is acceptable (return to top).

    Advertising:   The purpose of WOODWEB Forums is to provide answers, not an advertising venue. Companies participating in a Forum discussion should provide specific answers to posted questions. WOODWEB suggests that businesses include an appropriately crafted signature in order to identify their company. A well meaning post that seems to be on-topic but contains a product reference may do your business more harm than good in the Forum environment. Forum users may perceive your references to specific products as unsolicited advertising (spam) and consciously avoid your web site or services. A well-crafted signature is an appropriate way to advertise your services that will not offend potential customers. Signatures should be limited to 4-6 lines, and may contain information that identifies the type of business you're in, your URL and email address (return to top).

    Repeated Forum Abuse: Forum participants who repeatedly fail to follow WOODWEB's Forum Guidelines may encounter difficulty when attempting to post messages.

    There are often situations when the original message asks for opinions: "What is the best widget for my type of shop?". To a certain extent, the person posting the message is responsible for including specific questions within the message. An open ended question (like the one above) invites responses that may read as sales pitches. WOODWEB suggests that companies responding to such a question provide detailed and substantive replies rather than responses that read as a one-sided product promotion. It has been WOODWEB's experience that substantive responses are held in higher regard by our readers (return to top).

    The staff of WOODWEB assume no responsibility for the accuracy, content, or outcome of any posting transmitted at WOODWEB's Message Boards. Participants should undertake the use of machinery, materials and methods discussed at WOODWEB's Message Boards after considerate evaluation, and at their own risk. WOODWEB reserves the right to delete any messages it deems inappropriate. (return to top)


  • Forum Posting Help
    Your Name The name you enter in this field will be the name that appears with your post or response (return to form).
    Your Website Personal or business website links must point to the author's website. Inappropriate links will be removed without notice, and at WOODWEB's sole discretion. WOODWEB reserves the right to delete any messages with links it deems inappropriate. (return to form)
    E-Mail Address Your e-mail address will not be publicly viewable. Forum participants will be able to contact you using a contact link (included with your post) that is substituted for your actual address. You must include a valid email address in this field. (return to form)
    Subject Subject may be edited for length and clarity. Subject lines should provide an indication of the content of your post. (return to form)
    Thread Related Link and Image Guidelines Thread Related Links posted at WOODWEB's Forums and Exchanges should point to locations that provide supporting information for the topic being discussed in the current message thread. The purpose of WOODWEB Forums is to provide answers, not to serve as an advertising venue. A Thread Related Link that directs visitors to an area with inappropriate content will be removed. WOODWEB reserves the right to delete any messages with links or images it deems inappropriate. (return to form)
    Thread Related File Uploads Thread Related Files posted at WOODWEB's Forums and Exchanges should provide supporting information for the topic being discussed in the current message thread. Video Files: acceptable video formats are: .MOV .AVI .WMV .MPEG .MPG .MP4 (Image Upload Tips)   If you encounter any difficulty when uploading video files, E-mail WOODWEB for assistance. The purpose of WOODWEB Forums is to provide answers, not to serve as an advertising venue. A Thread Related File that contains inappropriate content will be removed, and uploaded files that are not directly related to the message thread will be removed. WOODWEB reserves the right to delete any messages with links, files, or images it deems inappropriate. (return to form)