Message Thread:
Wooden range hoods
4/1/25

I have a wooden range hood to build. Queston is what are you all that build these with the swoop sides and fronts using to make these bends. I am thinking MDF but all i have excess to is 1/2. Will this work if you make enough relief cuts on the back side? Thanks
4/1/25 #2: Wooden range hoods ...
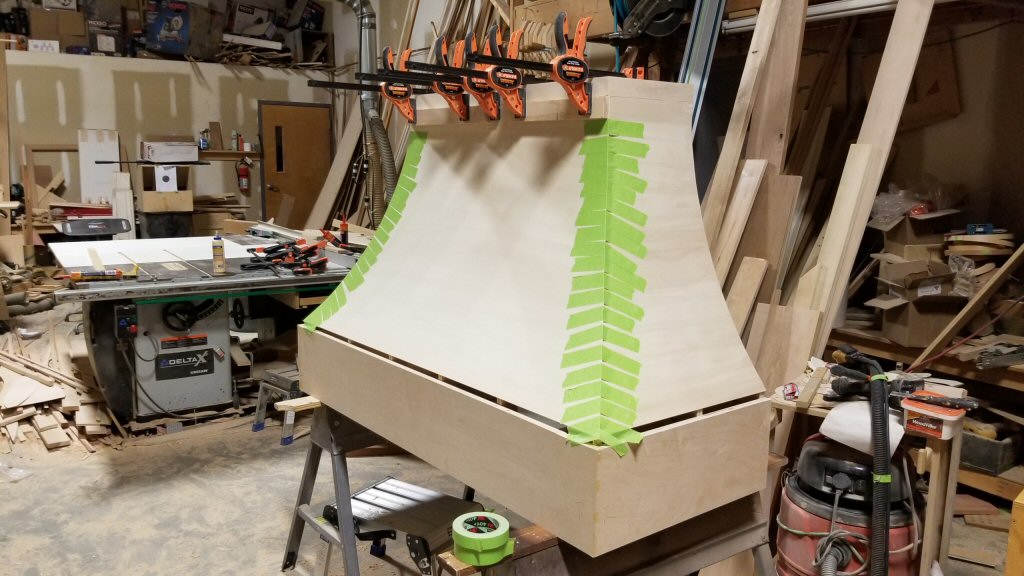
I use a couple layers of bending poplar over shaped ribs.

View higher quality, full size image (1024 X 683)
View higher quality, full size image (1024 X 576)
4/2/25 #3: Wooden range hoods ...
Leo tell me more about the poplar plywood how thick is it and where to buy?
4/2/25 #4: Wooden range hoods ...
Bending Poplar is about 1/8" thick and is made of 3 layers. I got mine from Atlantic Plywood which is my usual supplier for plywood and finishes.
I'm sure if you put in Bending Poplar into a search or maybe Italian Bending Poplar you might figure out where to buy it.
4/2/25 #5: Wooden range hoods ...
Thanks Leo I have found some not to far away it will do the job .
4/2/25 #6: Wooden range hoods ...
Good luck with it all.
4/4/25 #7: Wooden range hoods ...
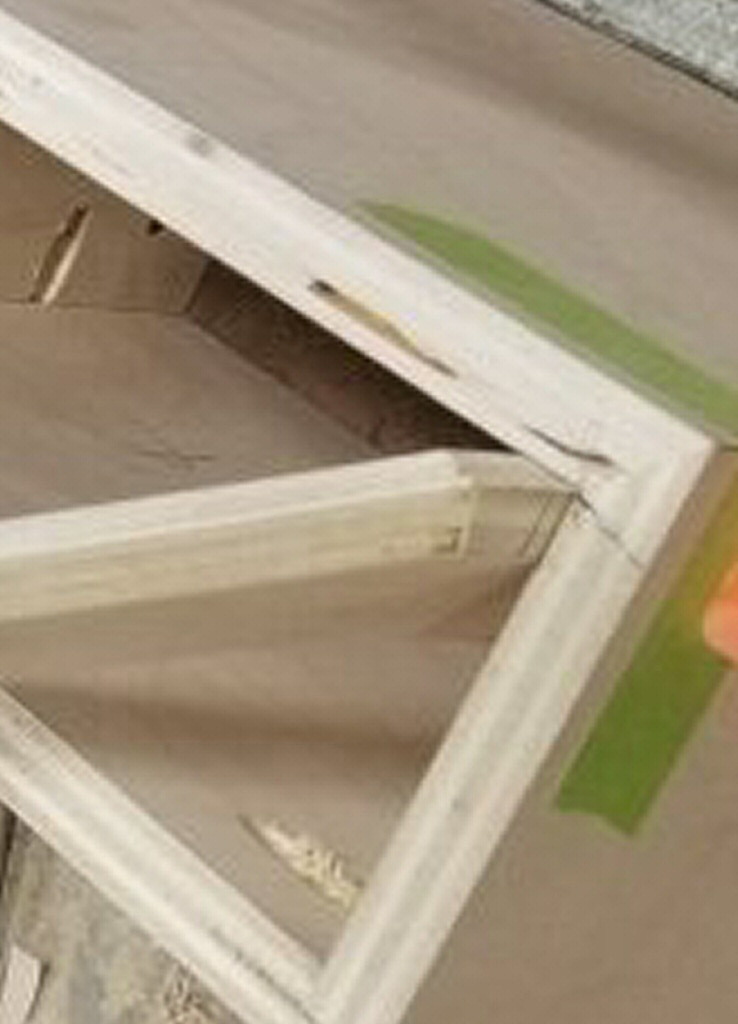
Leo, in your picture I see there's a corner block above your hip rib but it's hard to tell from the picture if the rib is mitered along its length, is it?
If it is, how did you make the miter cut? I've made miter cuts along a curved piece before using a jigsaw set at 45�, cut the curve on one side and flip it and cut the curve on the other side.
How long did it take you to build the first one? How long does it take now after how many builds?
I've been asked to build these several times and I can never imagine that for what I would have to price it at that they would move forward with it, considering the cost of what a pre-made one is. But maybe I'm overestimating the time involved.
4/4/25 #8: Wooden range hoods ...
Yes it's mitered. I'm sure I used a router bit. The bending Poplar wasn't mitered because it was a painted unit. It was butt jointed. This was done a long time ago and I don't remember exactly what I did. I think I put the side on and trimmed it flush and then overlayed the front onto it. If I was going to do this in a stained piece I would do the same thing but then veneer the piece and still not worry about trying to make a curved miter.
Probably took me about a week to make it and paint it. I haven't made another one with the duel curve on it so I couldn't tell you. Everything I do is custom and I don't do a lot of things more than once.
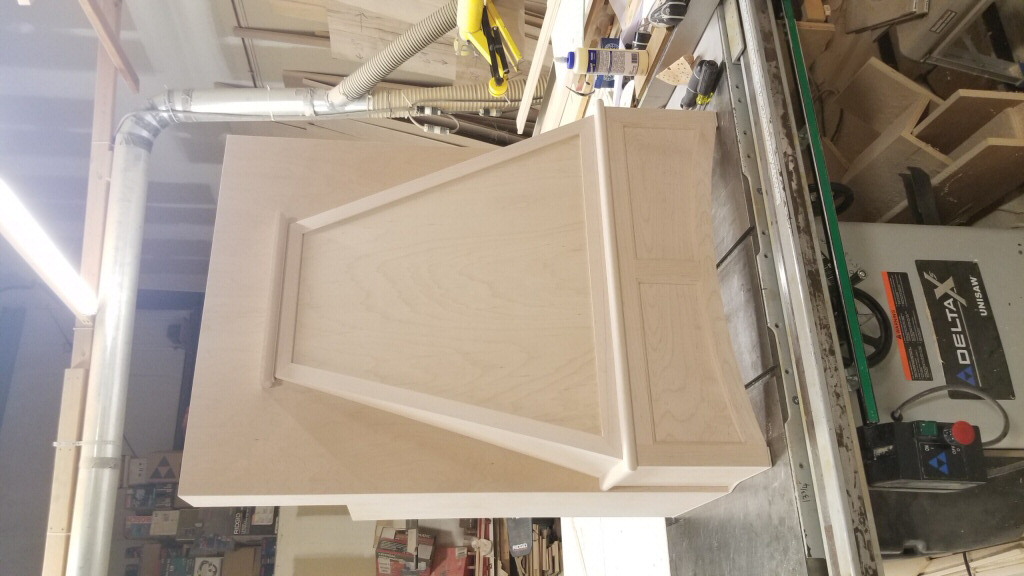
The closest I've come to making another is the other hood I've put a picture up of. But that one isn't anything near what I think you need to produce.
View higher quality, full size image (738 X 1024)
View higher quality, full size image (1024 X 576)
4/7/25 #9: Wooden range hoods ...
Chris - The bending poplar is a good way to go.
�Relief cuts on the backside� is a primitive method for anything since about 1950 or so. It will show as facets, no matter what you do.
Mitering is the way to go, but the 45 degree will not be the angle throughout the part. Build your hood. Put a too wide temporary hip corner in place, then get out your 60� long pencil and lay it on the curved struts so it marks the hip, as an extension of the face as defined by the curved struts. Keep it parallel to the earth. Do it on each side of the hip. You can measure the angle at this time if you like. Cut your hip at the longest/greatest angle, then work it to the changing/lesser angle as it indicates. Spokeshave recommended (solid wood hips). Copy that angle on the faces so they miter together. Use a hard drying, thick, epoxy for the face miters. Do not butt them. The joint will telegraph in time.
There are many quick box makers that will butt, yaller glue, pin it and go to the bar. Fill it tomorrow. Respect your work. It will elevate you.
4/7/25 #10: Wooden range hoods ...
7 years and no telegraphing so far. I'm sure I did more than just butt to make sure it doesn't telegraph because I am acutely aware of that issue.
4/7/25 #11: Wooden range hoods ...
Looking at some modern carriages, I see curved and even 2 curved frame and panel work. Could it be that carriage builders can out frame a cabinetmaker? As in those range hoods.
Adding the 1/4� x 2� strips to emulate frame and panel, either butted or mitered, is standard fare, tho some would call it mediocre in light of a carriage maker.
I admit that I did not do compound curve frame and panel until 1995 or later.
4/8/25 #12: Wooden range hoods ...
Leo,
Thanks for sharing the pictures and additional info.
4/8/25 #13: Wooden range hoods ...
Thanks guys for the input I'm going to build me a small one to get it all figured out before tackling the real one.
4/10/25 #14: Wooden range hoods ...
Chris,
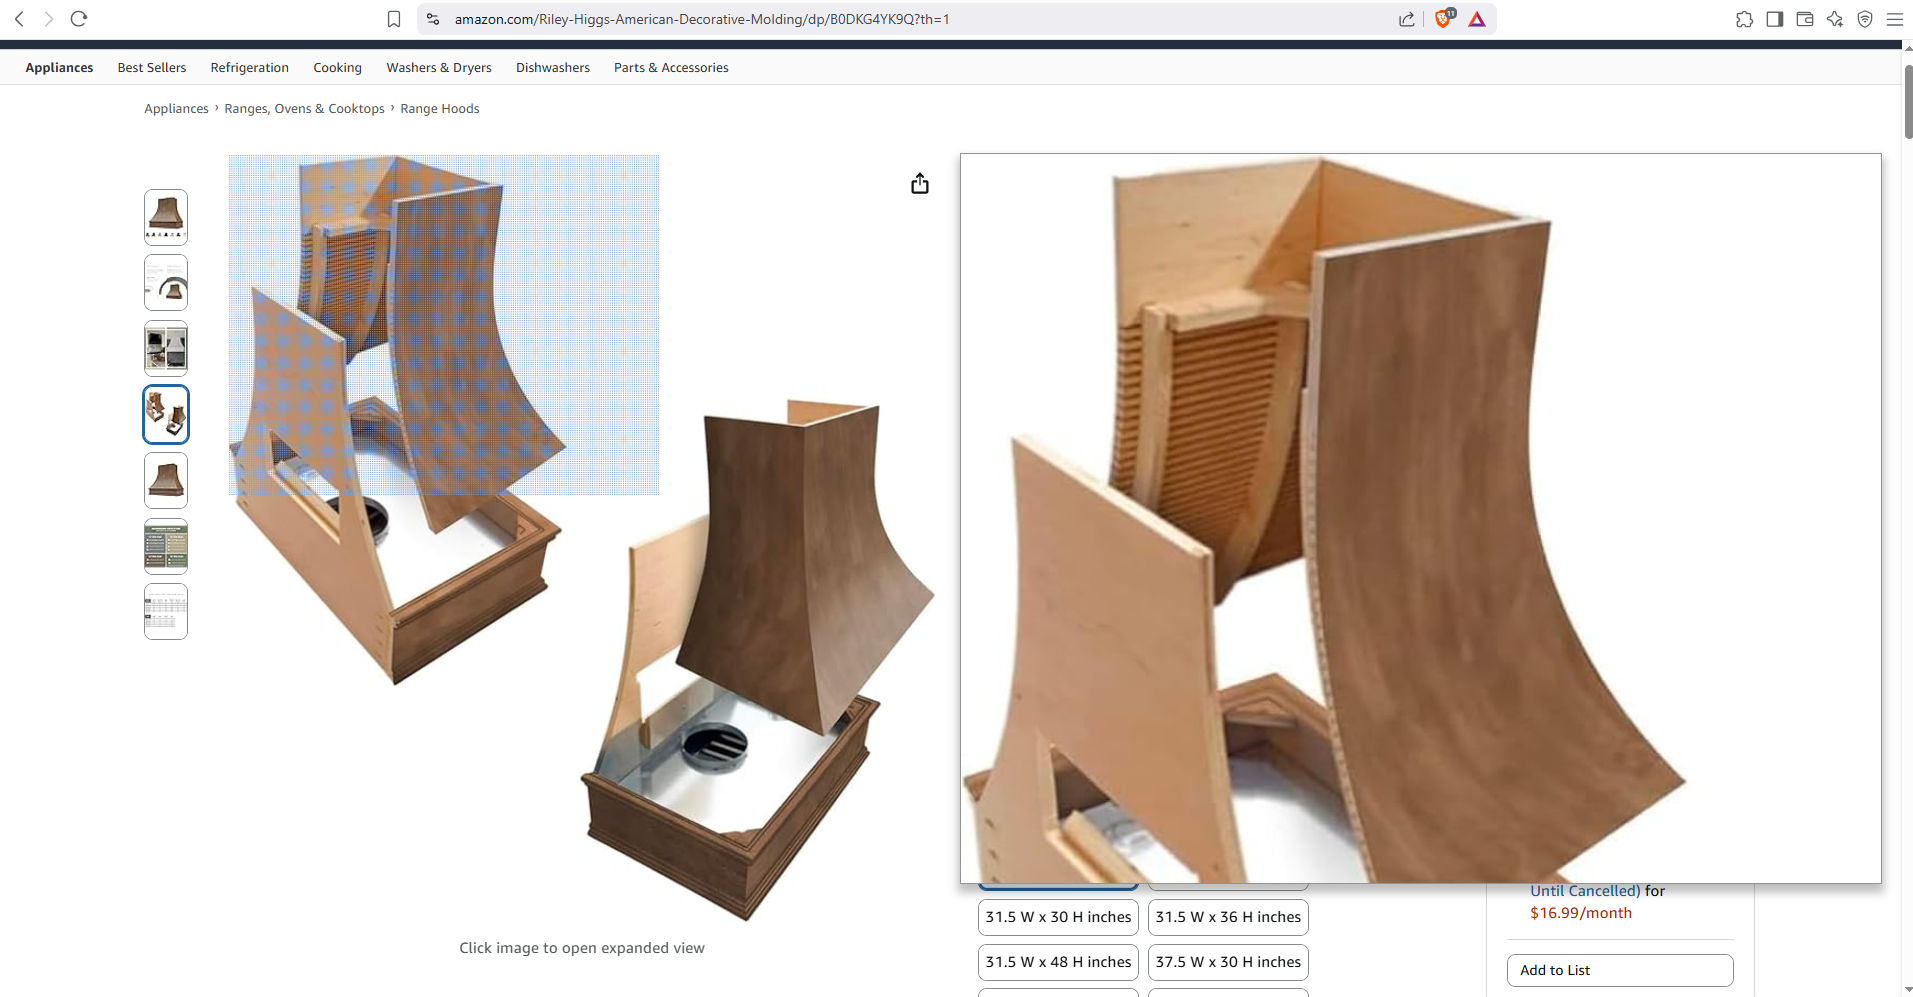
Here is a look at the method you asked about in your initial post.
From the drawing, it looks like this company uses thicker plywood, maybe 3/4", and uses the kerfing method for bending the plywood with mitered corners onto curved supports.
I've used both the kerfing method and multiple layers of thin material to build paneling, install baseboards, etc. on curved walls and archways, though the multiple layer method was preferred. I've seen both where the kerfing showed up as facets, if cut too deep and bent on a small radius, and looked terrible and where they hadn't shown up years after it was done.
My guess is they do it this way to make it easier for semi-skilled assemblers to put these together without have to deal with the multiple layers.
View higher quality, full size image (1913 X 997)
4/10/25 #15: Wooden range hoods ...
Slippery slope alert!
Dumbing down skilled trades is responsible for the rampant mediocrity evident in most of our products, wood and otherwise. Quilts that are printed, wood furniture made from plastic, electric power savers that are scams, plastics imitating metals and woods.
We should be using the finer examples of craft as goals for lesser skilled workers to aspire to. Kerfing is not a desirable skill. Cold bent lamination is a far better method. And one that is attainable in almost any shop. Mitered corners, with a developed angle to the miters, is also doable. Curved frame and panel is more complex, but should not be discarded simply because it is not easy.
Respect your craft, respect yourself.
4/10/25 #16: Wooden range hoods ...
I'm all for that. But gotta pay the bills. If you can get the clients that will pay for the above quality product fantastic. Most want something that look like champagne on a beer budget. And if you can't provide it they'll go to a box manufacturer that will and the the craftsman will be out of a job.
I do good and better work. I refuse to do the box quality. On occasion you get a client who is willing to pay to have it done right.
Kerfing is a technique like any other. And depending on the pay scale it's either right or not. Sometimes you do the job you're given and not the job you wish to do. Not everyone has money falling out of their wallets.
4/10/25 #17: Wooden range hoods ...
We a doing a 3 sided curved hood in the next few days. Ribs and bent MDF for paint grade. I'll try and get some pic's of the process.
4/10/25 #18: Wooden range hoods ...
Thanks Steven for the pictures. Yes Hen Bob that would be great to see the details of your build.
8/23/25 #19: Wooden range hoods ...
I first posted this back in April I have finally actually started building it. I have built it real similar to the one Leo has posted on here. When I took the job the contractor said that it was to be painted now, he is coming back saying no no it needs to be rift cut white oak. I have already ordered 1/8" Italian poplar for the skin coat going to double layer it. Now my biggest problem is I contacted a veneer supplier and asked about veneering this with the white oak, and he replied that the 1/8" Italian poplar would not be ridged enough to apply that over time it would bubble up in spots on me. I feel I have enough webbing built in this hood to support it but now I'm double guessing myself your thoughts please.
As far as the bottom part of the hood I am able to remove the piece of 6" high maple and replace with white oak rift cut.
8/23/25 #20: Wooden range hoods ...
Don't use contact cement, use a PVA or an Epoxy to adhere the veneer to the Italian Poplar. It won't move then. Vacuum bagging it would make sure you have good contact everywhere. Probably have to do it in 2 stages, the sides and then the front.
8/23/25 #21: Wooden range hoods ...
Leo
Apparently I have myself in a mess if I use the epoxy will it have to be clamped or not and what brand do you recommend? Vacuum bag is not a option
8/23/25 #22: Wooden range hoods ...
I don't understand how it went from a paint job to rift Oak. How is that on you? Anyway....
If you are going to use epoxy and not use a vacuum bag you'll have to find a way to put even pressure on the veneer. So some kind of bendable soft substance.
Maybe some of that bendable rubbery styrofoam and lots of bungee cords or even just weight. Maybe put the hood at an angle so it will hold the weight. So a thin 1/2" pc of that rubbery styrofoam and then fill it up with sand. Or something like that. I'm sure you might be able to come up with something appropriate.
8/23/25 #23: Wooden range hoods ...
How about regular yellow wood glue I normally use titebond 3 use it and then come up with a way to clamp it just have to do it one side at a time? I remember I ask about painting it when it was discussed because I was not going to do it if they wanted stained. Hopefully I can work my way through this I appreciate your input
8/23/25 #24: Wooden range hoods ...
I think epoxy is a better easier way to go. You have to coat both sides but you don't really need pressure. With a PVA you'll need pressure AKA vacuum bag.
8/23/25 #25: Wooden range hoods ...
With the epoxy would I just roll it on with a roller and you say it wouldn�t need clamping? Where would be a good place to get it and what would you think would work best? Thanks again.
8/23/25 #26: Wooden range hoods ...
Any epoxy designed for wood will work. And yes it's called wetting the surface. You put a good coat on both sides so when you put them together they meld. You'll still need to figure out a way to make sure the veneer stays in full contact with the hood substrate. You won't need clamping pressure, but you still need pressure to make sure that contact is made throughout every square inch.
You can't just put them together and expect the epoxy to hold them to shape. It might work, but you can't take that chance because undoing that kind of mistake would be painful.
I would do a few tests to see if you can figure out the holding method before you do it on the hood itself. Just to make sure you're not getting in over your head.
9/2/25 #27: Wooden range hoods ...
Getting back to work on the range hood. I glued and screwed 2 layers of 1/8" Italian poplar down and then I got thinking about the screws do you think I will stand a chance of having them backing out showing through my veneer? I can glue a 3ed layer of poplar plywood with no screws if need to.
9/2/25 #28: Wooden range hoods ...
Anything that's not smooth can telegraph. Make sure the screw is sunk and use a polyester filler such as wood bondo, same with any other imperfections. On mine I used 1/4" crown staples.
9/2/25 #29: Wooden range hoods ...
Leo
Thanks I have filled them with wood putty I am thinking I am going to use titebond 3 on this glue up there it�s no way I think I can use epoxy and get it spread in position and clamped in 20 minutes. I am thinking with the titebond I can clamp and if it starts to dry to quick the top will be hanging open I can re apply some more glue and then continue to clamp. You think it would be best to apply glue to both surfaces?
9/2/25 #30: Wooden range hoods ...
Use the West System with the slow hardener. You'll have more than enough time. You can unclamp in about 16 hours.
9/2/25 #31: Wooden range hoods ...
You think 1 quart should be plenty?
9/2/25 #32: Wooden range hoods ...
Should be plenty.
9/2/25 #33: Wooden range hoods ...
Do you use a plastic spreader with small notches to spread that epoxy?
9/3/25 #34: Wooden range hoods ...
A lot of good info in this thread, but I have to point out that rift white oak is a totally inappropriate material.. wood is not used In proximity to fire. Metal is what is used, with wood being the simulacrum. Metal for its containment. Stone would be a good material, but way too heavy. Rift White Oak is a wonderful material, tho hardly fire resistant.
|