Message Thread:
Shaper Set Up to Cut Wide Channel - Is This OK?
3/13/24

Hi all. We run a light Hammer F3 shaper with 30mm spindle and sliding table but are not very experienced with it.
It seems OK but I would appreciate some input on whether or not the following set up would work well and be safe.
We have a more or less standard 125mm dia rebate cutter/block with a counter bore in the top surface deep enough to hide the retaining cap and spindle top - basically so that it can cut longer tenons from underneath without the spindle and cap catching the work.
We're looking at the possibility of using it to cut a wide but shallow full width (= the full 125mm diameter of the block) channel in an oak piece - the finished channel 6mm deep x 125mm wide and cut across the grain.
The oak piece is roughly 250mm wide x 40mm thick x 500mm long, the 6mm channel would be cut in several full width passes of say 2mm depth each.
The work in that case would pass over the top of the spindle - it would fully cover the block which would be set to project only slightly above the machine table.
The shaper has a sliding table which means that the work will be anchored down on to it and against the fence. It can be pushed through without any need to put a hand anywhere near the cutter.
The end of the board would run against the fence to counter any right angle push due to cutting forces.
The job could done with multiple passes on a router table, but this would be very slow since there are multiple pieces to be done.
Thoughts?
Thanks...
3/13/24 #2: Shaper Set Up to Cut Wide Channel - ...

Sounds fine. A pic would really help
3/14/24 #3: Shaper Set Up to Cut Wide Channel - ...

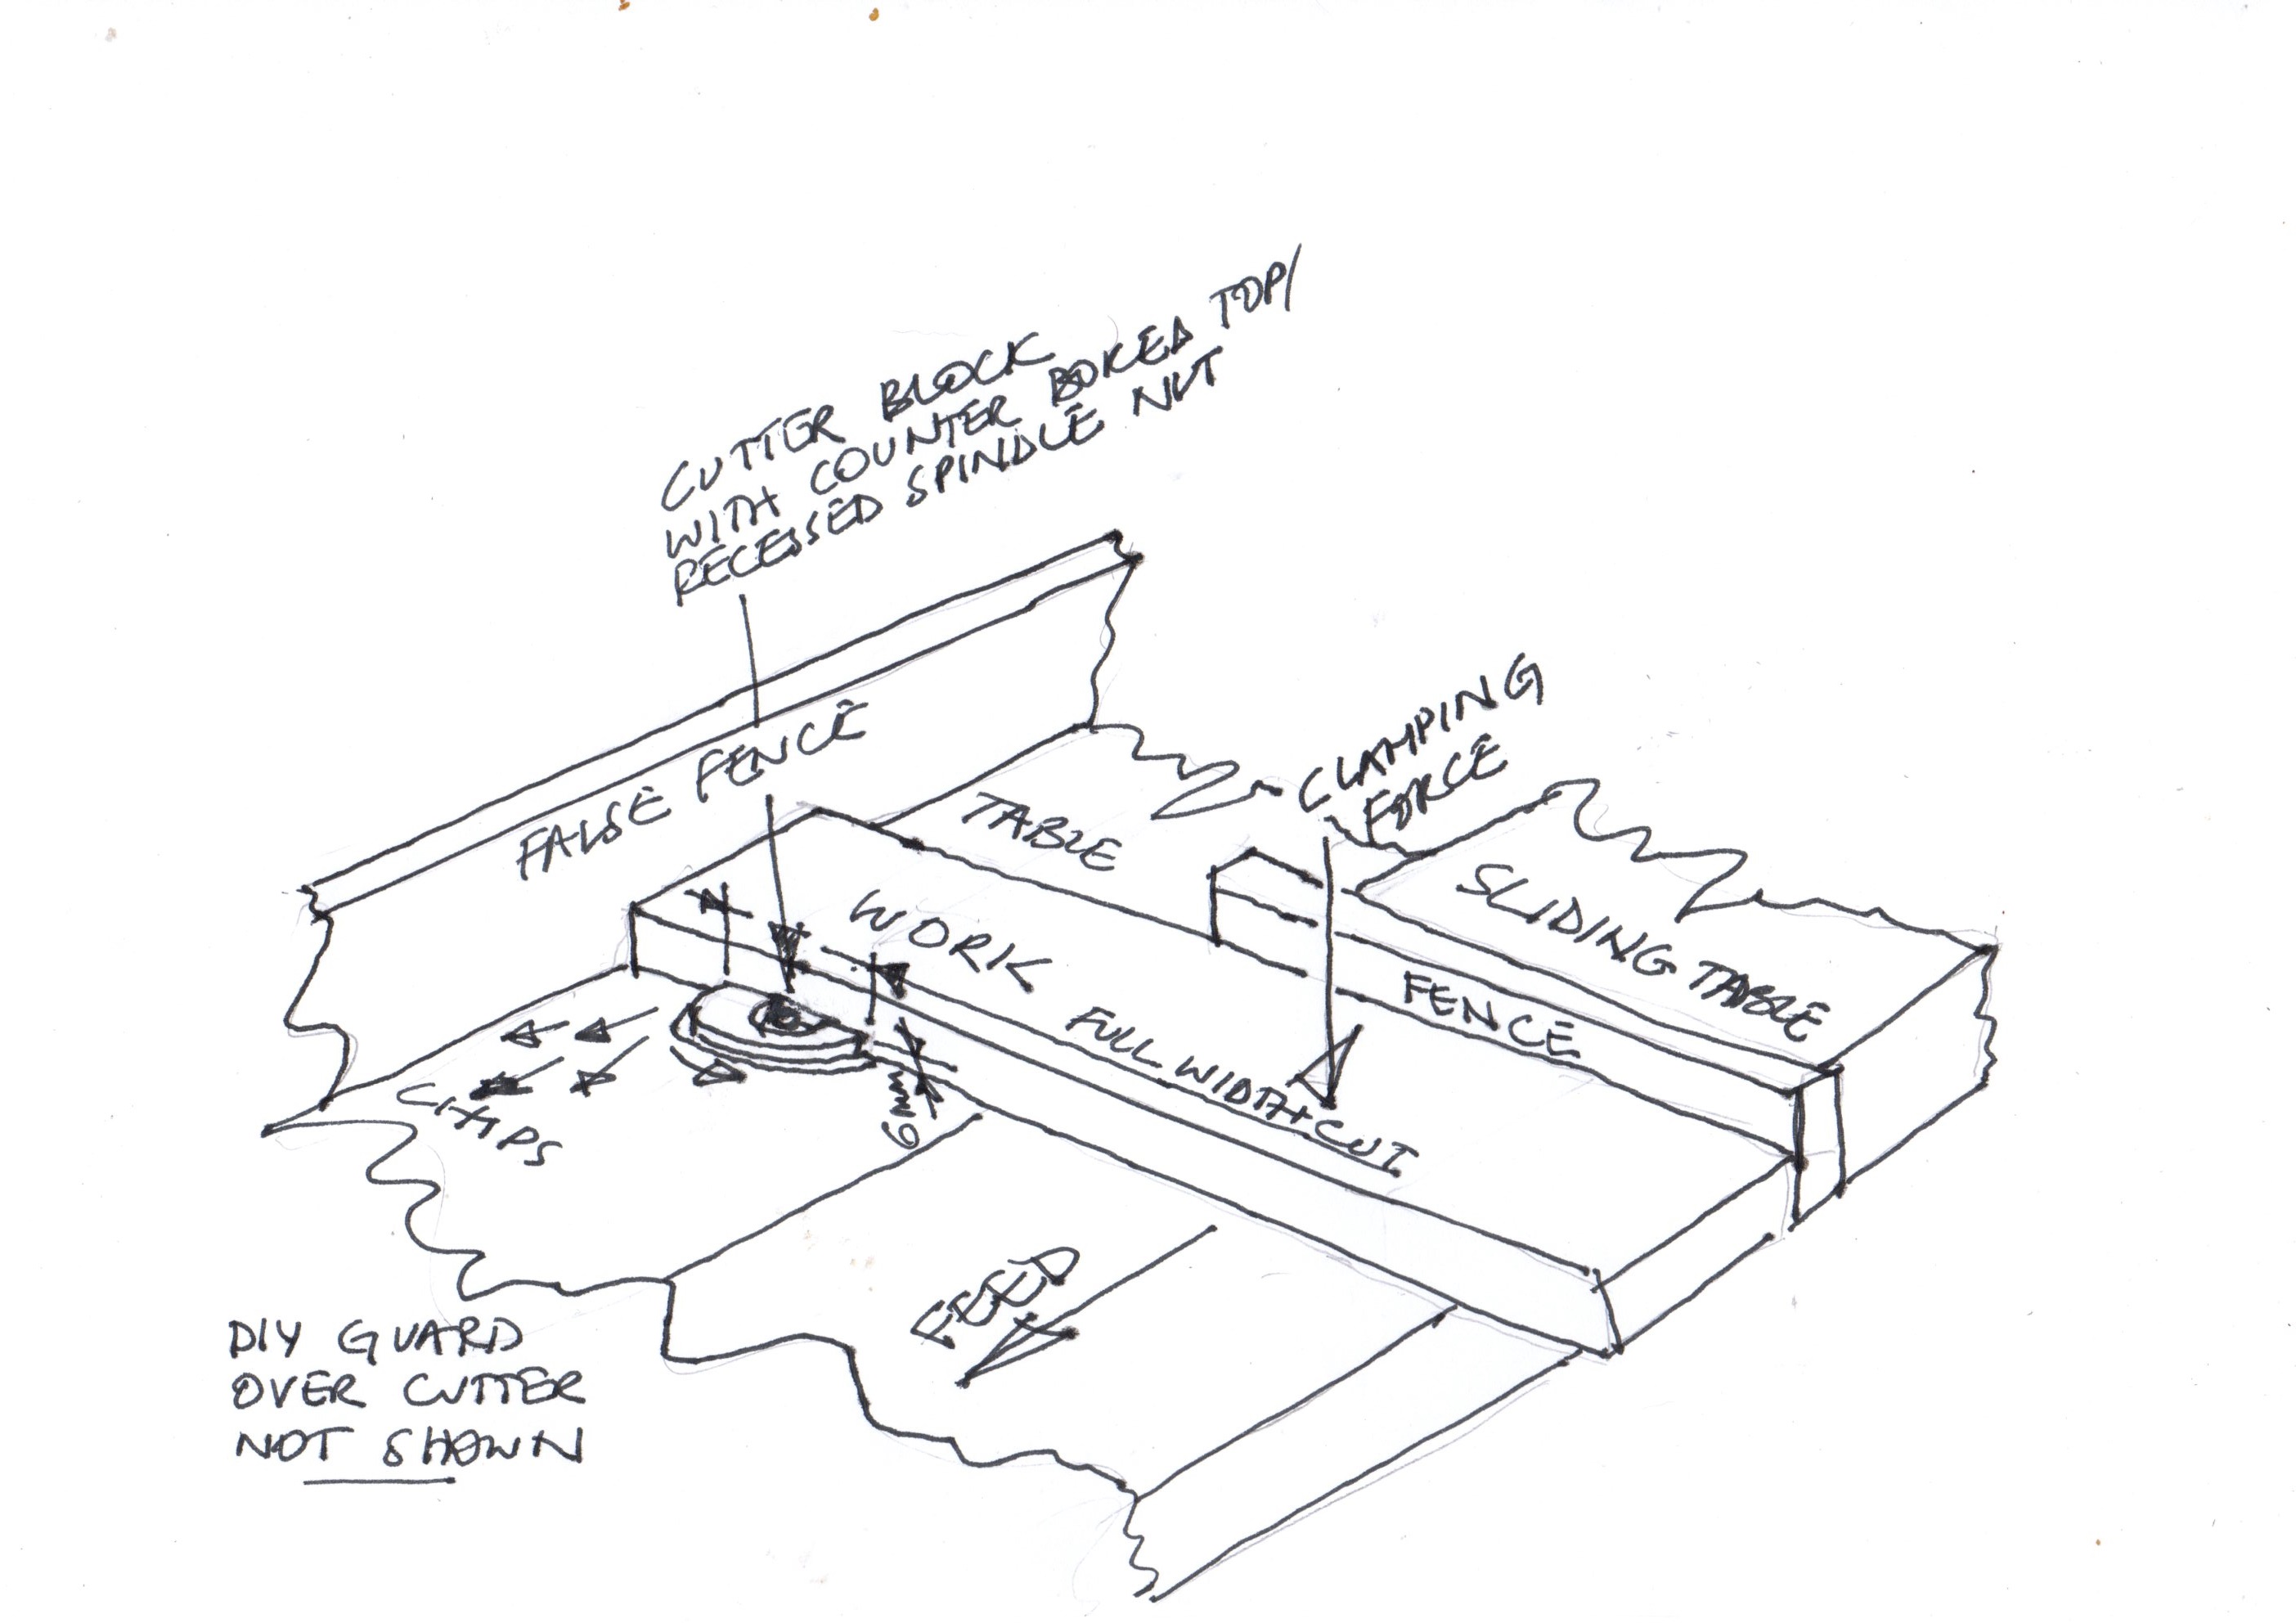
It's not set up yet Dave but I've attached a sketch showing what I provisionally have in mind
The cut is essentially a large scale version of cutting a fence guided groove the full width of a rebating cutter on a router table - except that in this case it would be the sliding table and fence doing the guiding.
So far as I can figure (a) it should (?) be doable, (b) would generate some thrust at right angles to the feed direction so the work would need to well secured, and (c) would block dust collection through the normal over table port – so that chips would fly out of the cut and down through the table opening.
View higher quality, full size image (2807 X 1984)
3/14/24 #4: Shaper Set Up to Cut Wide Channel - ...

You will have major blowout on the back edge, and that gap between the fences will be a big safety issue.
3/14/24 #5: Shaper Set Up to Cut Wide Channel - ...

I guess I was a bit approximate with the sketch Rich.
The fence would be pushed in as close to the block as is possible, and I'd include a fairly wide backing strip to prevent blowout. Also a cover over the cutter mounted off the false fence.
Some blowout won't much matter anyway because the piece will be worked while over width and trimmed to the finished size afterwards.
My main concern was that there might be something I was missing about cutting across the full width of the block that could give rise to a more fundamental issue..
Thanks for the input.
3/15/24 #6: Shaper Set Up to Cut Wide Channel - ...

I don't love the use of two fences to constrain the workpiece. I would back off the fence or use it as a lead in block to position the work before the cut. Slight mis-alignment or crud between the fence and work can cause problems.
How stiff is the workpiece? If flexible then it might want to chatter with vertical vibration. If so add a block on top under the hold down.
Sharp tooling is your friend.
3/15/24 #7: Shaper Set Up to Cut Wide Channel - ...

Thanks Tom - it seems as though you're not seeing a fundamental problem with the cut anyway.
It seemed feasible to me, but I was cautious because I've never seen a description of a rebating block being used that way. (most mind you are not counterbored to recess the spindle cap)
The workpieces are oak and pretty solid - about 40mm thick x 250mm wide x 500mm long. (they will be cut down afterwards)
I'd figured that the fence would need to be carefully aligned and set back a hair - but hadn't thought of the possibility that a chip between it and the end of the piece could cause a jam.
The inserts in the cutter block will be turned so that its using fresh cutting edges.
3/15/24 #8: Shaper Set Up to Cut Wide Channel - ...

I think the cut will be fine. If I were trying to achieve a really precise fit I would do this in two or more cuts. First to plow through second (and possibly third) cut to cut the shoulder about 1.5 mm wider. Full plowing has the cutter engaged 180°. Not the best for finish and tolerance. But I am over-thinking likely. You'll see after a couple of cuts.
3/15/24 #9: Shaper Set Up to Cut Wide Channel - ...

I can and will take a light finish cut Tom - the channel can be a bit wider than the diameter of the block.
It'll be a few weeks until I get to the job, but a few test cuts will get the bugs out of the set up.
The main thing is that it seems to be feasible..
One aspect of this set up that makes me cautious is that there are not many rebating blocks about that are counterbored to recess the spindle nut/cap to permit deeper tenoning and the like.
It's not 100% the ideal method in that deeper tenoning this way (over the top of the spindle) requires referencing cuts off the opposing faces of the piece, but on the other hand not everbody is going to be in a position to buy tenoning discs or whatever for a single job.
A related thought is that low profile/submerged spindle nuts/caps don't seem to be much used either.
Does anybody have any thoughts on why this might be the case?
3/15/24 #10: Shaper Set Up to Cut Wide Channel - ...

One thought as to why recessed spindle nuts might no be common is that it is best practice to keep your cutters as low on the spindle as possible which means spacers stacked on top. You may have a cutter block intended for use on a tenonner. Just a guess
3/15/24 #11: Shaper Set Up to Cut Wide Channel - ...
 It's just a stock 125mm rebating block Tom. I had a tool maker friend counter bore it just over 16mm deep with a view to being able to cut longer tenons than would otherwise have been possible.
He used a very precise CNC mill - the seat for the spindle cap is flat and square to the spindle within a few microns. There's 35mm length of untouched bore left which fits the 30mm dia spindle - it seems plenty.
I know of at least one example of a counterbored block offered for sale - this was what inspired the mod.
3/16/24 #12: Shaper Set Up to Cut Wide Channel - ...

I would screw a sacrificial backing board to the sliding table fence that extended to the length of your work piece. This would provide more support to the workpiece and reduce any blowout on the back end of the cut.
Alternatively, I'd make a fixture to hold the workpiece (or multiples if you have a lot to do) and make the cut with a cnc.
3/16/24 #13: Shaper Set Up to Cut Wide Channel - ...
 Backers to both sides would probably make sense D.
Against that the piece can start wider than needed and be ripped to width afterwards - which might mean depending on how bad it is that the blow out may not matter.
The drawing shows what would be a first pass, it will be necessary to somewhat widen the cut channel. The final cuts on all three faces can be quite light which should minimise blow out too.
There's quite a bit of detail to figure out when the set up is seen in the physical - relying on the hold down clamp alone might not be ideal. There's going to be some force at right angles while cutting too - which means that some sort of stop is probably needed..
Thanks for all the input guys - it's a great way to spark thoughts...
3/20/24 #14: Shaper Set Up to Cut Wide Channel - ...

There seems like a lot of better options to get this cut .
Dado blade and a sled.
Dado blade and a slider.
Radial arm saw.
Are you hell bent on getting hurt ?
3/20/24 #15: Shaper Set Up to Cut Wide Channel - ...
 Website: https://virmer.com/
Hi, glad to see new members on the forum!
Regarding your question about using the Hammer F3 to cut a channel in oak, the 125mm diameter rebate cutter is quite suitable for cutting a 125mm wide channel in oak. It will take several passes to make a 6mm deep channel as you plan. However, keep in mind that this approach takes some time due to the shallow depth of the pass and the large width of the channel.
3/20/24 #16: Shaper Set Up to Cut Wide Channel - ...
 Website: http://www.sogncabinets.com
I'd be squeamish about having the tool completely buried in the material.
Hog most of the material out with a dado head, so your final pass taking .020 or so with the shaper.
3/22/24 #17: Shaper Set Up to Cut Wide Channel - ...

Thank you Karl. Light cuts for sure.
I've been provisionally looking at the set up on the machine.
It presents a few issues to be solved in that the chip collection hood has to be placed a long way back to clear the end of the workpiece - to cover the tool area it will need to cantilever out over it.
I think (?) the tenoning hood will just about accomodate it, the sheet metal moving guard (don't know what it's called) the work projects through will add more protection.
It's not going to do much chip collection at that - the chips will be thrown out of the cut in the feed direction, and out the other end of the cut once the cutter breaks through. Hard to deal with other than to clean up afterwards.
The table on the F3 is only flat (-ish), when (as it needs to be the slider is set a tiny hair above it) so it looks as though it may make sense to use a tenoning plate (they are alightly relieved underneath in the section over the table) under the work...
4/5/24 #18: Shaper Set Up to Cut Wide Channel - ...

Out of curiosity how did this work out?
4/5/24 #19: Shaper Set Up to Cut Wide Channel - ...

Hi Allen. The job hasn't been done yet - it'll probably be several weeks before I get to it.
Have to finish a nother project first.
I'll post when I have information.
4/20/24 #20: Shaper Set Up to Cut Wide Channel - ...

Hi Allen/all.
The set up of the F3 to trial cutting channels as the original query (and also long tenons) was completed today.
Bear in mind that the following is DIY and a little unorthodox. It may or may not amount to safe practice and may or may not be regarded as good practice by the powers that be.
Anybody wanting to try something similar should first take steps to satisfy themselves that what they intend is safe.
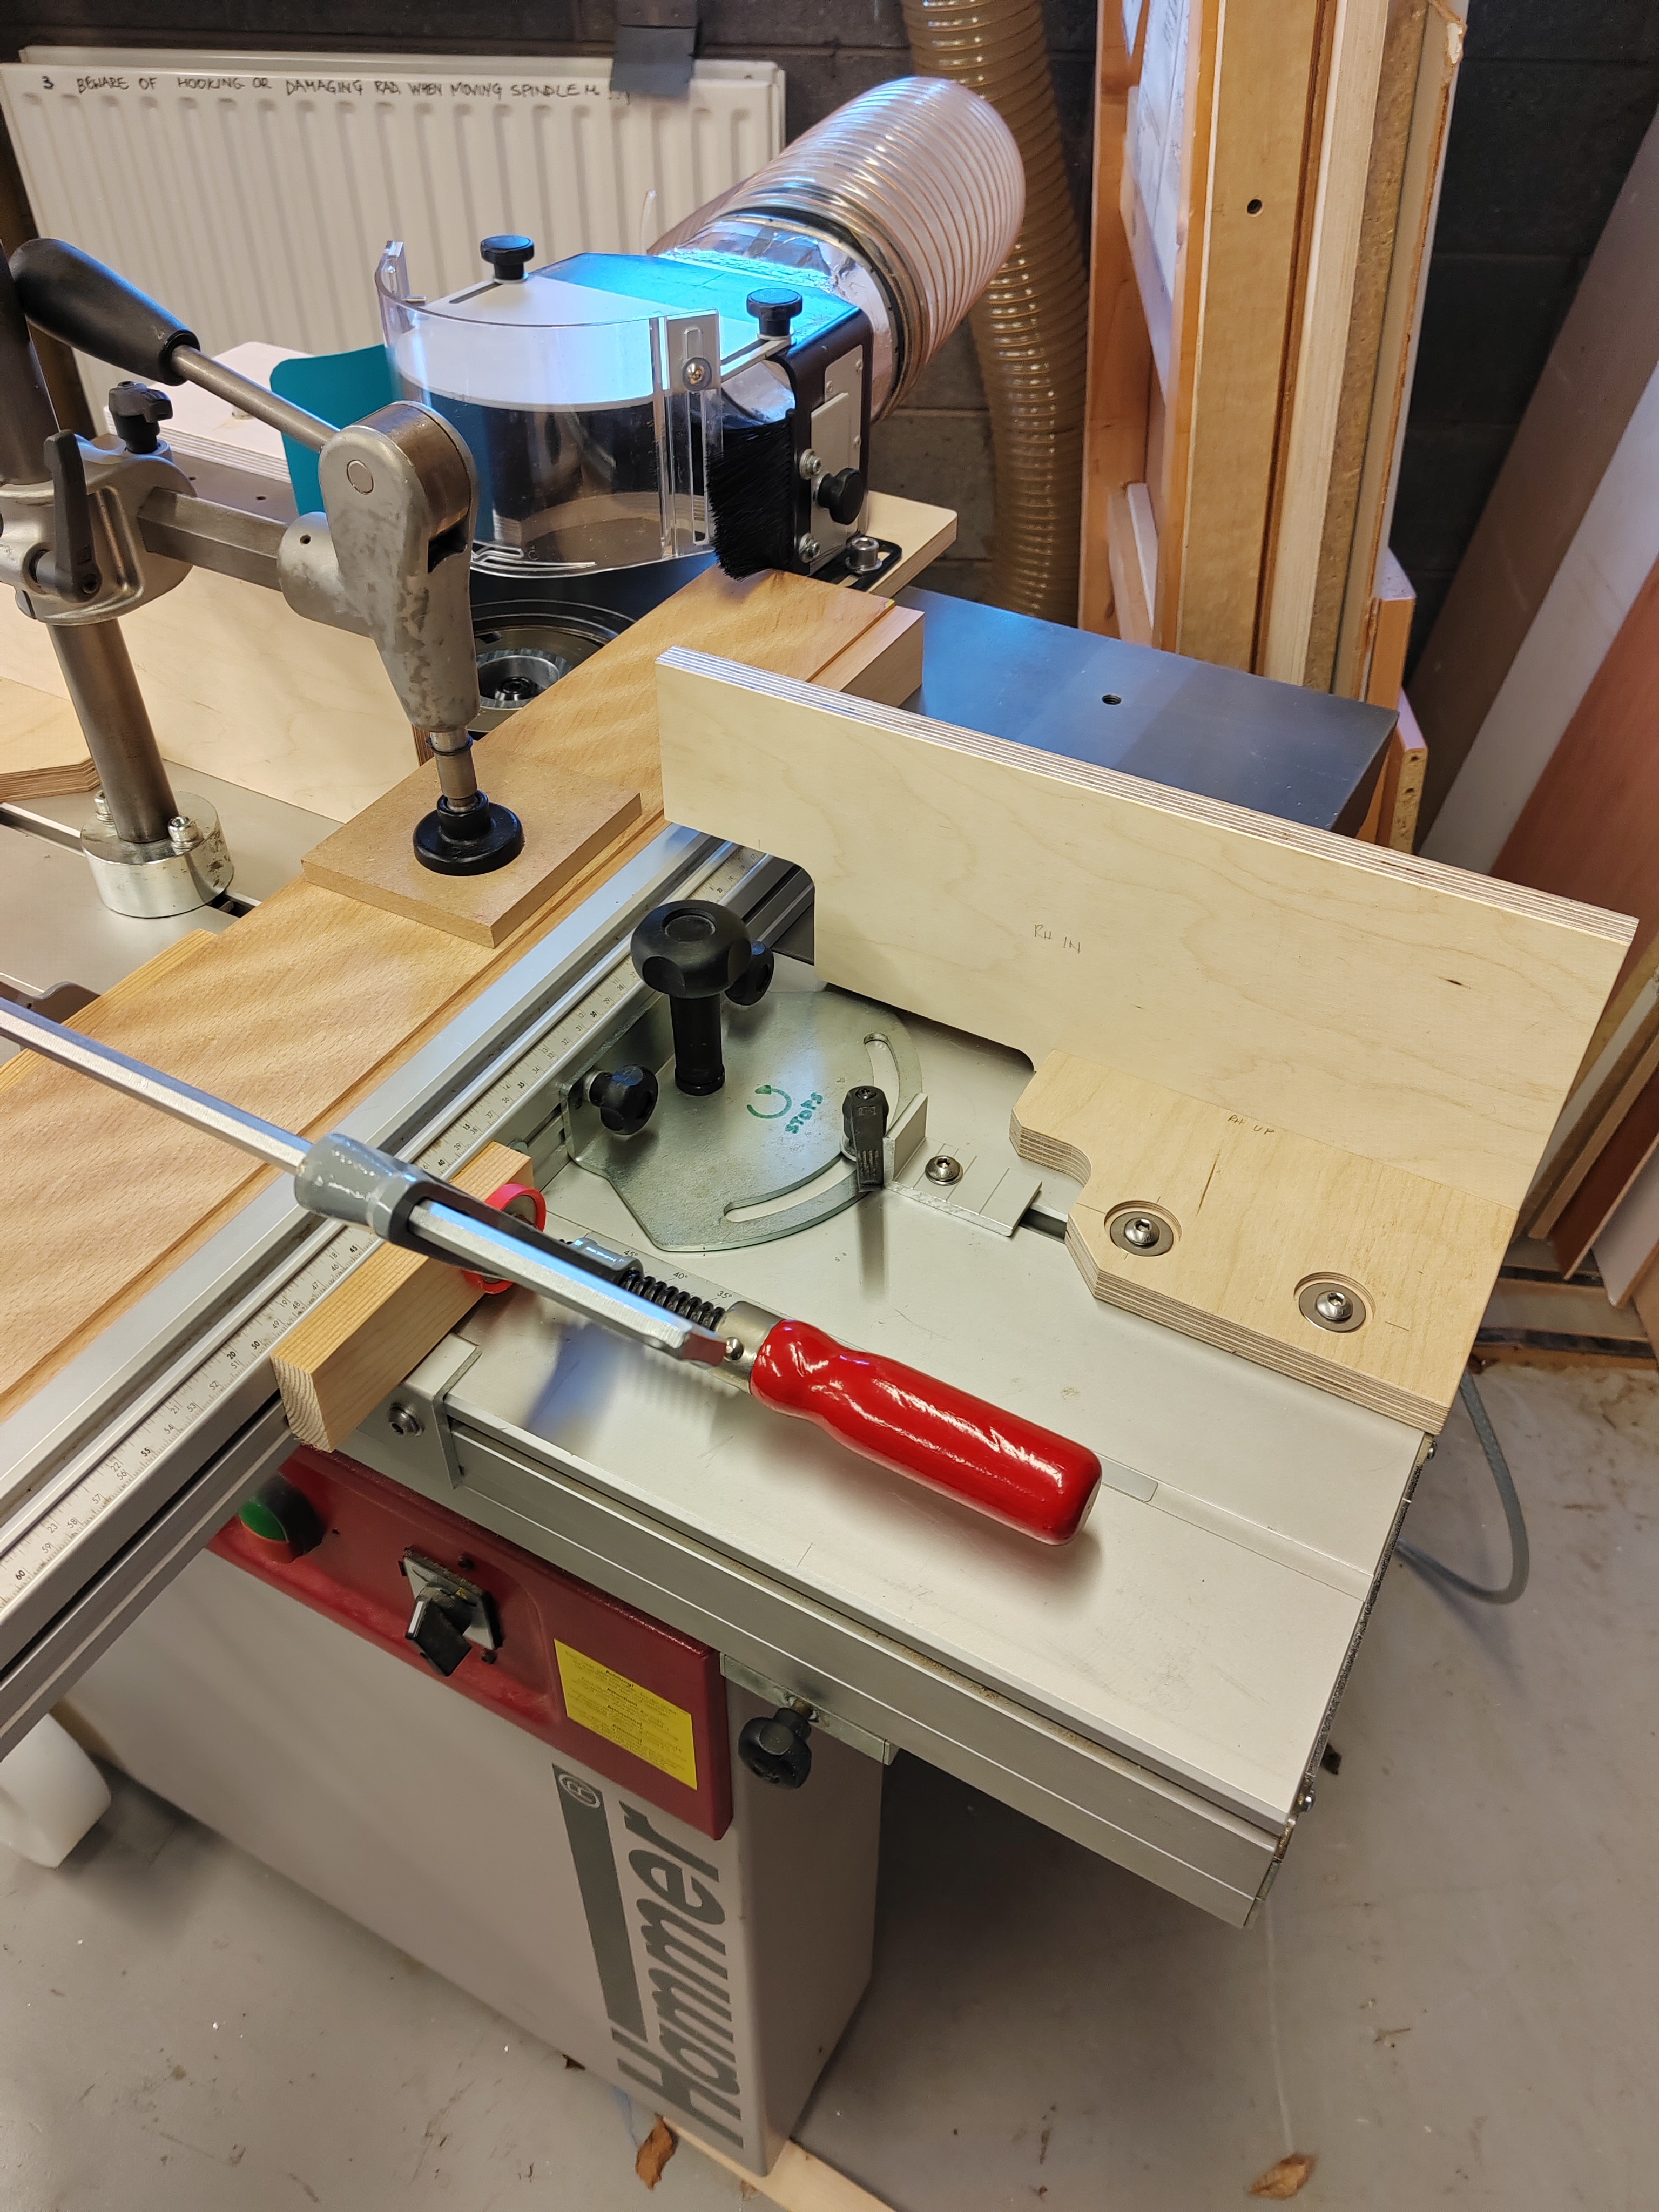
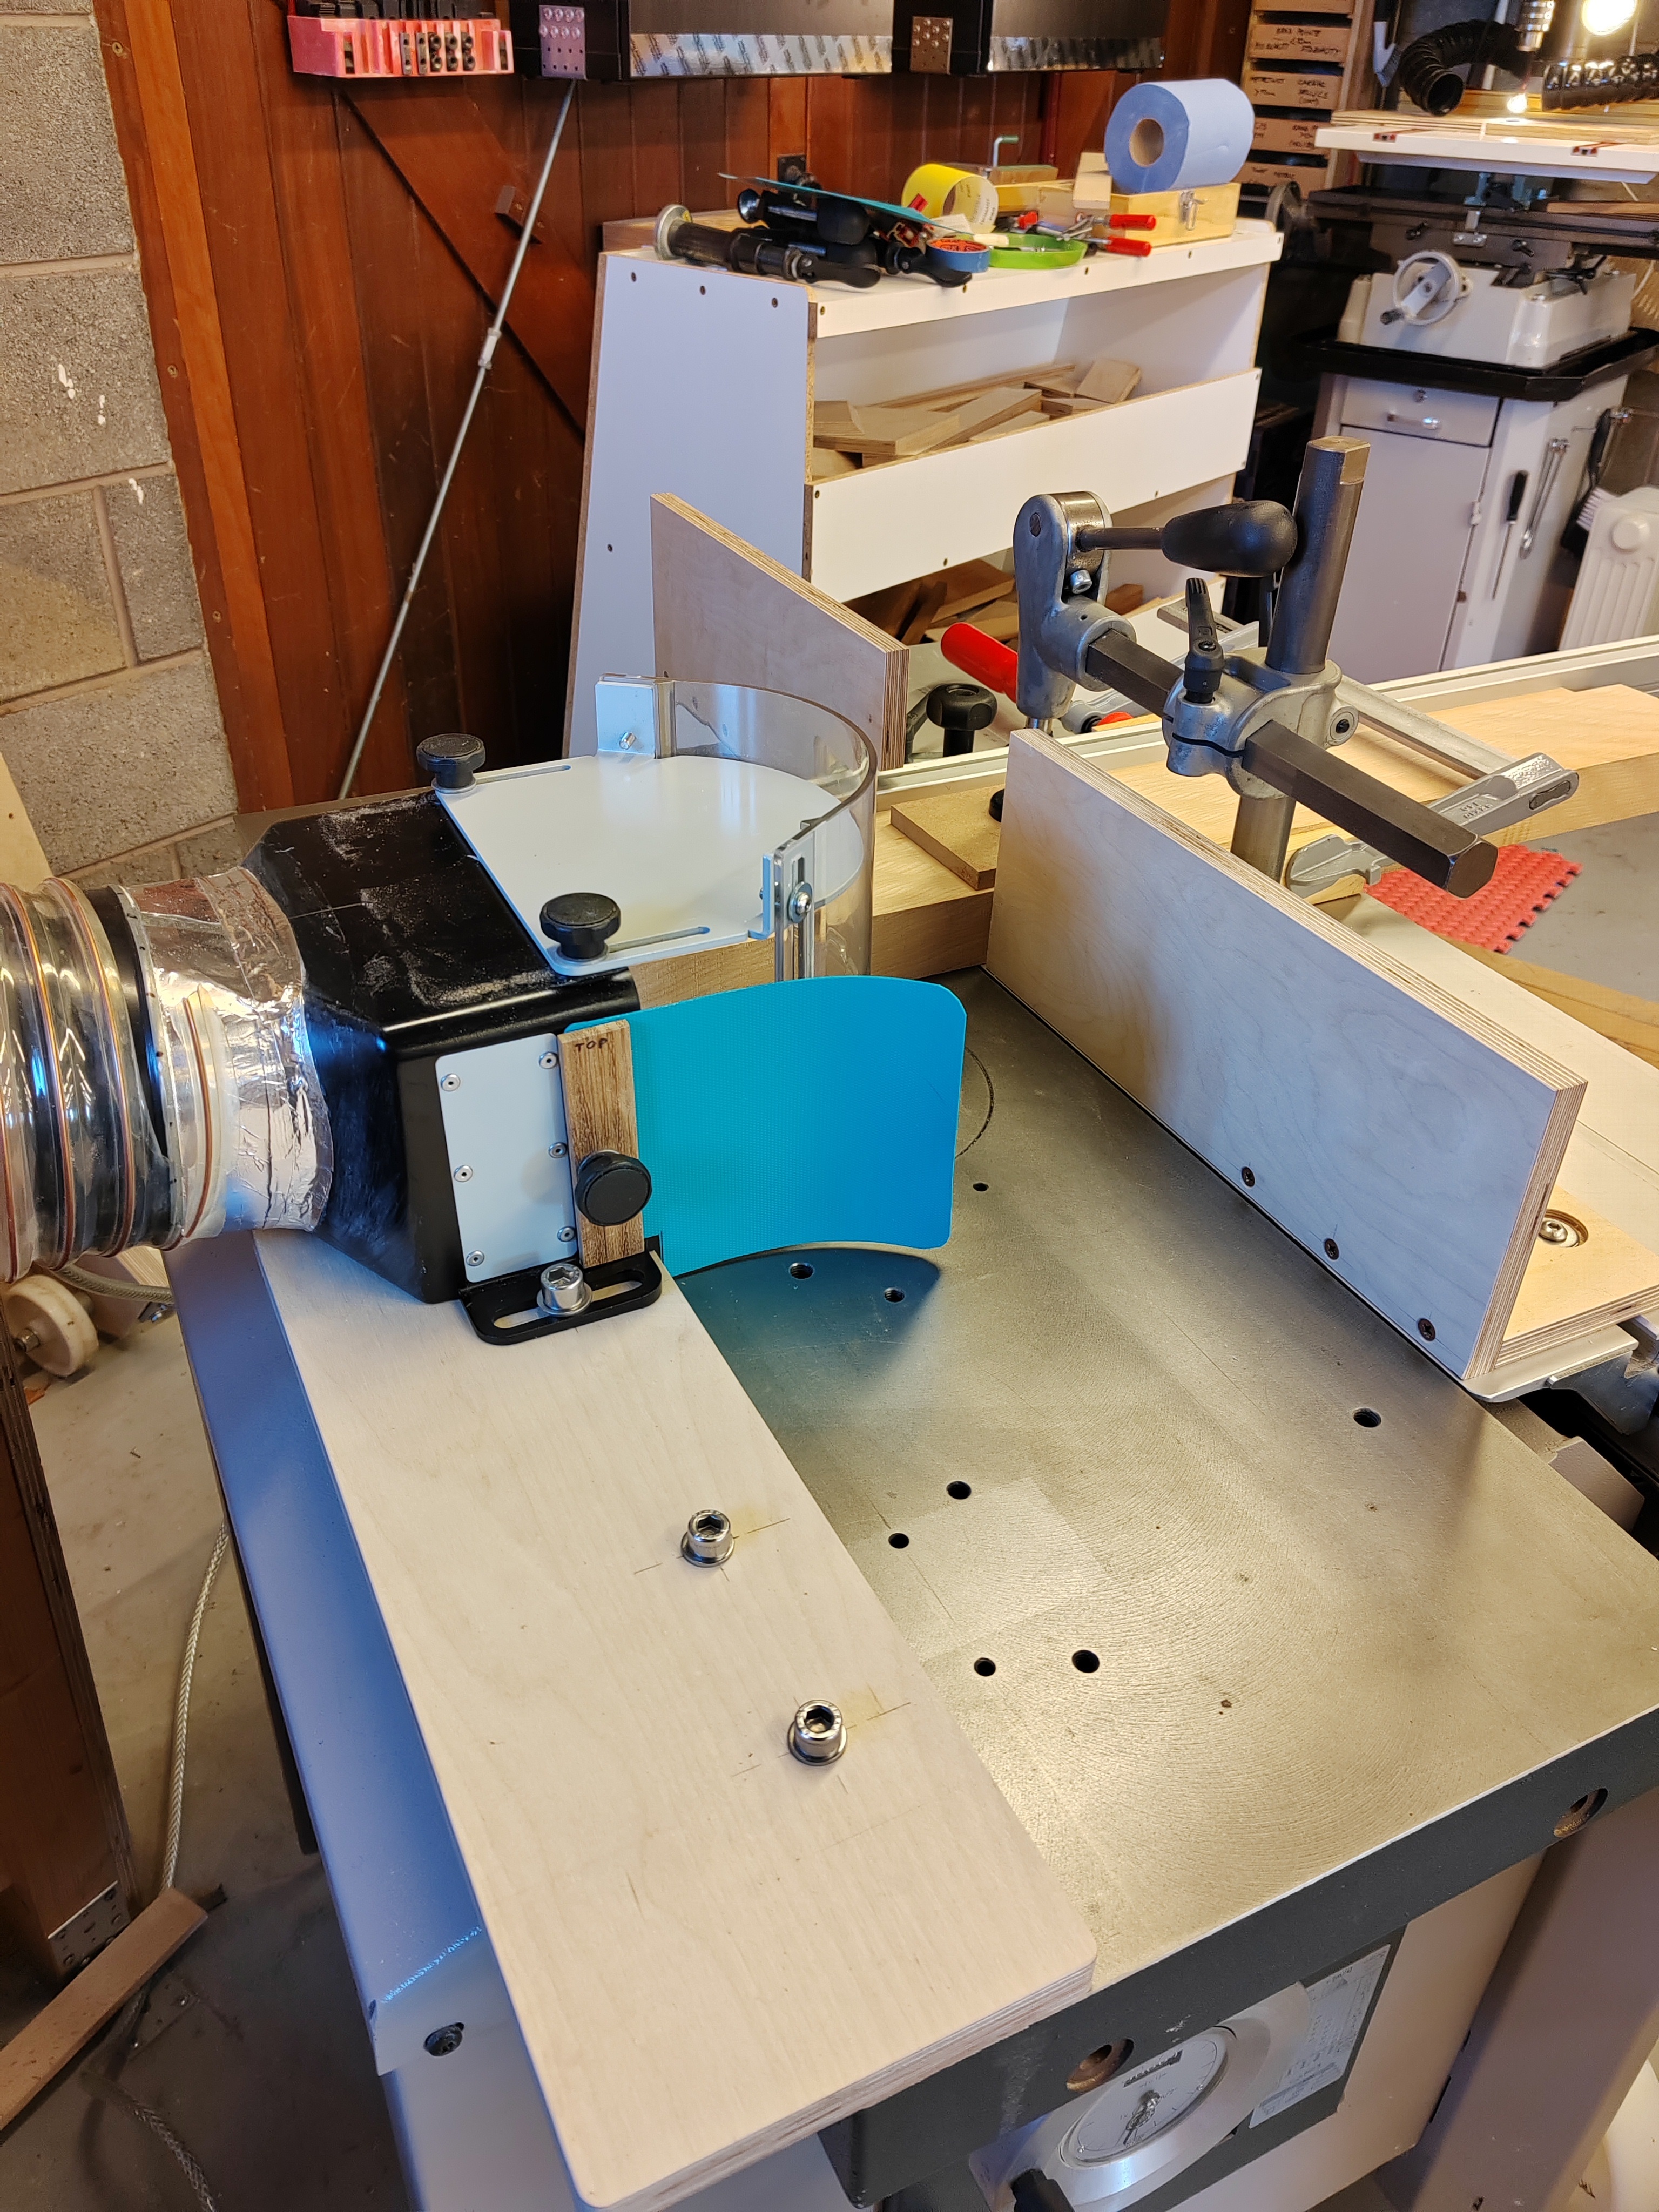
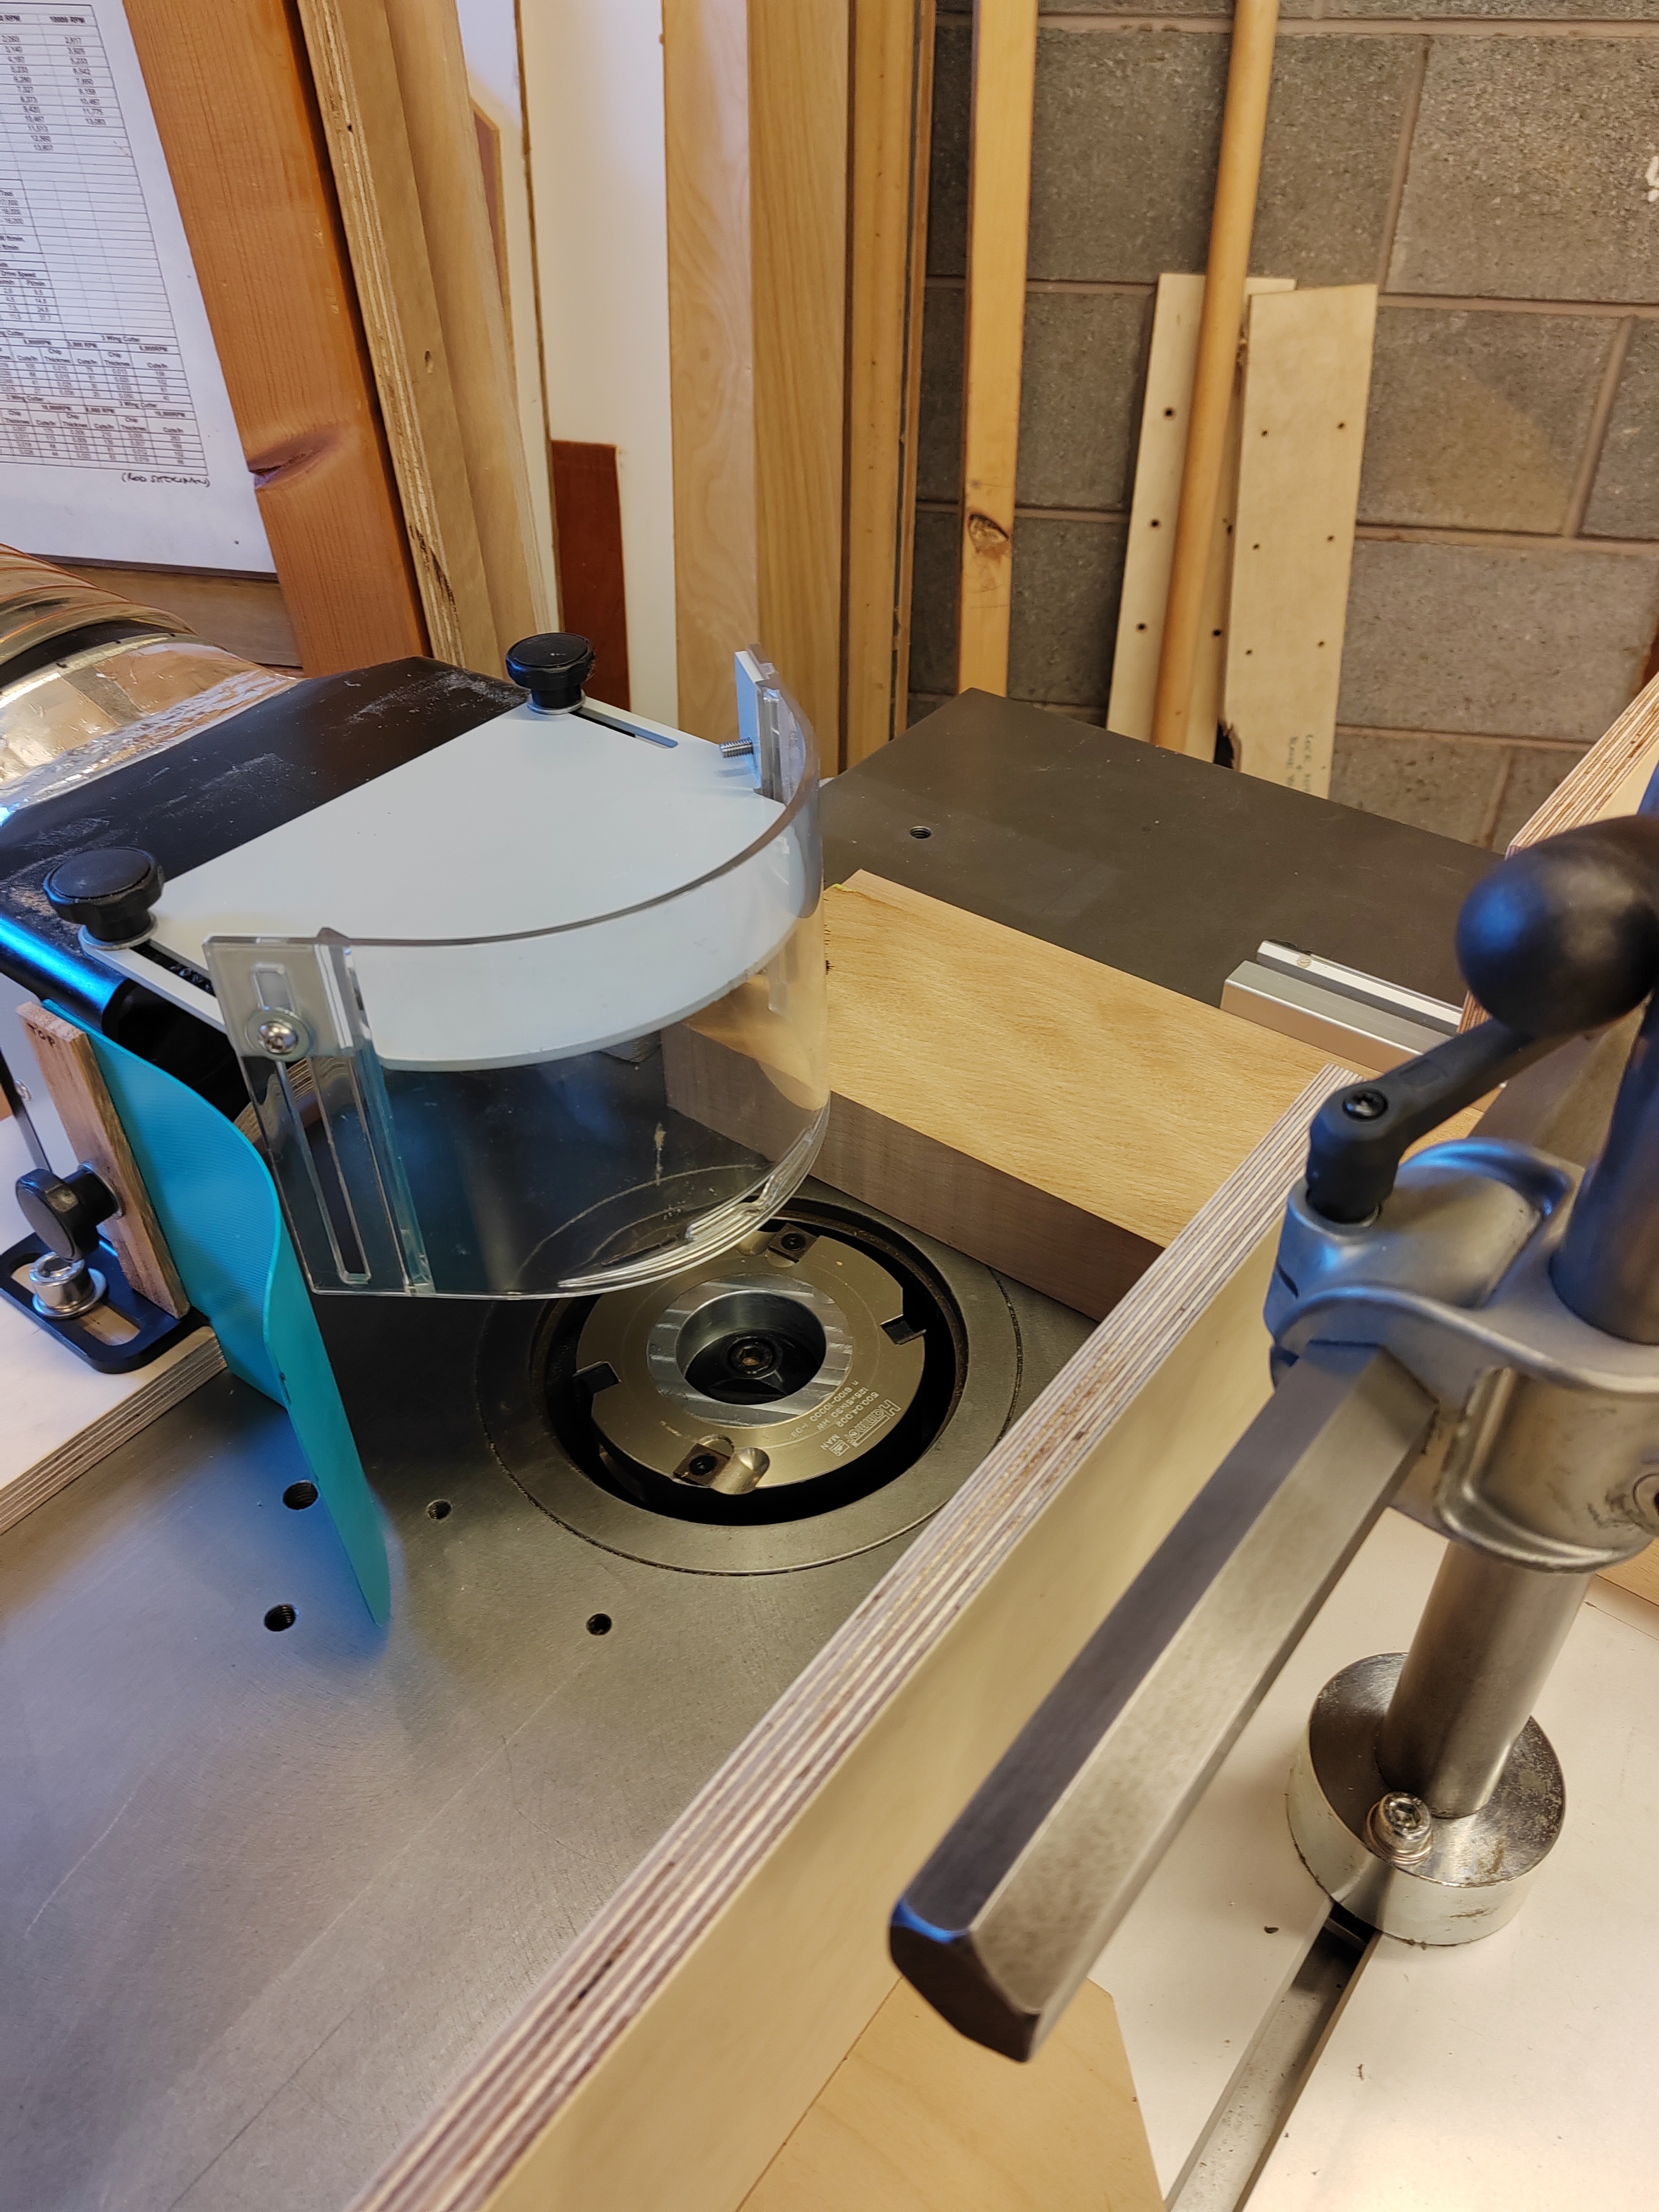
The x3 pics attached show the general arrangement.
The biggest difficulty turned out to be to come up with a dust collection/hood/guarding arrangement which would permit the work to pass over the top of the block.
It was achieved by removing items not required from the stock Hammer curve hood, fitting it with a 160mm connection to suit the flexibles used by the high flow dust system and by mounting it on a ply base which picked up pre-tapped holes in the machine table and set it back further than is standard.
A flexible dust guard made from an old table mat was fitted to the outfeed side in the hope of stopping most of the dust and chips thrown forward while cutting.
An adjustable screw type end stop was built to permit repeatable and accurate placement of work. It mounts on the table to the infeed side of the hood – it wasn’t used in the test cuts and isn’t in the pics.
Tenoning guards were made from 18mm ply and mounted on the slider T slot.
Additional DIY stops secured by T nuts in the slider slots were made in aluminium to secure the fence at right angles and to reduce any possibility of its being pushed back along the slider T slot. Another was fitted in the fence slot to bear on the mitre quadrant screws and reduce any possibility of it being pulled in towards the cutter.
The hold down is the stock Hammer/Felder item, but the work and the backing strip were also clamped crosswise to the fence – again to reduce any possibility of the work being pulled in.
The cutter is the stock Hammer/Felder 125mm dia aluminium rebating block with fresh inserts which was very accurately counter bored to just recess the retaining cap. This so that the work could pass over it to cut channels, long tenons etc.
The following message will include a fourth pic which shows the resulting cuts.
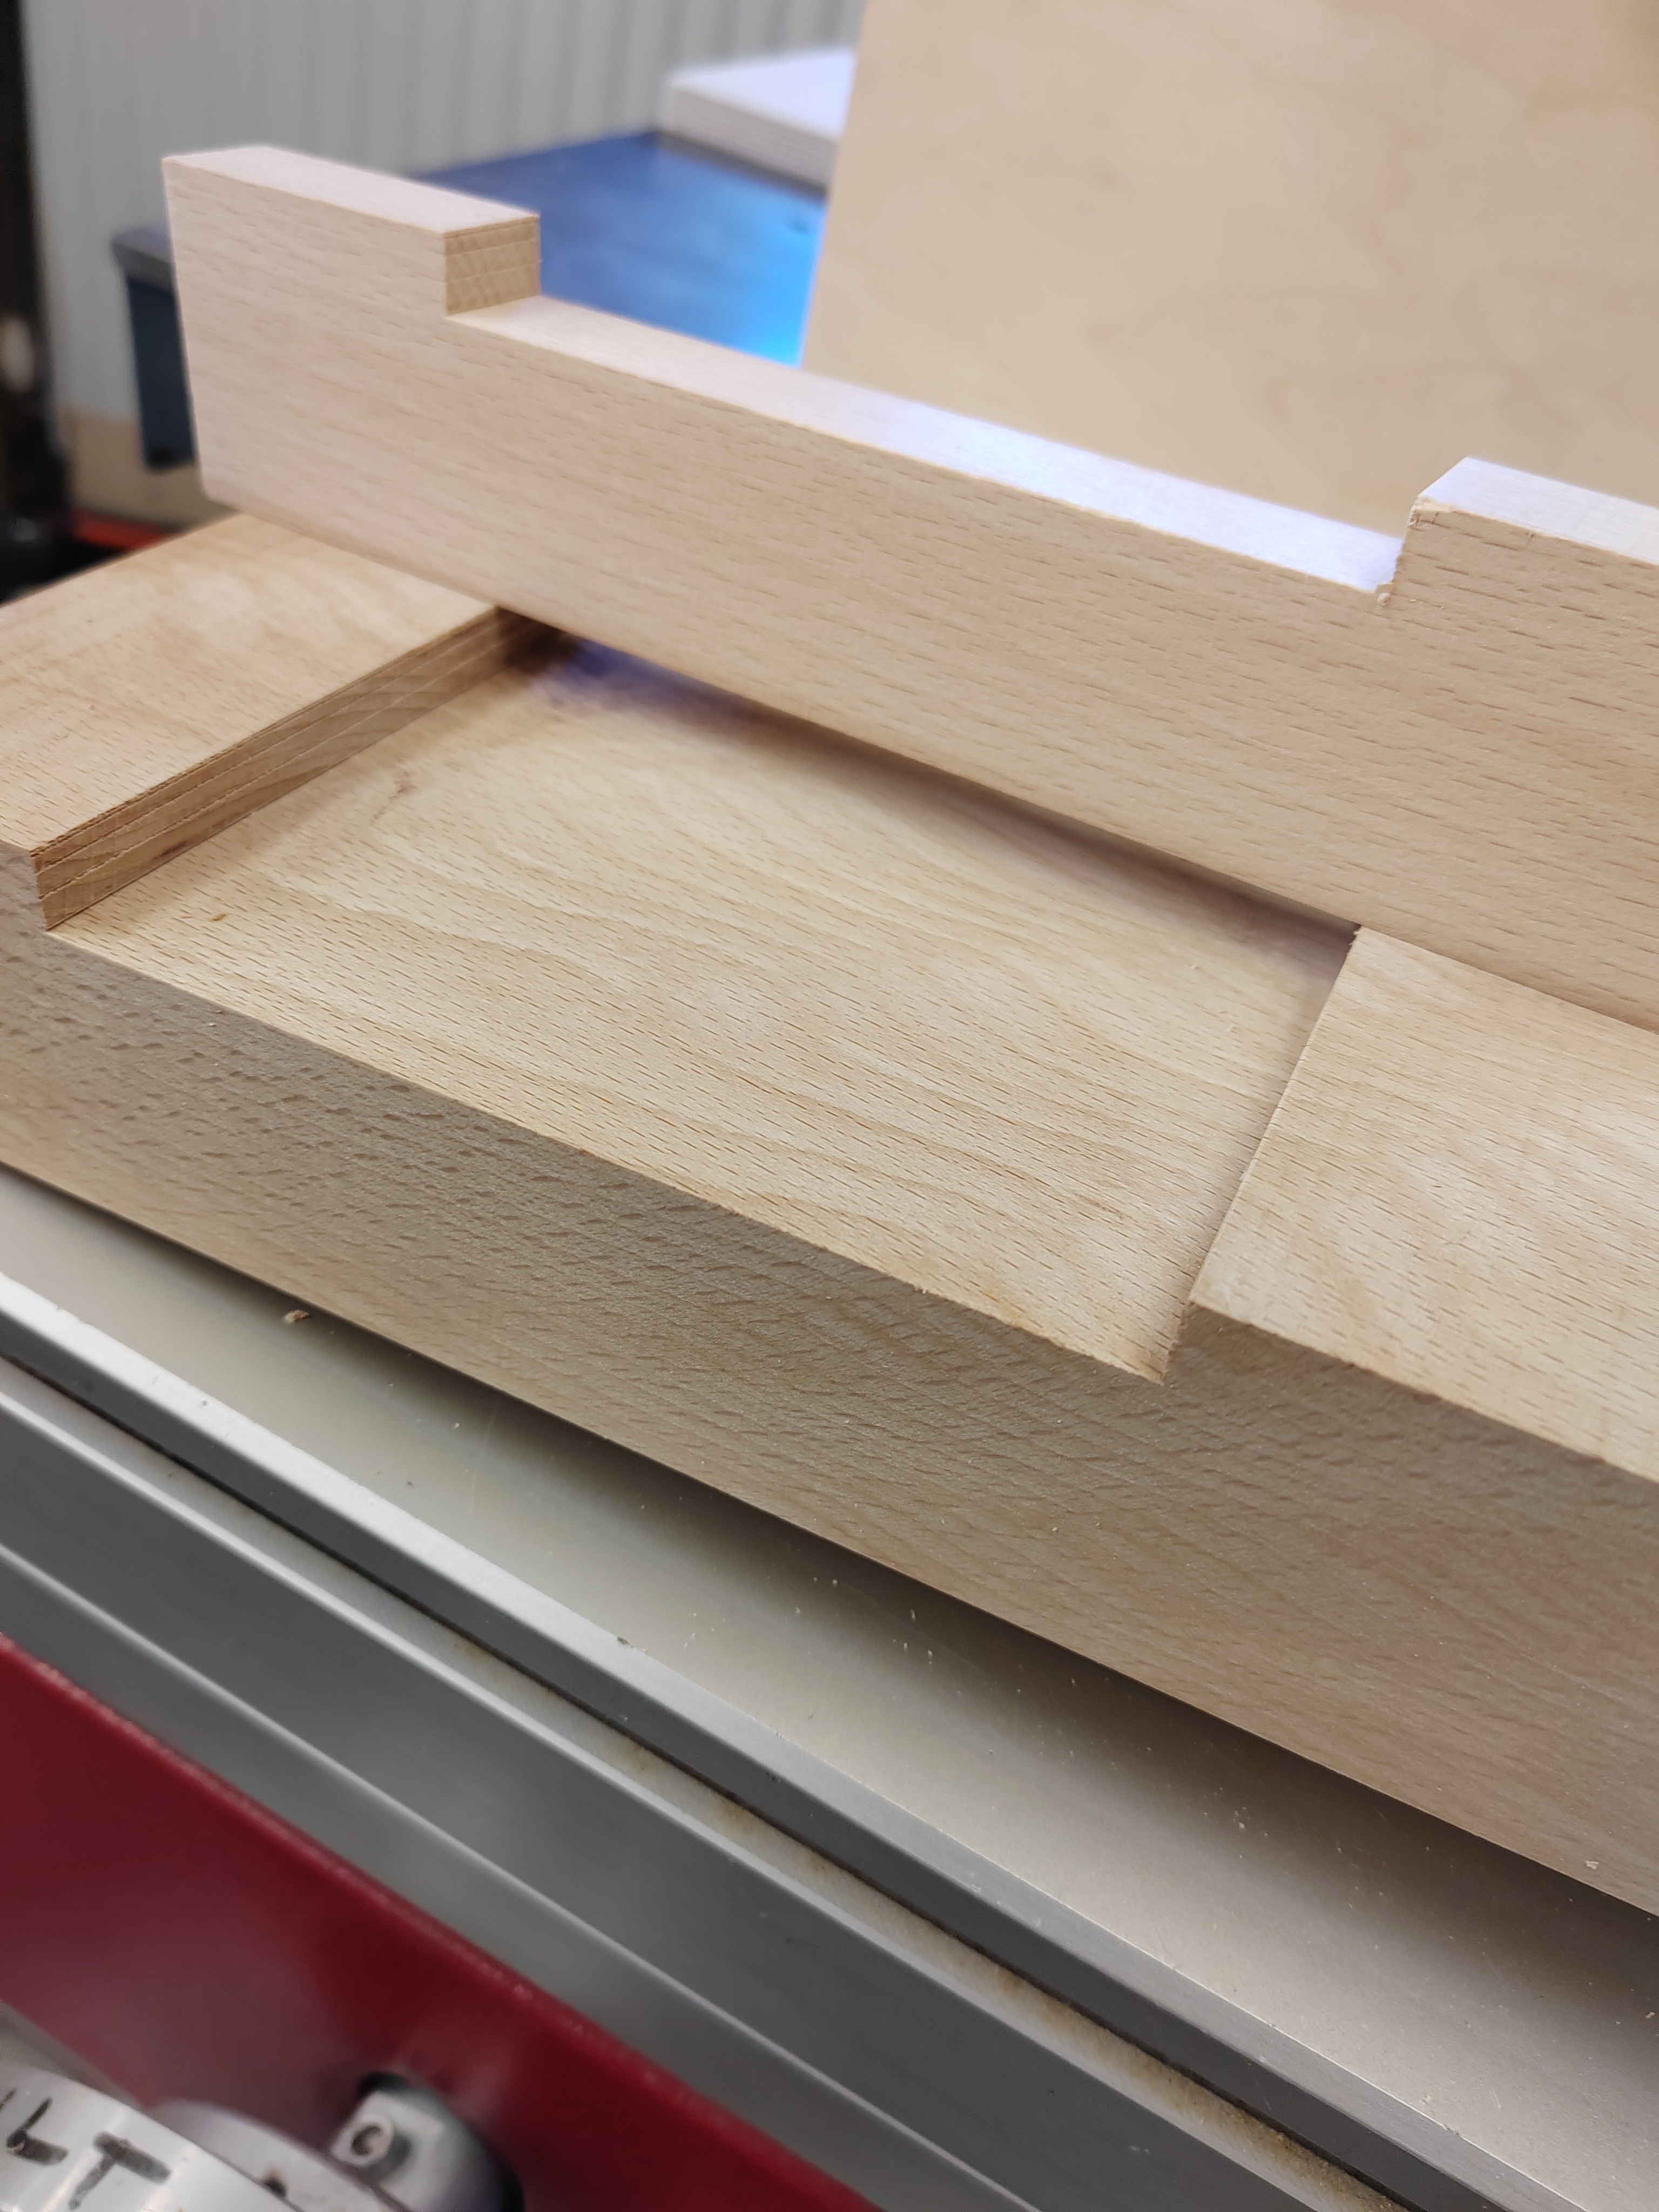
The test cuts proved to be a bit of anti-climax.
The machine (a 3Kw Hammer F3) laughed at the initial 1mm depth of cut. The marks on the shoulders of the channel (the width of which is the diameter of the block) show the depths of the successive cuts. The last was about 4mm deep by which point the machine was just starting to feel the load.
The test piece is beech with fairly exotic grain which happened to be about.
The cut quality was very good – even the backing strip exit edge showed only very light breakout. (see the pic with the next message)
It proved a bit awkward to get the spindle set vertically so that the base of the cut channel was accurately in the same plane as the base of the work/the same depth at both sides. It was about 0.3mm out side to side in the first cut – despite the spindle having been set vertical. The inaccuracy was dialled out using the spindle tilt (after backing off the very difficult to access and rather crude tilt stop) – it will hopefully be possible to get the stop set so that future cuts will be accurate in this regard.
Dust/chip collection was surprisingly good – probably helped by the high flow Pentz dust system. A little escaped through gaps to the front and to the outfeed side, but not much.
Next up is to make a batch of parts requiring a channel as in the case of the test piece, then a job involving 70mm long tenons.
Comments appreciated…
View higher quality, full size image (3072 X 4096)
View higher quality, full size image (3072 X 4096)
View higher quality, full size image (3072 X 4096)
4/20/24 #21: Shaper Set Up to Cut Wide Channel - ...

This is just to put up the fourth pic showing the test cuts.
View higher quality, full size image (3072 X 4096)
4/21/24 #23: Shaper Set Up to Cut Wide Channel - ...

Atta-a-boy, Ian!!!
Your ingenuity paid off and it sounds like you can do it in 2 passes rather than 3.
Well done, Allen
4/21/24 #24: Shaper Set Up to Cut Wide Channel - ...

Thanks Allen.
It can I'm sure handle a deeper cut than 4mm, although by how much I'm not sure.
The possibility I suspect is that if overdone it could fairly quickly transition from cutting easily to biting off more than is advisable - if loaded to the wrong side of the torque curve.
What might happen then I've no idea. If everything is well anchored down it may (since the feed rate is controlled by how much hand pressure is applied to the slider) be just a matter of easing the feed rate.
I got the stop set accurately on the spindle tilt this afternoon (so that the channel was cut to the same depth on both sides to within 0.02mm (<0.001in) over its 125mm width) - but it took several hours of PIA trial cut/measure/adjust repeats to get it right.
One down side of cutting a wide channel or a long tenon this way is that the block must be set so that its top surface is accurately in the same plane as the surface of the slider - much more so than is required in the case of e.g. a shallow decorative profile.
It hopefully will hold the setting.
The tilt hand wheel turns a TR16mm (metric ACME) trapezoid threaded screw which passes through a bronze block attached to the spindle assembly.
The stop is a fairly primitive steel collar internally threaded as the screw with two grub screws bearing directly on the thread to lock it at a given position.
It's difficult to access and adjustments are not very controlled...
4/22/24 #25: Shaper Set Up to Cut Wide Channel - ...

Hi Ian,
I have a sliding table saw that uses that same arraignment for blade tilt.
If you change blade height the blade angle changes!
If your tolerance is .3mm in 125mm I suggest you keep an eye on it as you change the depth of cut. Your shaper appears to be new so hopefully it's tighter than my saw, Allen
4/22/24 #26: Shaper Set Up to Cut Wide Channel - ...

Hi Allen. The shaper is actually almost 15 years old but has seen only occasional use. (health problems kept me out of the workshop for several years)
My saw is a Hammer K3 with an 8ft slider and uses a similar system to stop the tilt when the blade is vertical.
It was equally a PIA to set up but despite very much heavier use than in the case of the shaper it has to be said that it has held its adjustment for quite a few years now.
The F3 will hopefully be similar.
My background is engineering - machine and engineered product design and development. I struggle with the idea of an arrangement which requires grub screws to bear directly on a thread.
Woodworking machinery at this end of the market is necessarily a bit that way, but experience suggests that difficult to adjust arrangements that deliver only minor manufacturing cost savings are in the general sense often poor economy for a business.
They risk forcing a choice between high set up costs during assembly and/or the shipping of very crudely set up and under performing machines likely to upset many customers.
A similar dilemma arises for field service people who must work to tight time standards to keep costs under control.
One consequence can be a strong incentive to specify wide tolerances in set up manuals to side step consequent warranty issues and the cost of precision setting up....
5/3/24 #27: Shaper Set Up to Cut Wide Channel - ...

Just a PS to the above in case it's of interest - but as above anybody thinking of trying something similar must first satisfy themselves that it is safe.
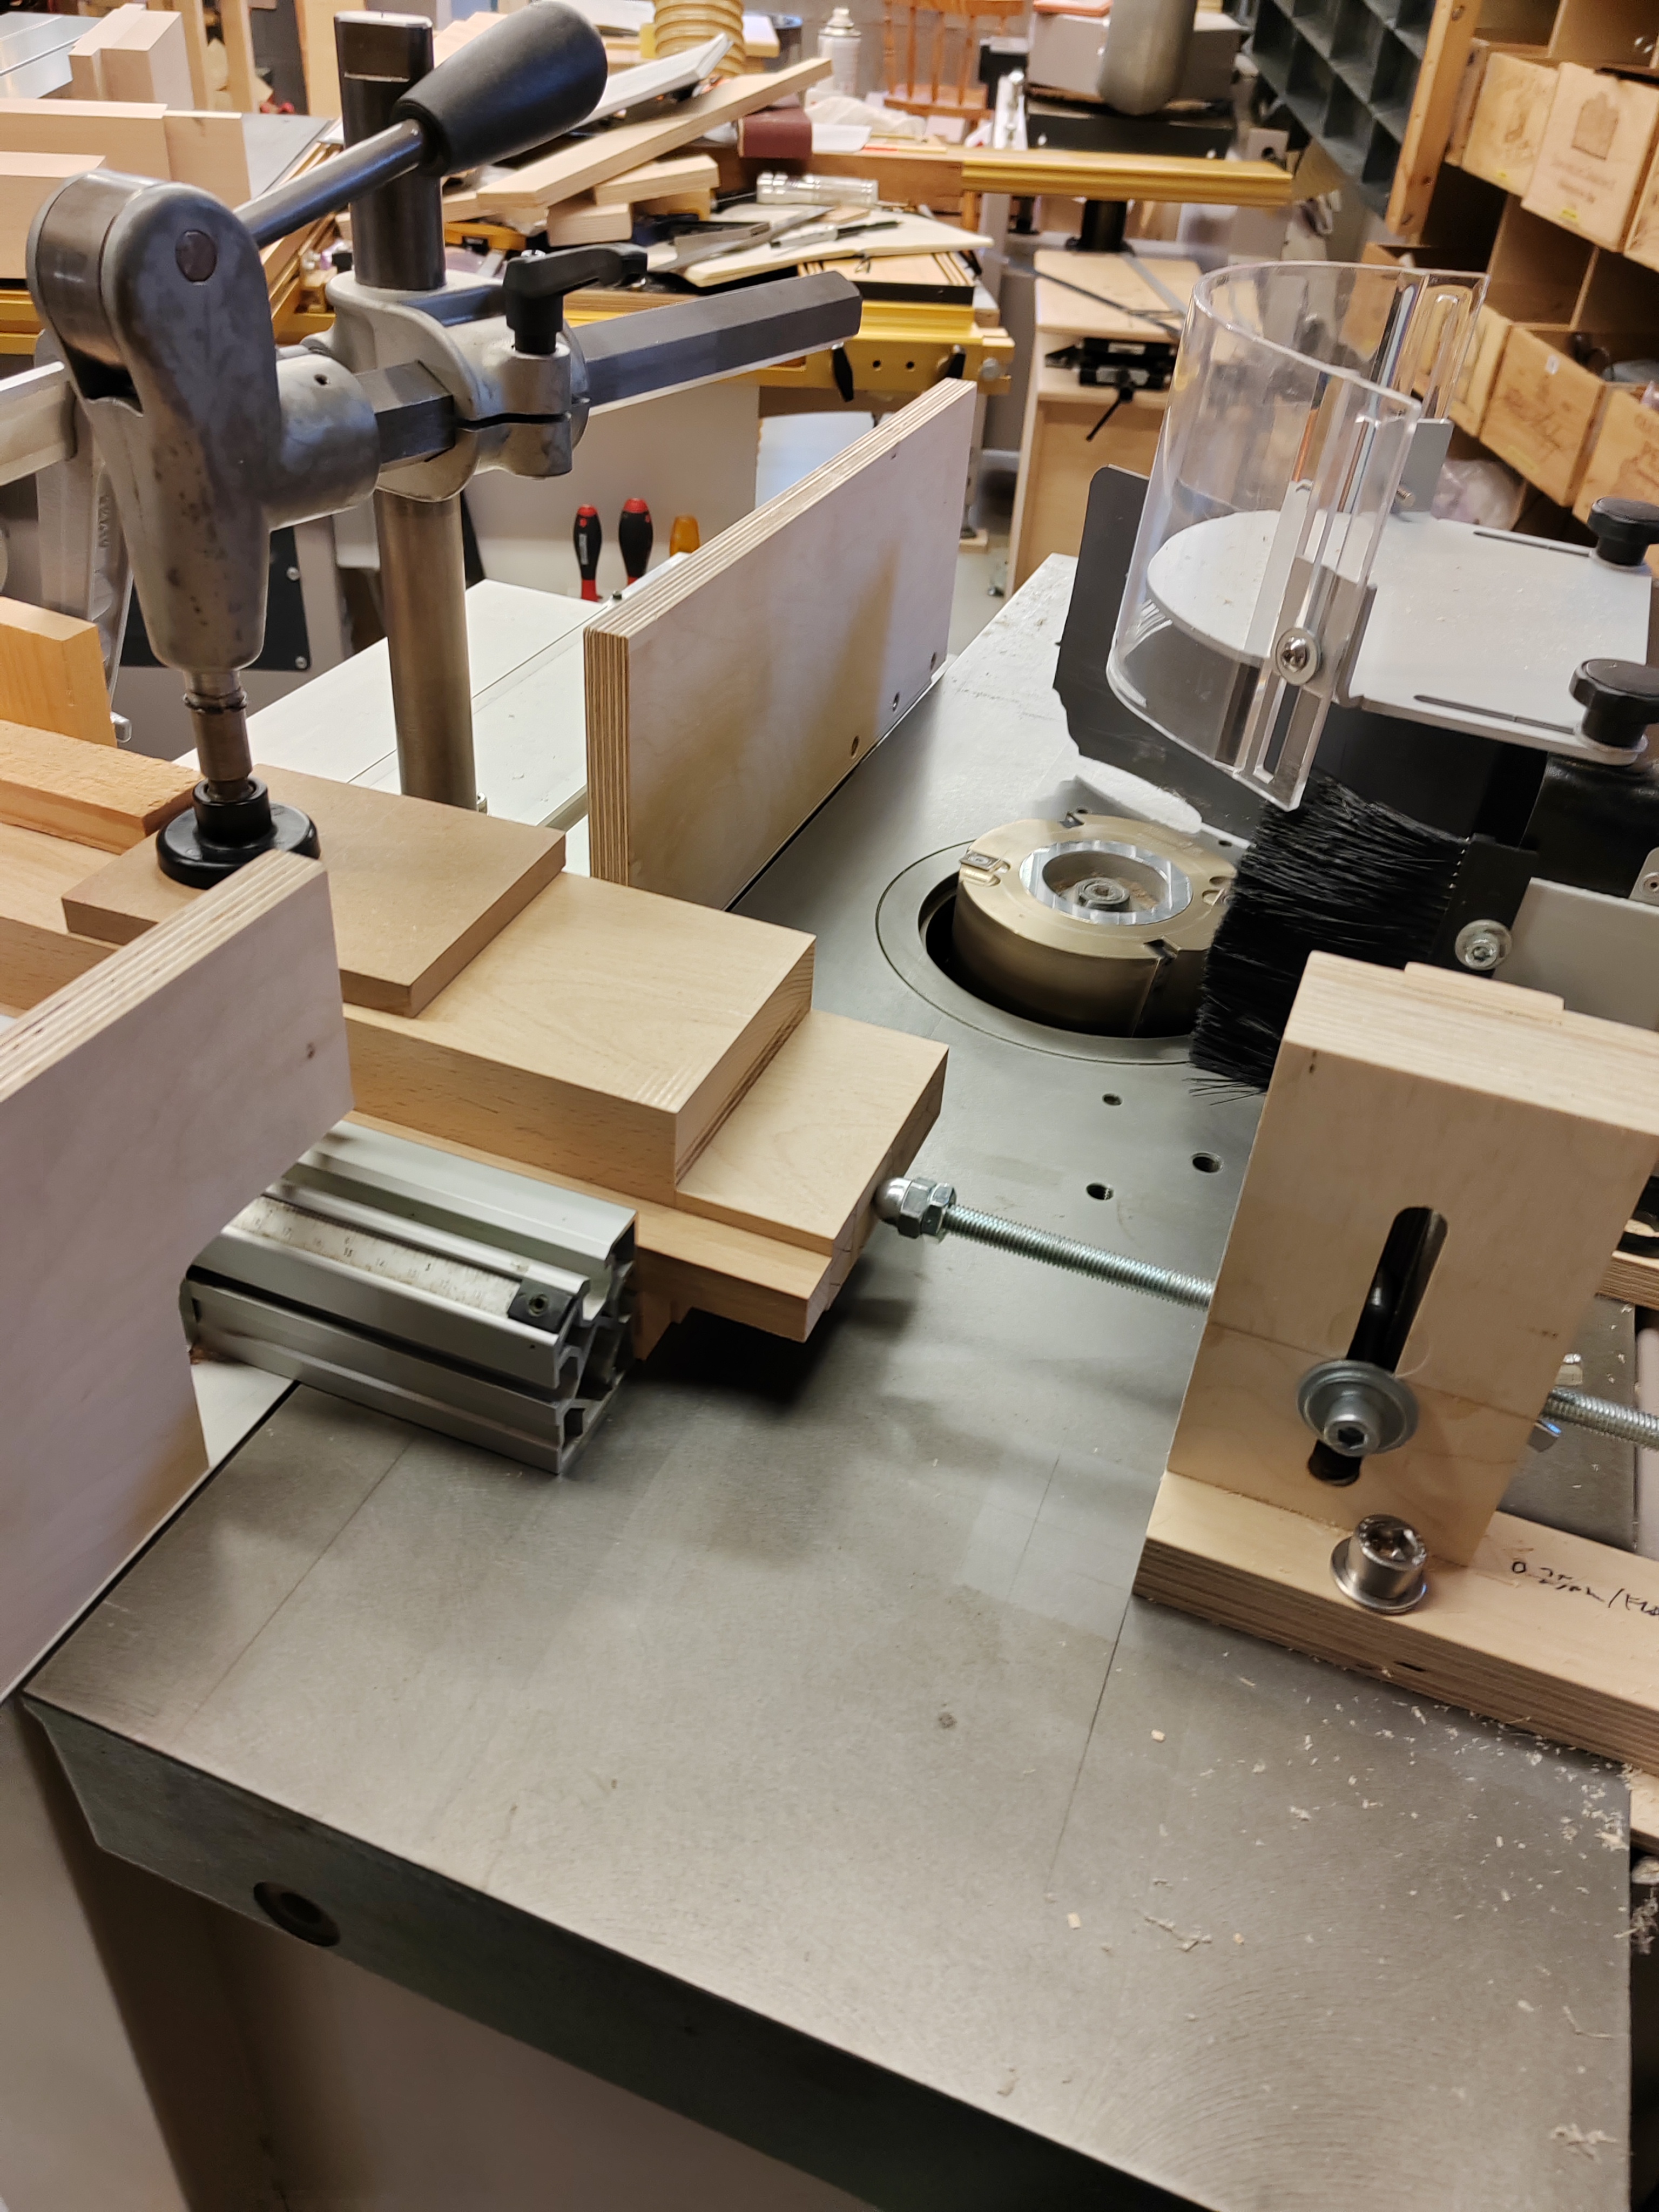
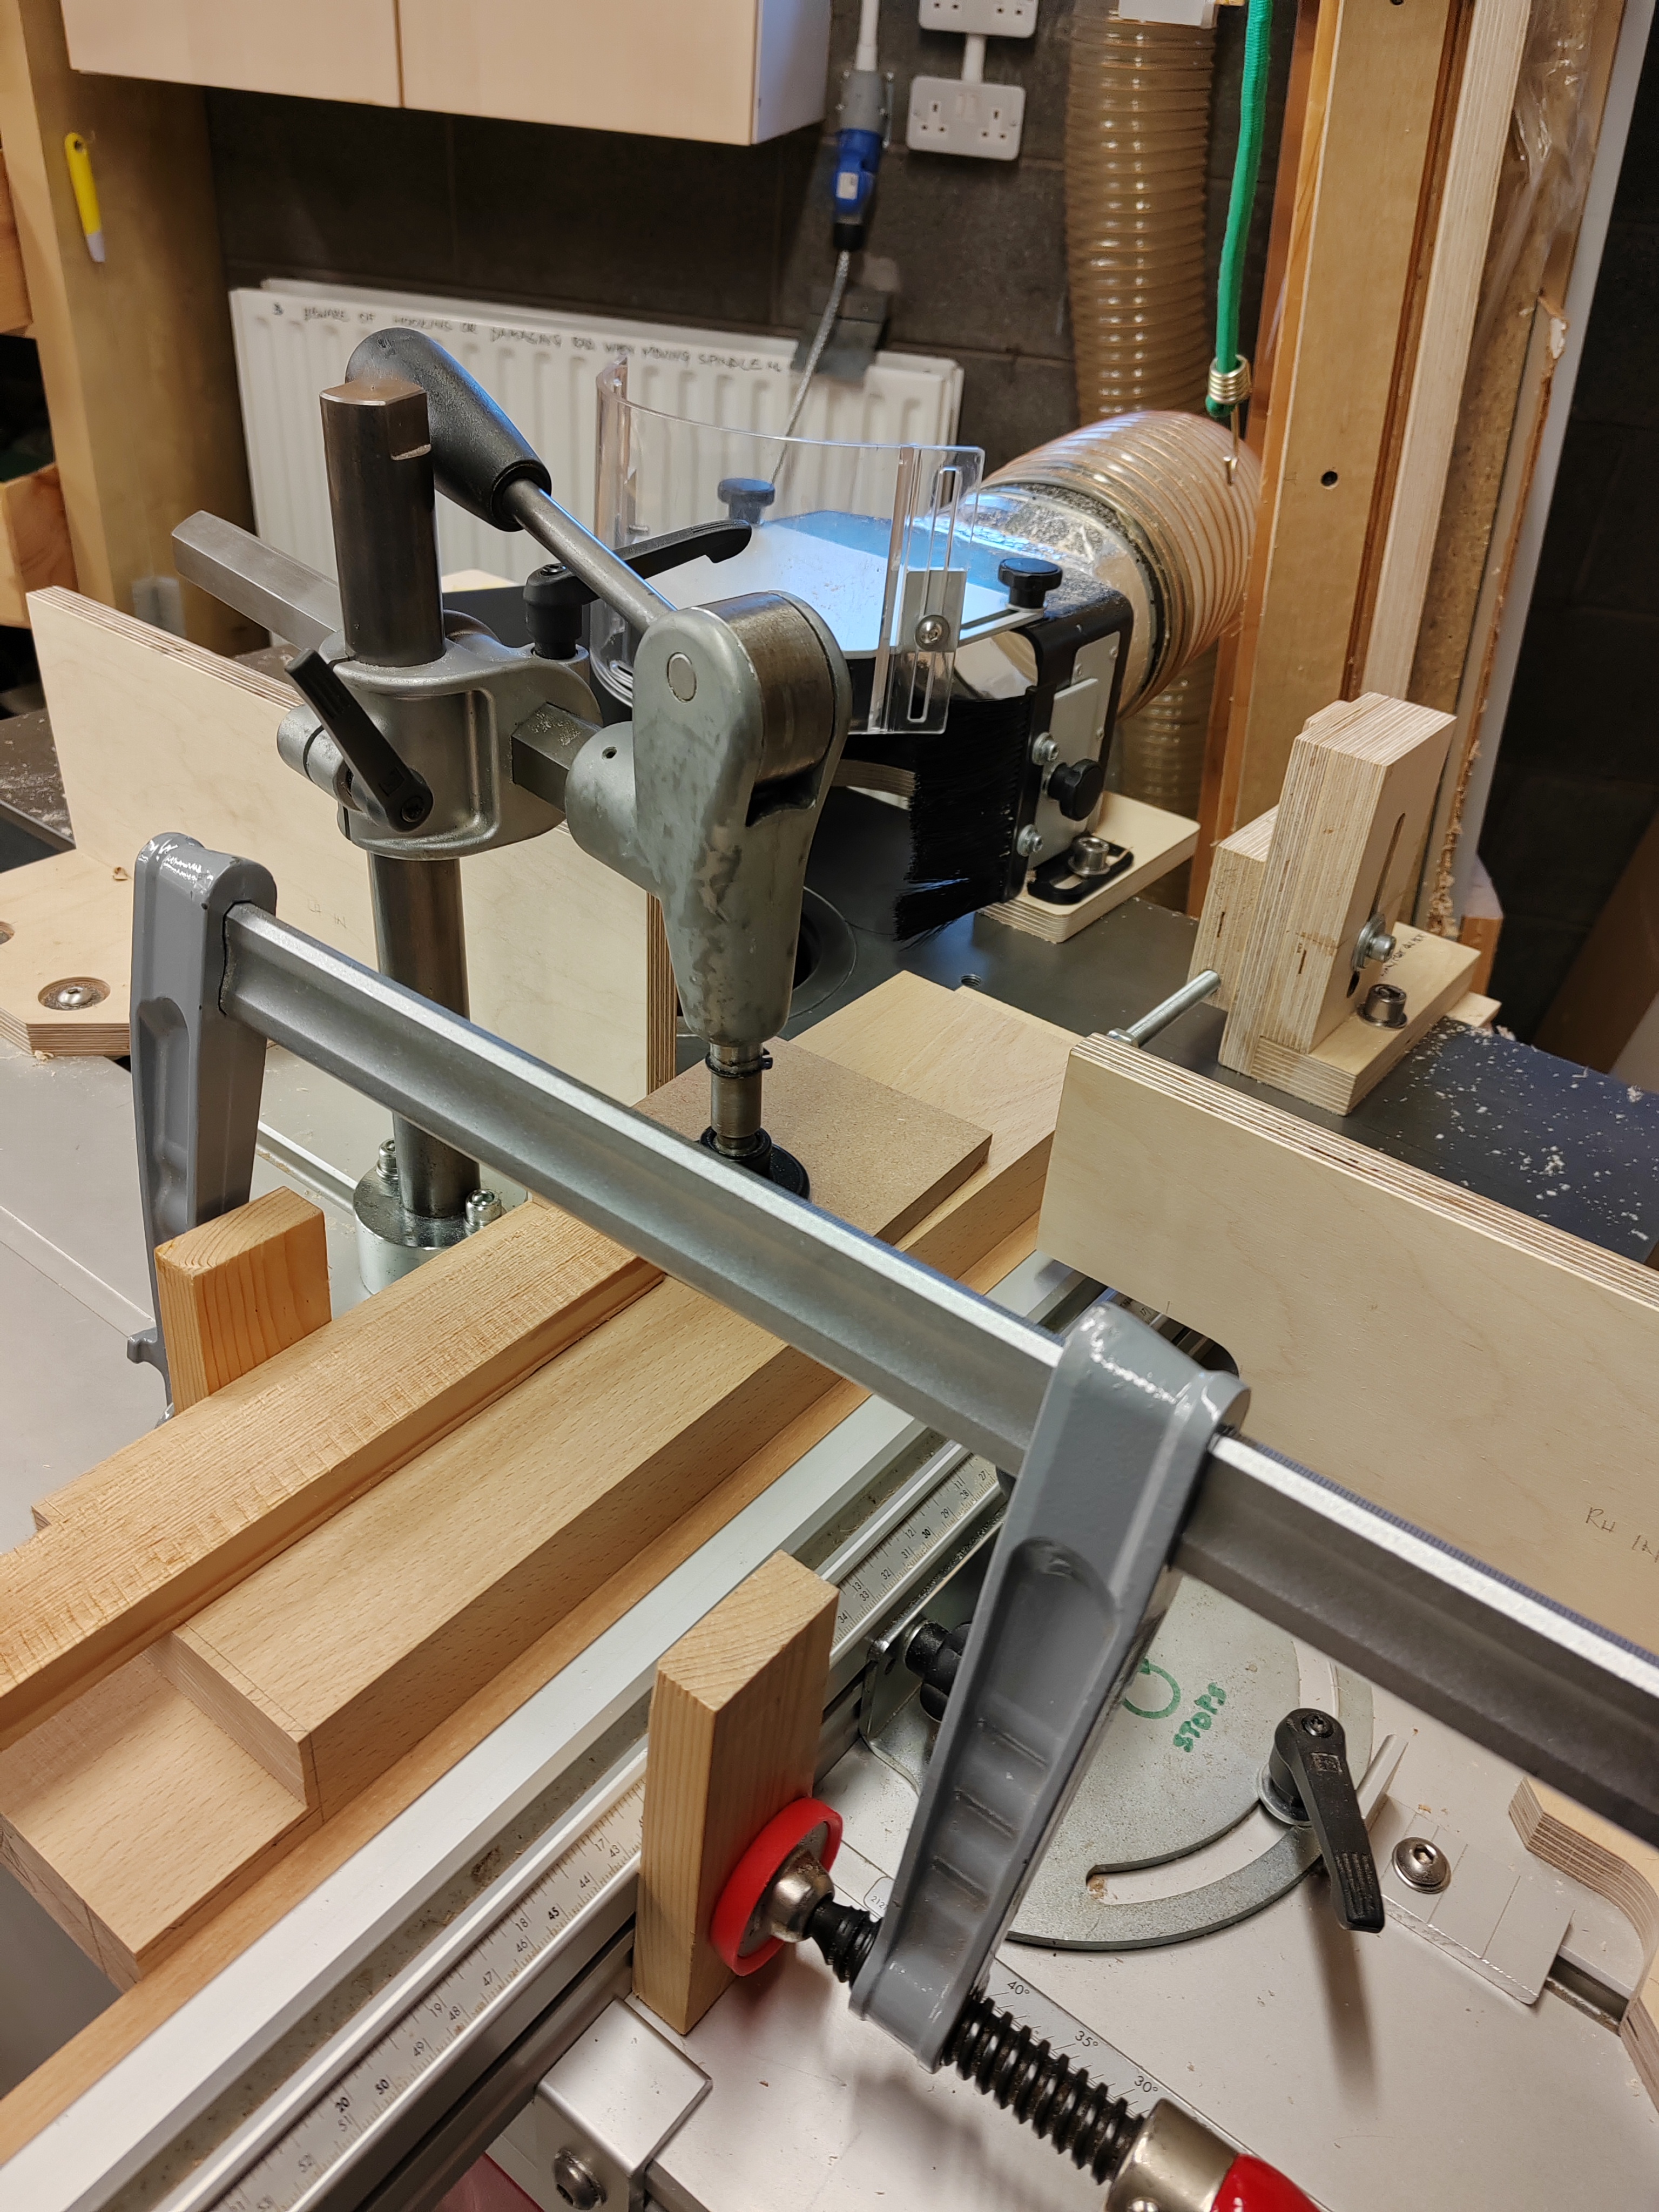
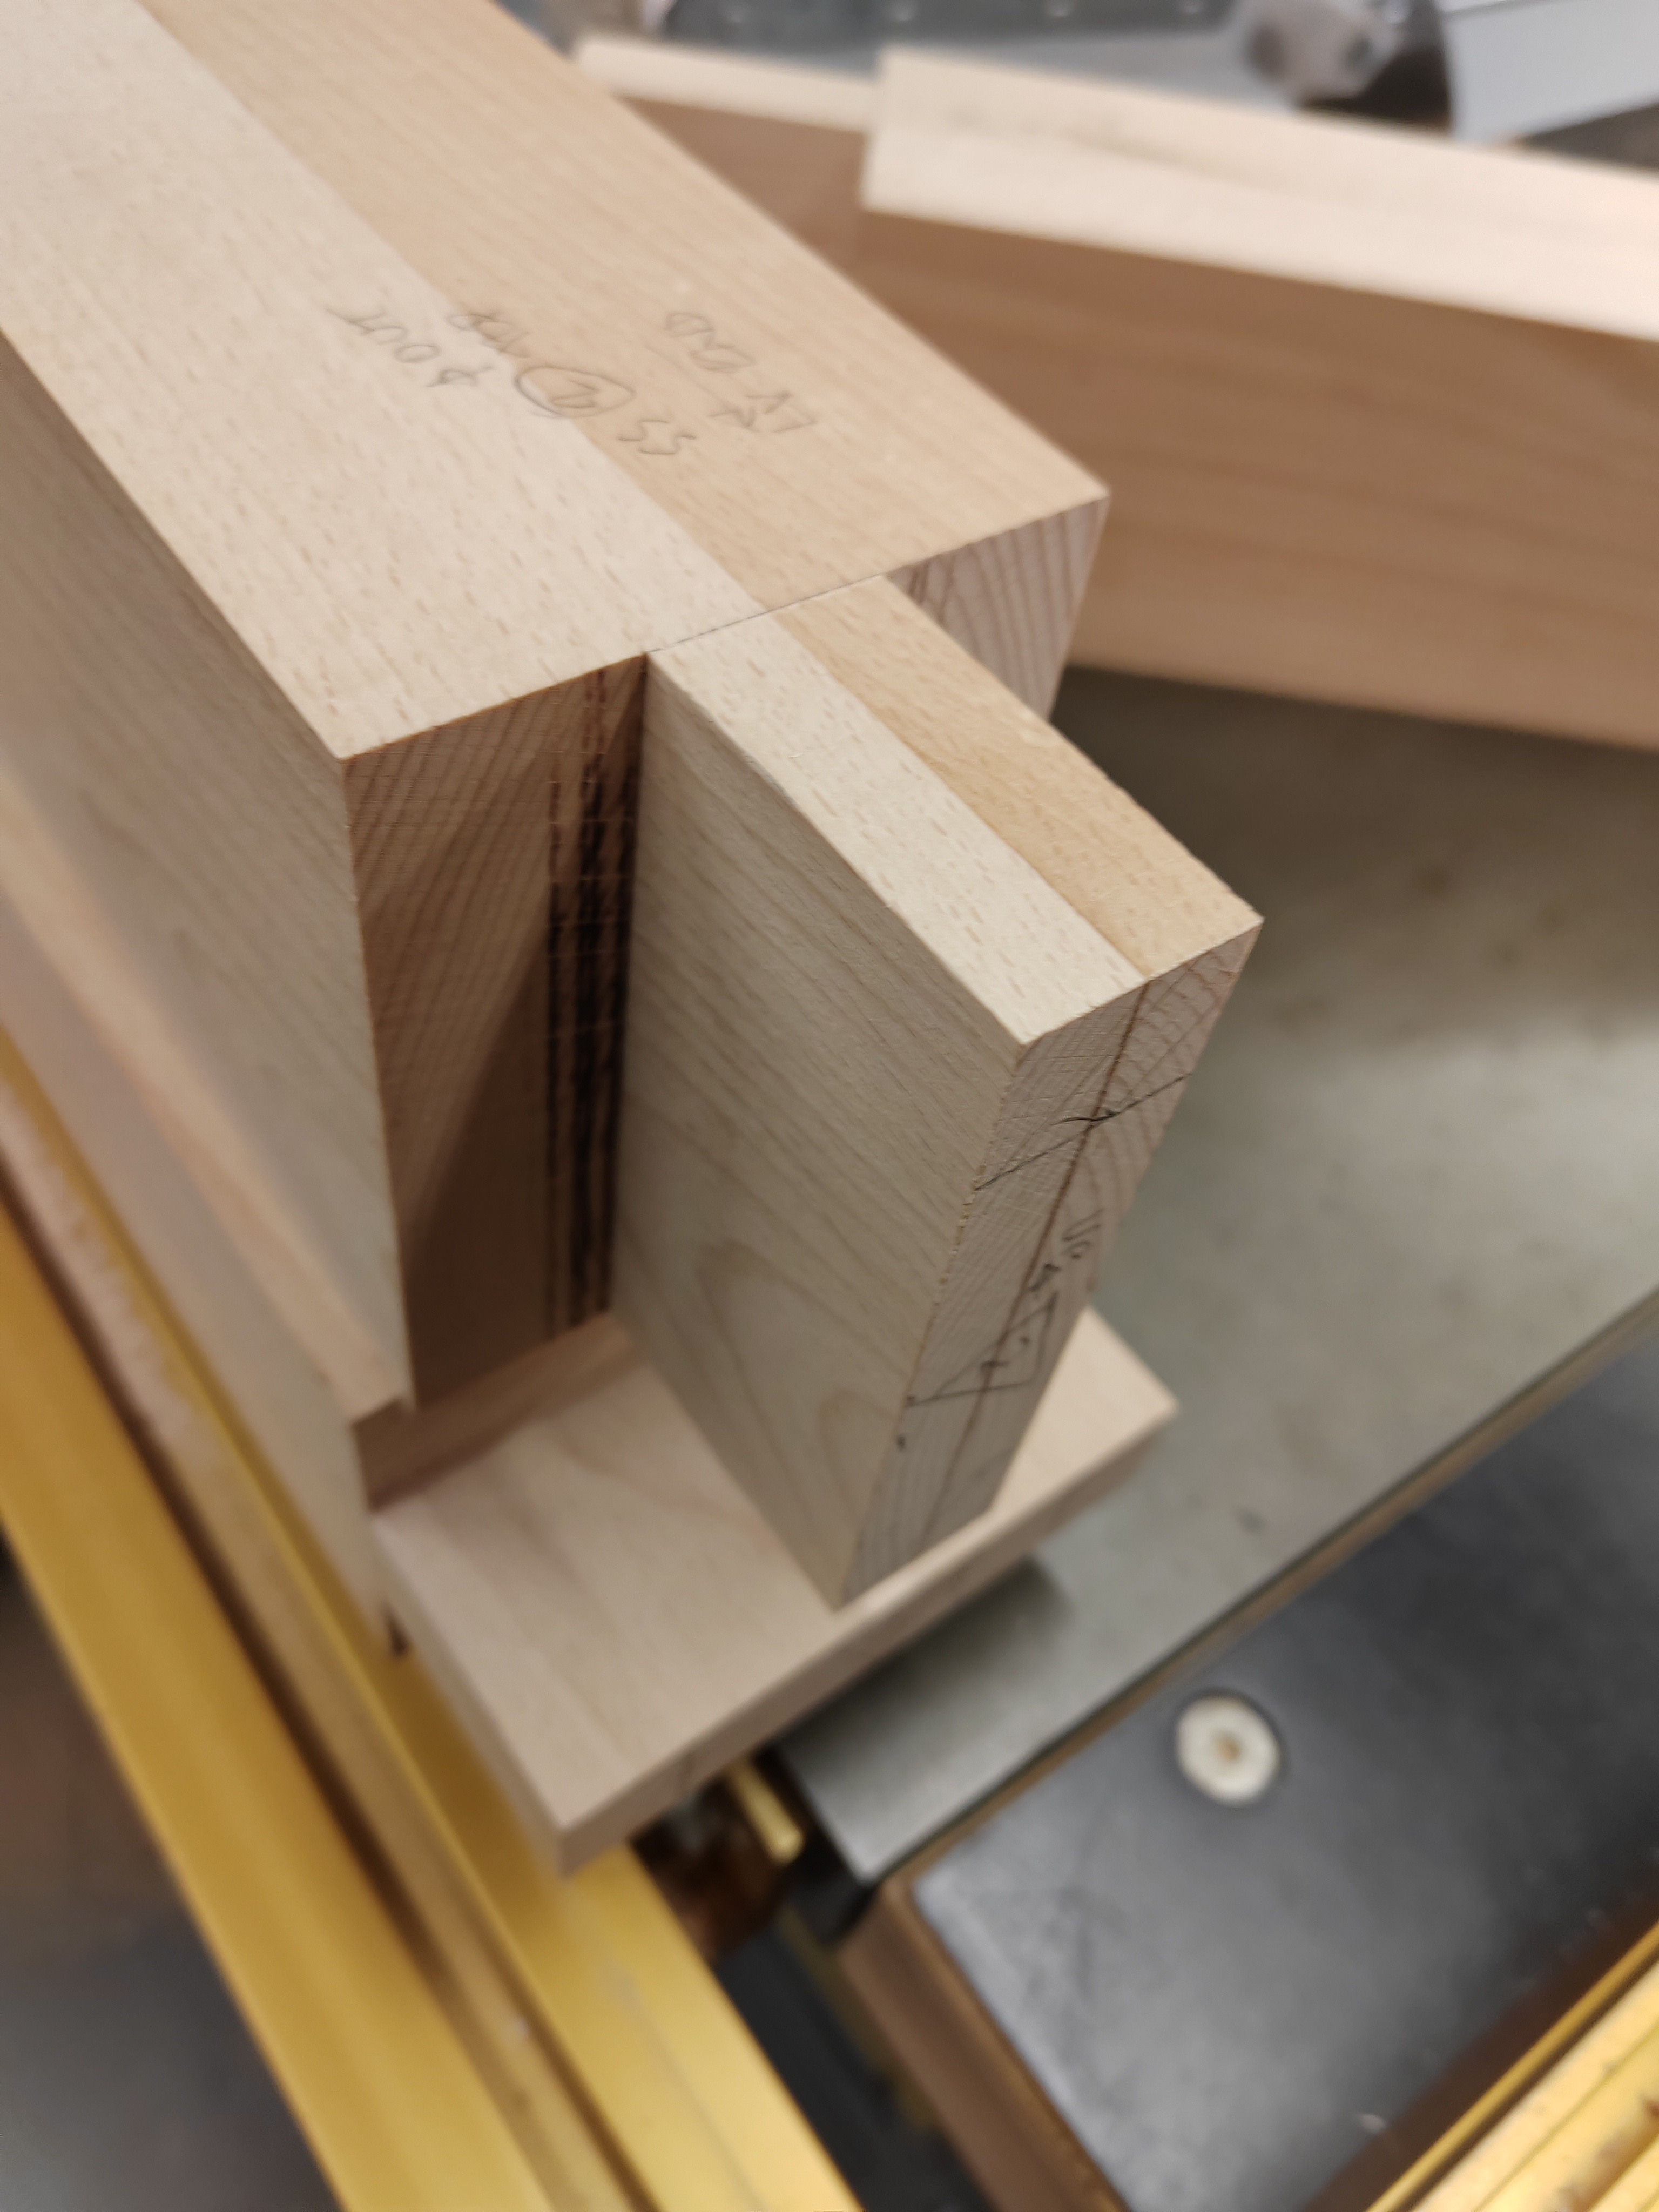
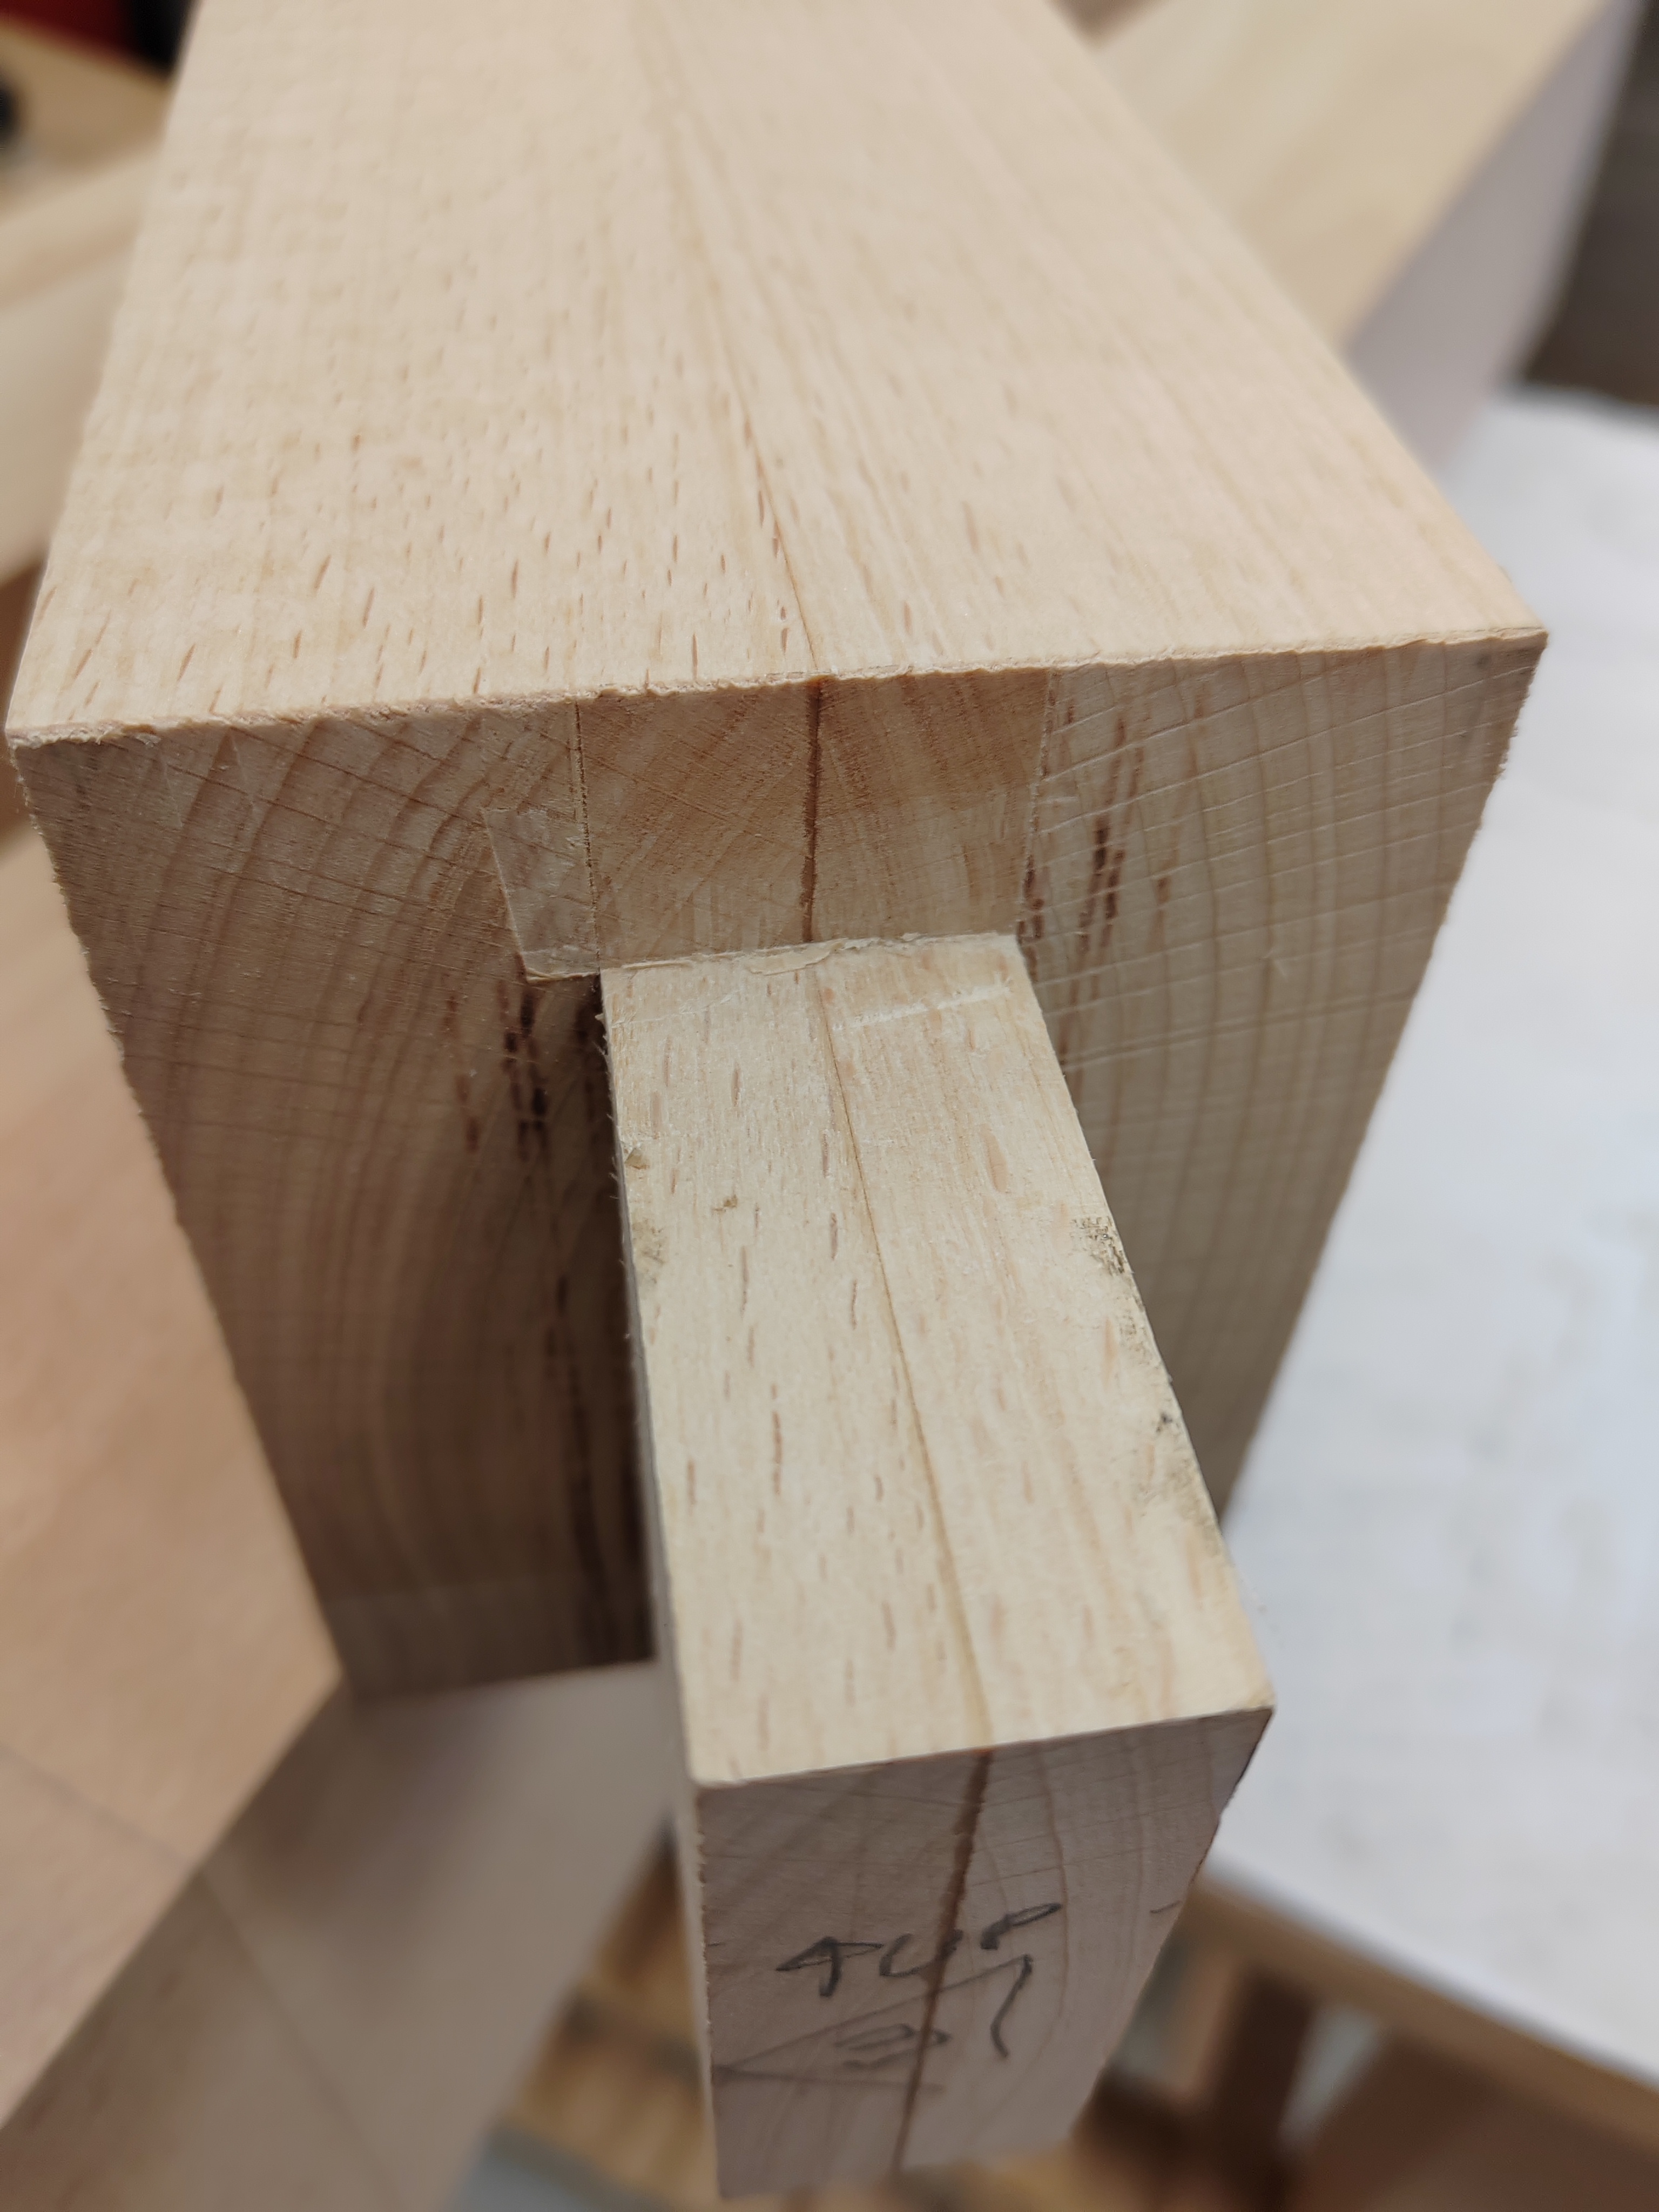
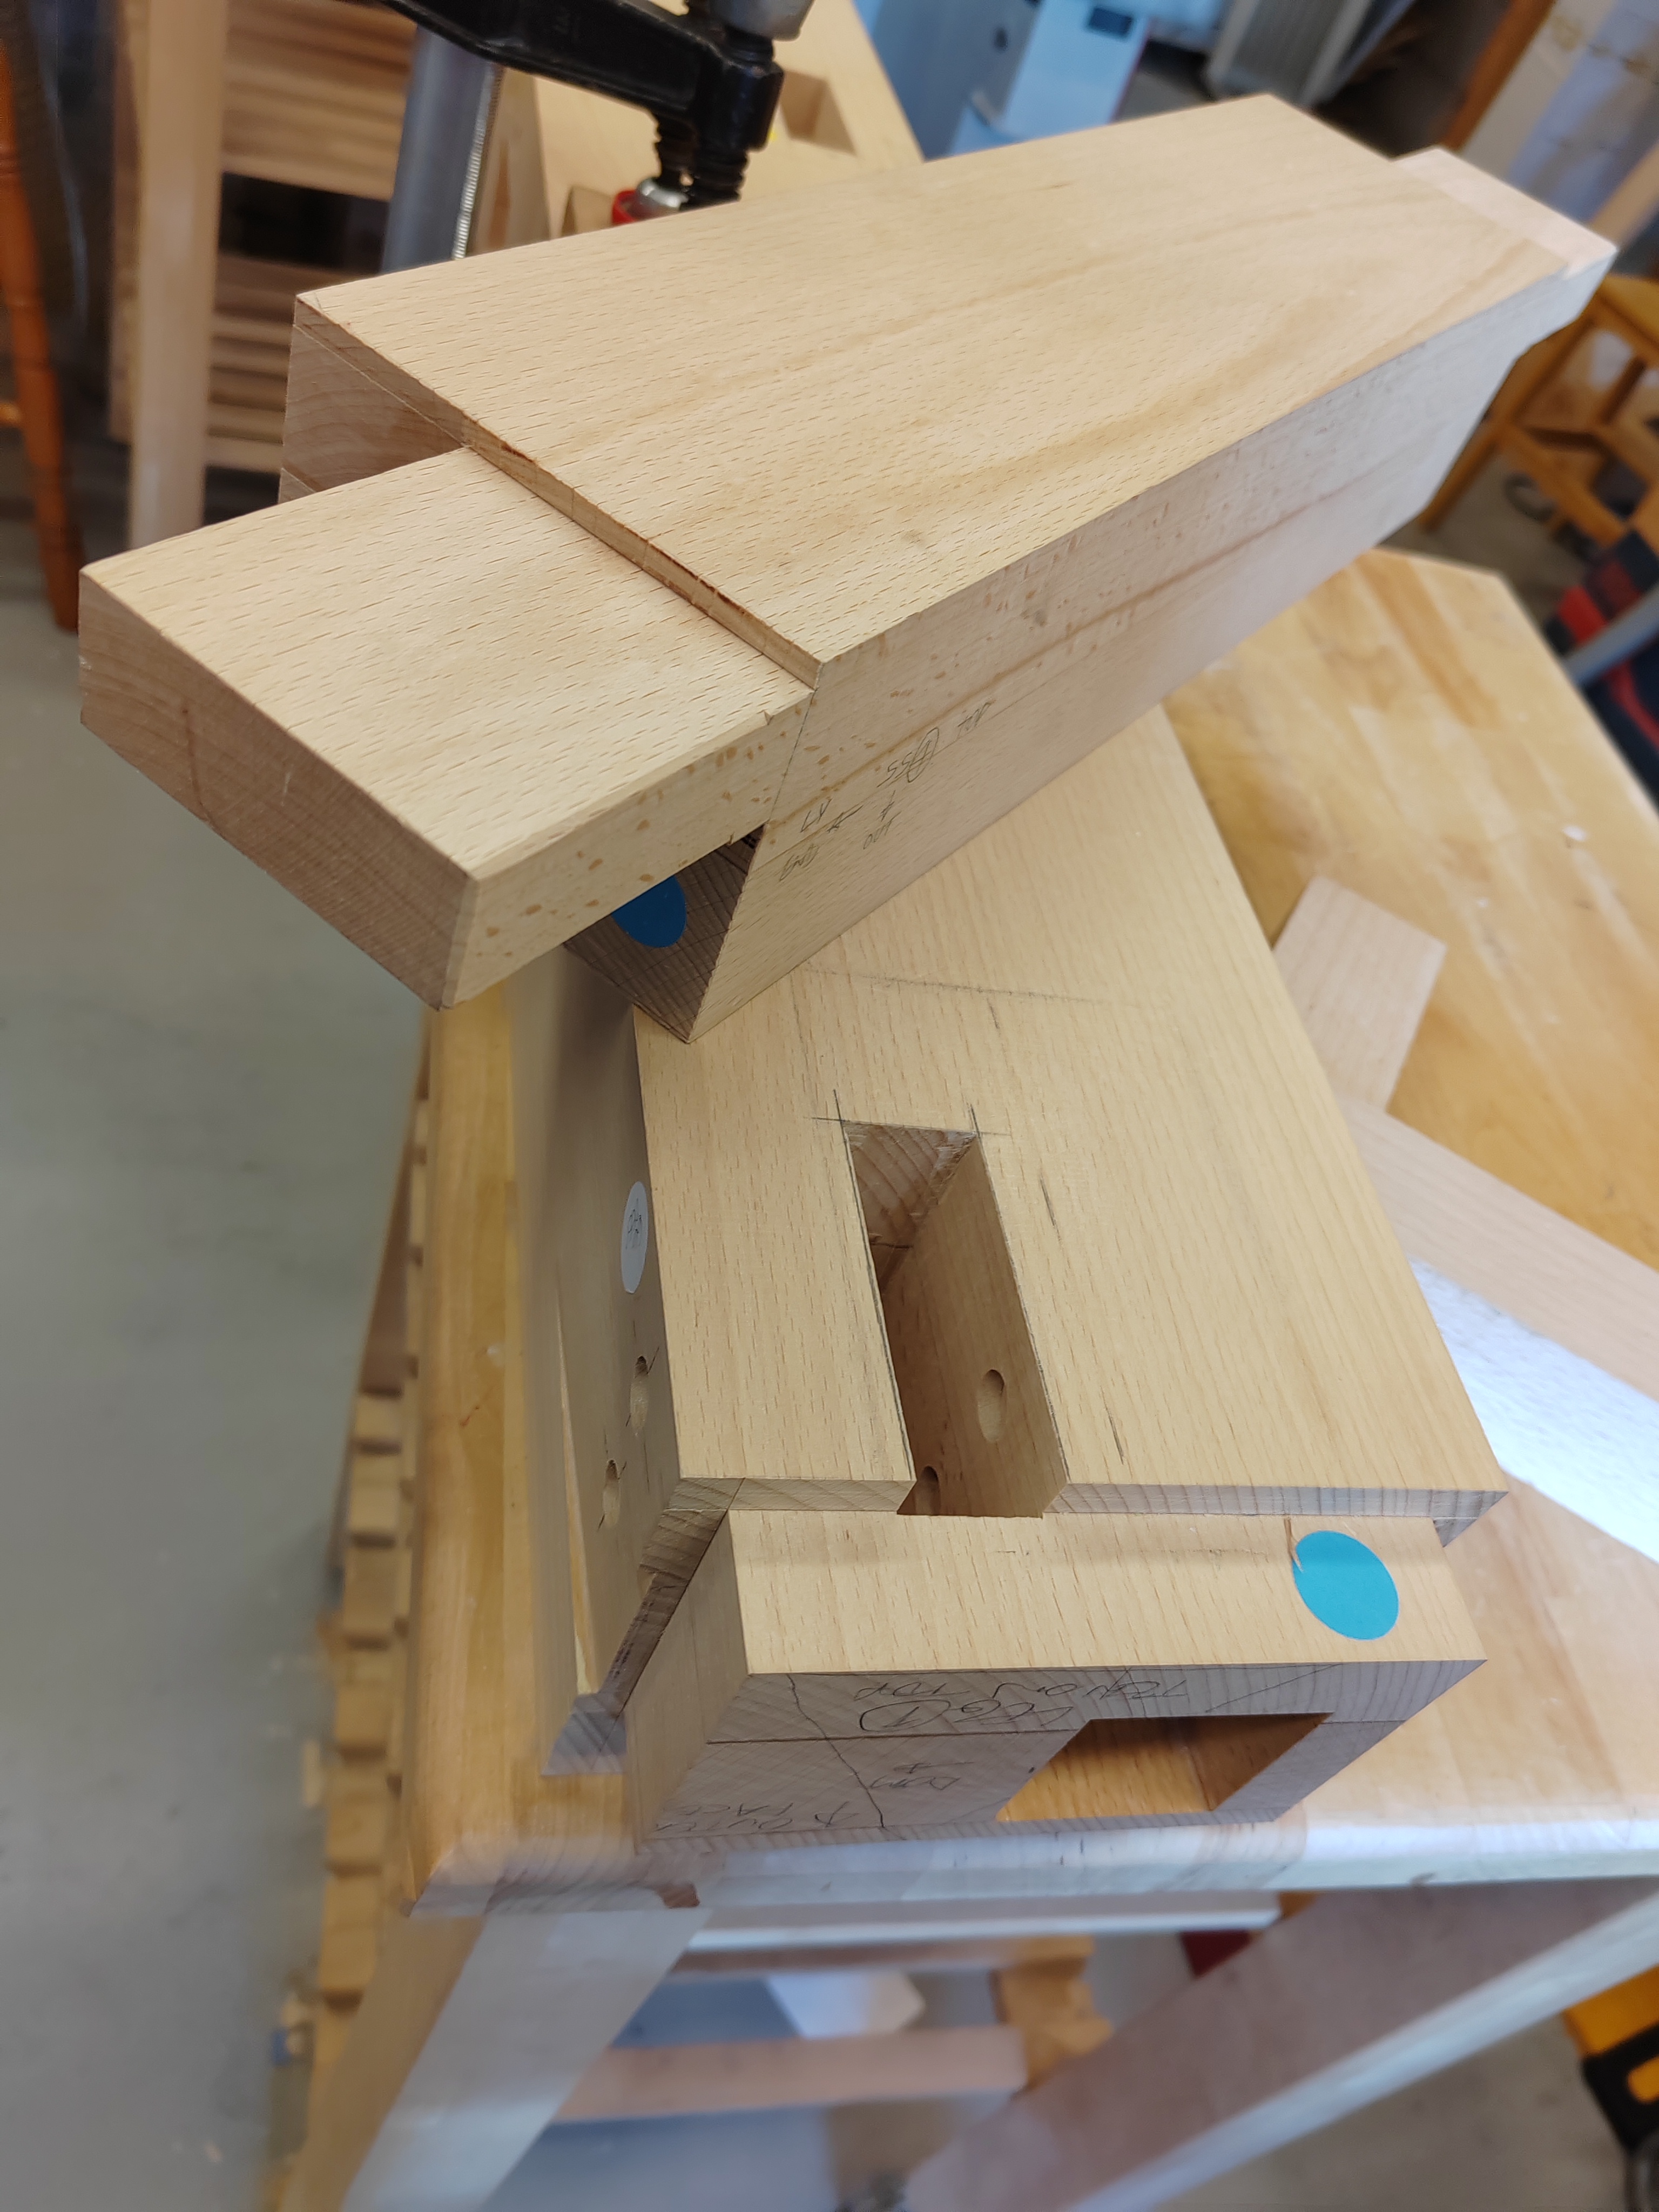
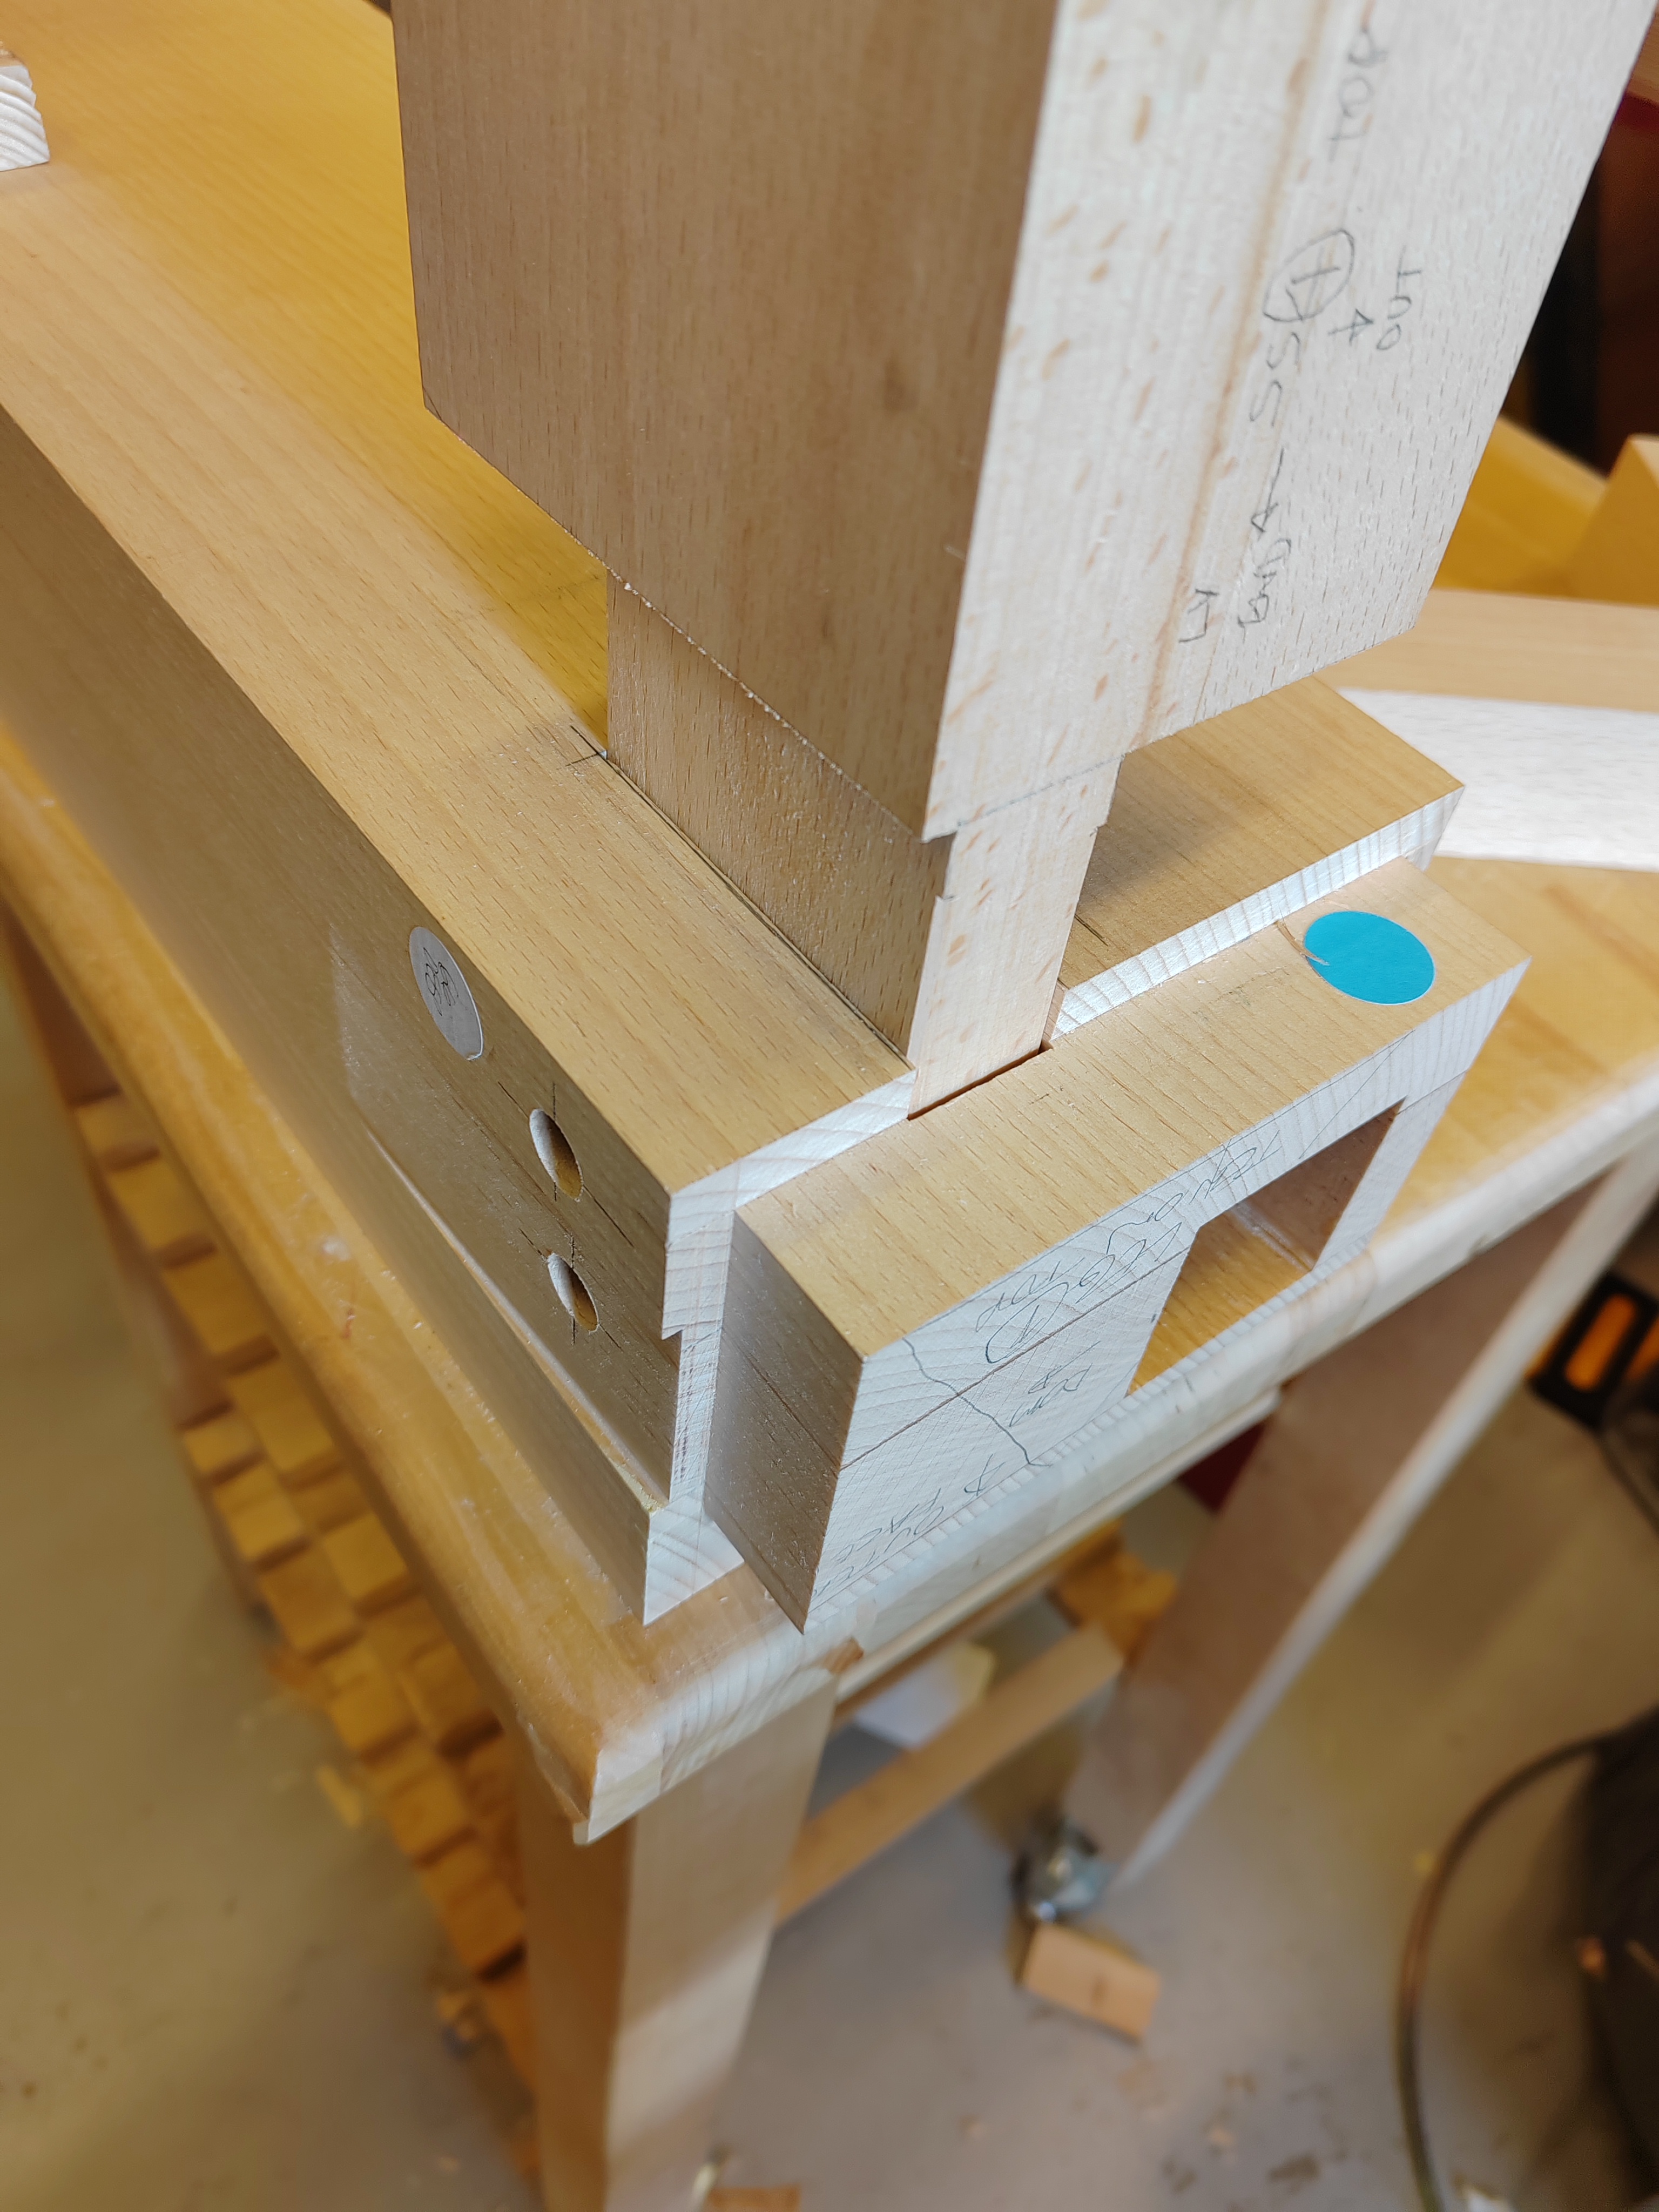
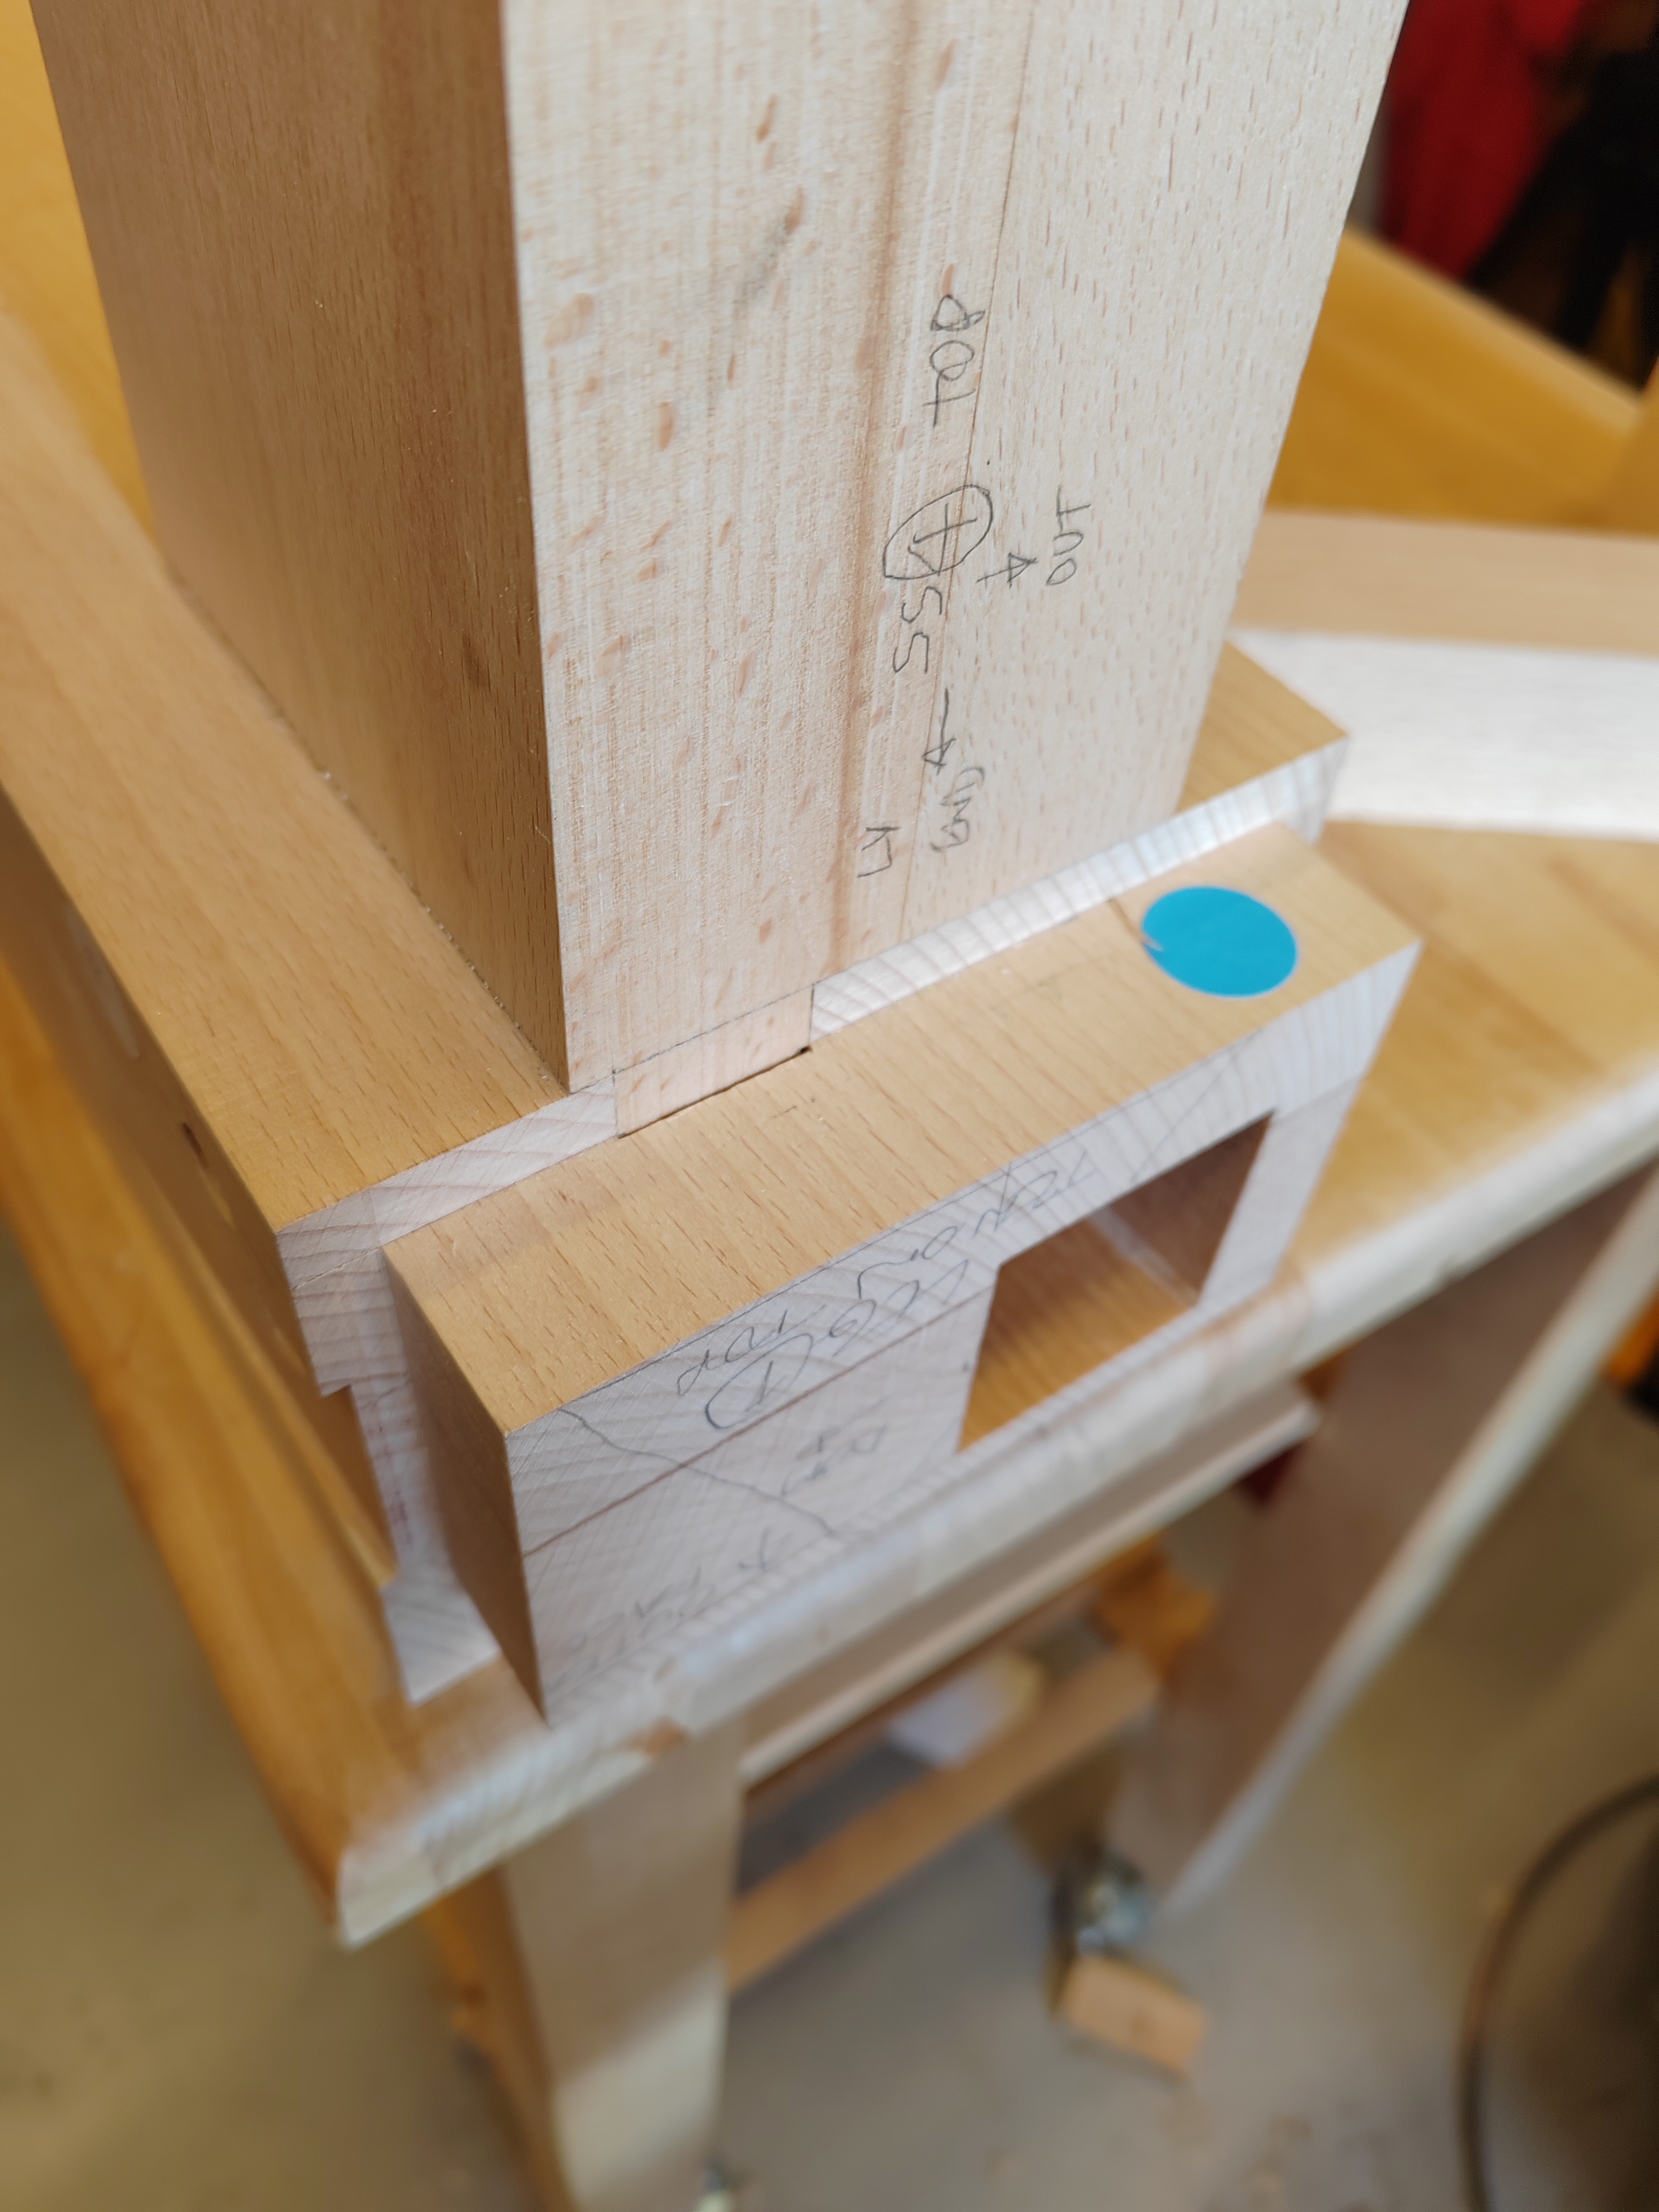
We've since the above been using the set up to cut 70mm and other longish tenons on large section beech parts for a heavy workbench.
Cutting each tenon face from underneath in this manner in a single pass is obviously labour intensive compared to more production oriented set up using stacked cutters etc.
The approach suited in this case - it's a relatively accessible and low cost option for a one-off job.
It because the cuts are referenced off different faces of the stock requires very precisely milling if it's to deliver accurate tenon dimensions - all pieces the same, accurately to length and with square end faces.
This in turn requires a very accurately set up saw, planer thicknesser etc. and good technique - especially with large section pieces as here.
The Felder 'digital' height gauge fitted on the shaper rise and fall (it's actually mechanical) helped greatly in achieving repeatedly accurate cutter height settings.
Very careful and accurate use of end stops etc is also required so that the shoulders end up in the same plane and so that the distance between shoulders on the pieces with a tenon at each end is accurately controlled.
The pics with this post show our set up - including the DIY adjustable end stop used to set tenon lengths.
It by contacting the piece at a single point near the centre of its end face minimises the consequences of any slight out of squareness.
The pics with the following post show some of the resulting work.
We have an aluminium tenoning plate but didn't use it because the heavy section timbers were easily able to support themselves - it would be needed with lighter stock.
Backers on the fence side of the work are necessary to prevent blow out.
We band sawed out most of the waste leaving about 3mm for the moulder to remove from each surface - again to reduce the possibility of blow out.
It was a bit unclear just how precisely the stop would locate the work (with careful use it turned out to position the work repeatably to within about 0.1mm) and we didn't want to risk the third and fourth cuts slightly cutting into the already cut first two faces of the shoulders - this would have been visible on the show face of the joint.
We consequently moved the stop in by 0.25mm for the third and fourth cuts and hand planed and chiselled away the resulting slightly raised strips.
It proved quite difficult to judge how much shove to apply to the sliding table to deliver the optimum feed rate – we were a little conservative and got a few light scorch marks near the corners.
The F3 had more than enough power to handle the cuts, but there is very noticeably more feed resistance when cutting longer tenons and deeper shoulders like these versus smaller work.
View higher quality, full size image (3072 X 4096)
View higher quality, full size image (3072 X 4096)
5/3/24 #28: Shaper Set Up to Cut Wide Channel - ...

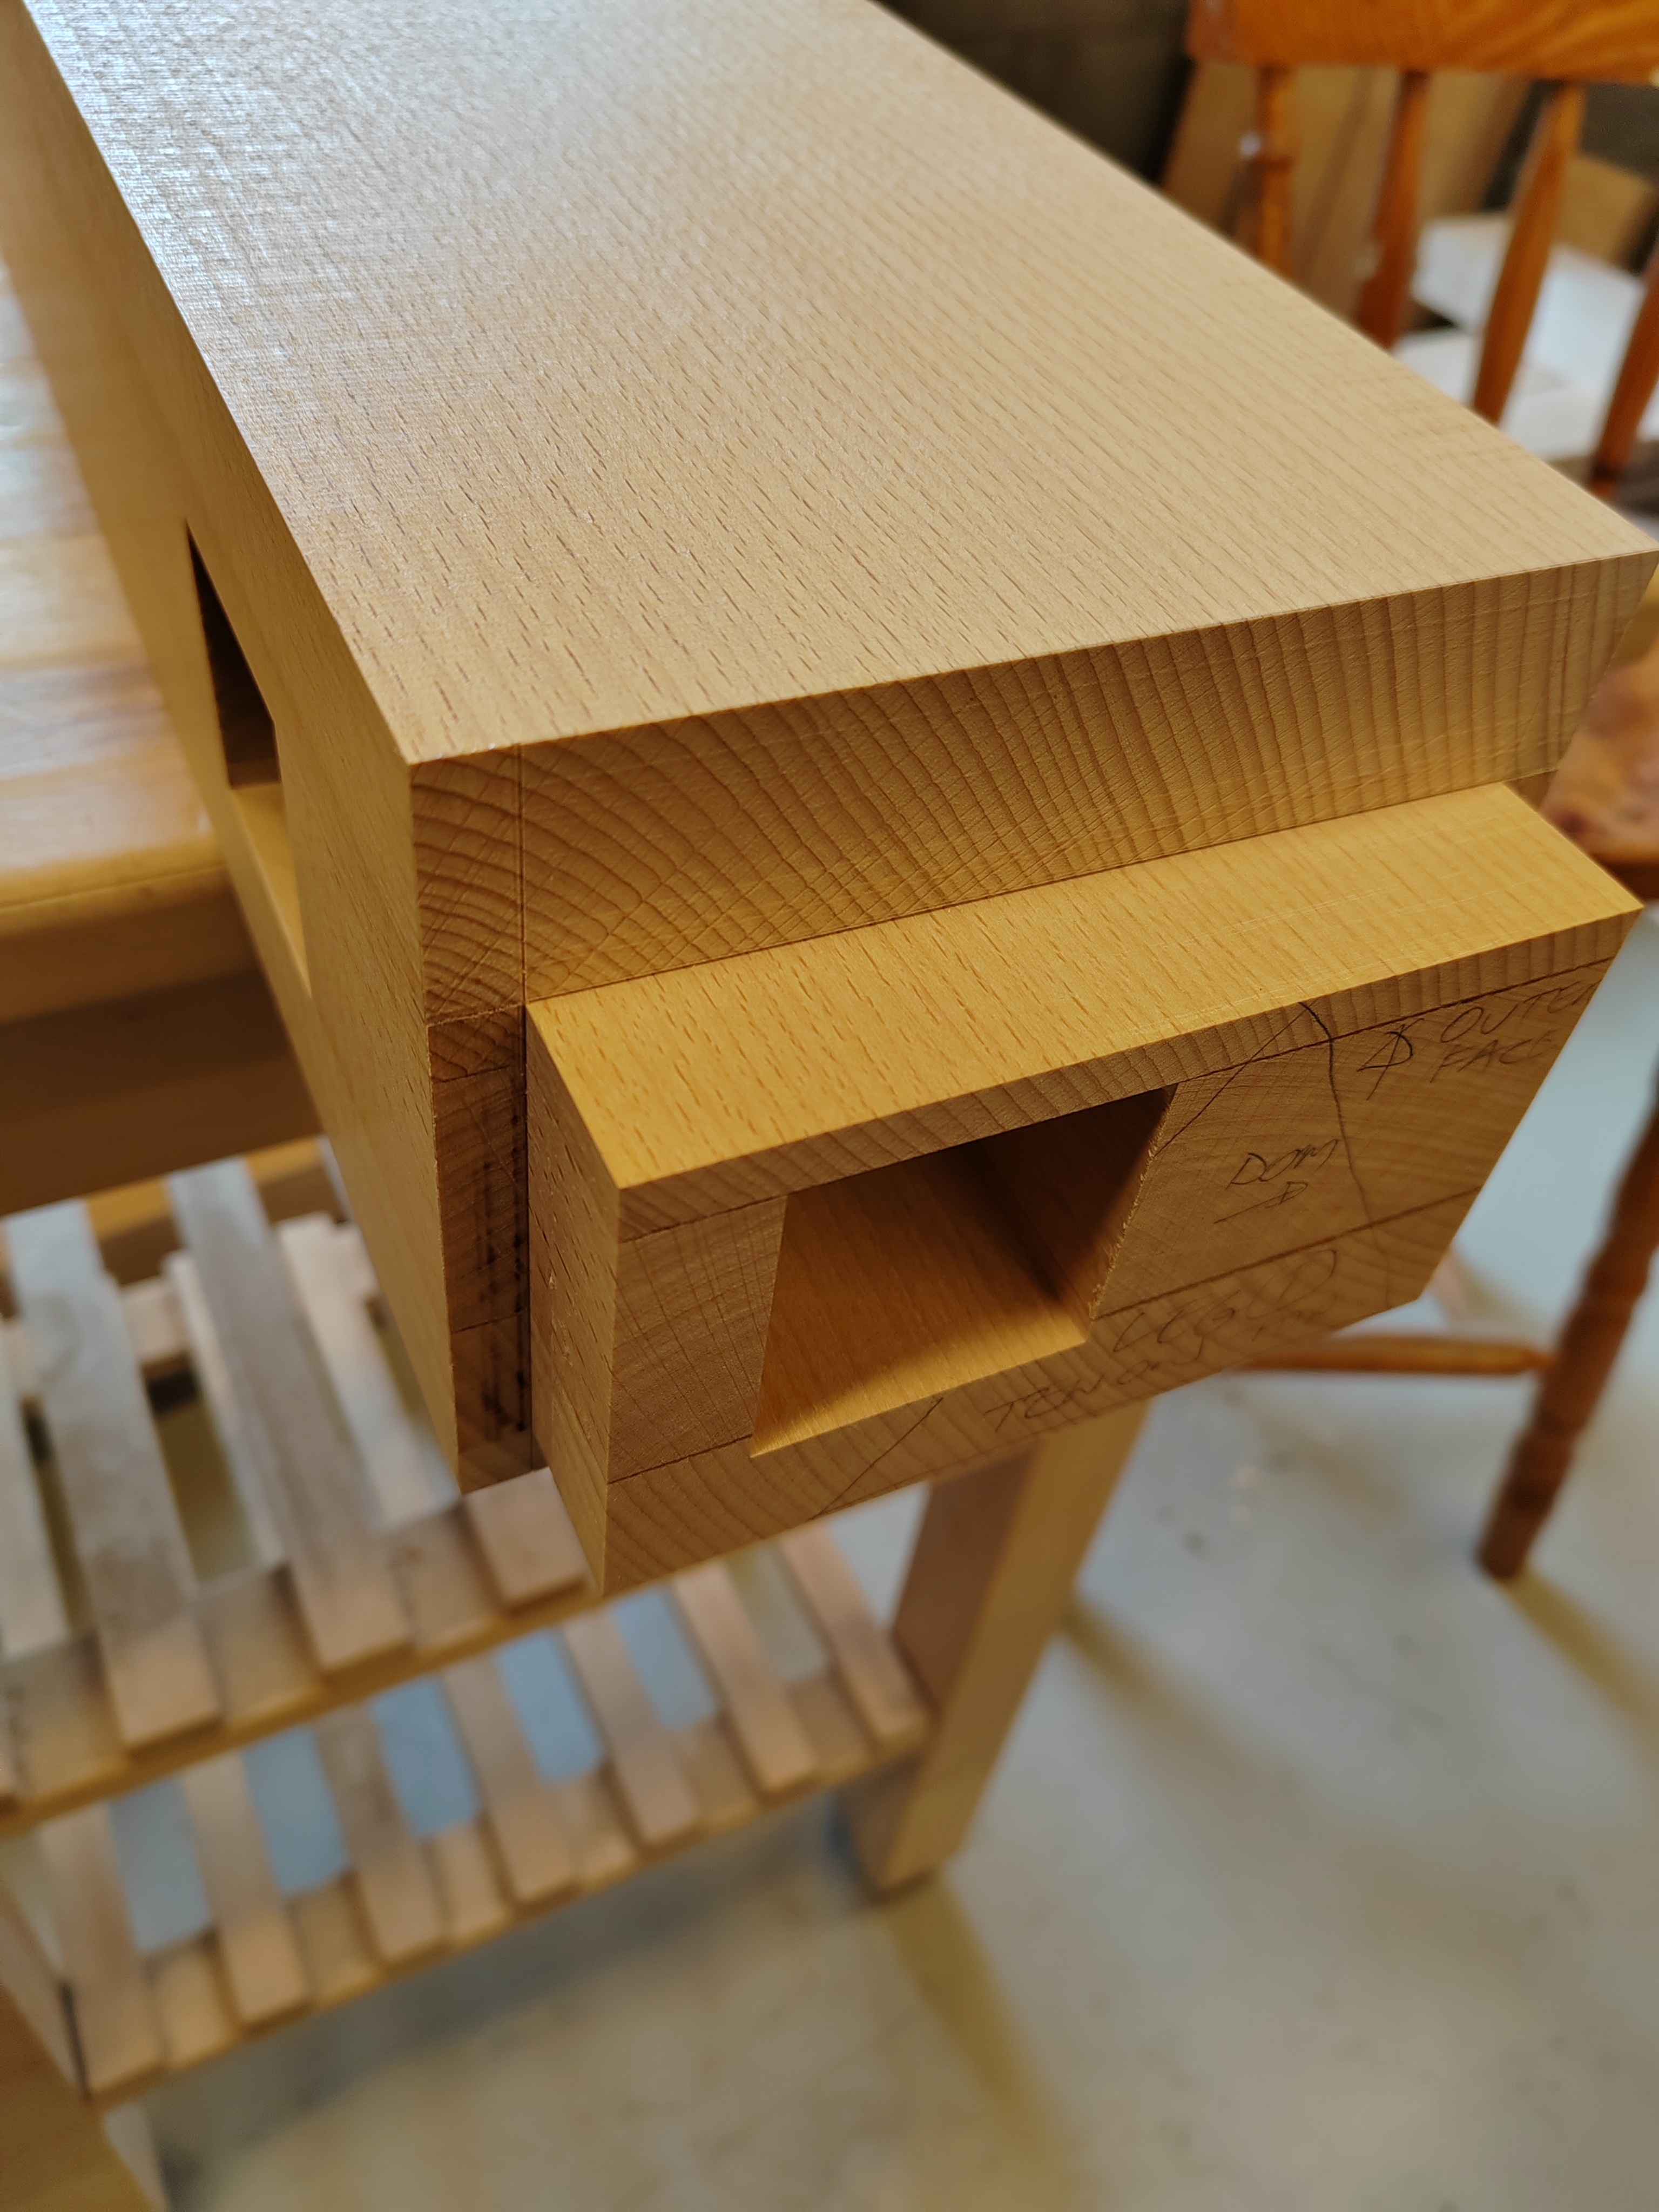
A few pics of the sort of results we got....
View higher quality, full size image (3072 X 4096)
View higher quality, full size image (3072 X 4096)
View higher quality, full size image (3072 X 4096)
6/19/24 #29: Shaper Set Up to Cut Wide Channel - ...

Pic of typical assembled joint - the shoulders fortunately turned out to be in the same plane and square...
View higher quality, full size image (3072 X 4096)
View higher quality, full size image (3072 X 4096)
View higher quality, full size image (3072 X 4096)
|
