Message Thread:
face frame cabinet assembly
8/22/23

Hey hive mind~
I've been building traditional inset face frame cabinets for many years and have yet to come up with a time saving solution for face frame installation. We currently build the box, pin the frame on to keep it in place then clamp and wait. Of course the big drawback is the "wait" part of that sentence. We can only do 4-5 at a time this way. I've tried pocket screws but most cabinets have at least one finished end so you have to clamp and wait anyway. Plus we build so tat the box is flush with the inside of the frame and the possibility of moving the frame is too great. Because of this construction method we can't use the fancy face frame pinners either. Does anyone have experience using a n RF gluer? Any other ideas? What do you all use?
8/22/23 #2: face frame cabinet assembly ...
An RF gluer gets you to 20 minutes of natural dry time but you have to wait for it to cool. I don't think it is the right solution. If you do I have a wood welder I'd be happy to sell you.
I would try a Senclamp type nailer which is a corrugated fastener shaped like a funnel. As the fastener penetrates it pulls the two pieces together.
We use a corrugated fastener from Spotnails every day. Solves the problem you are describing. We found the Senclap unit a little to aggressive, it hits hard.
We shoot it in to the back corner of the corner at 45 degrees. You can hardly see it. In a face frame application you would not see it. They add strength also.
Where are you located. We could nail some things and send it to you or have you stop by.
Bill
Example of the corrugated gun we use.
8/22/23 #3: face frame cabinet assembly ...
Website: http://www.sogncabinets.com
I only use removable clamps on finished ends and places the nails don't hold it down.
Do my toe if that applies
Flip it over, go cut and sand my back. Tag the back on, pull the clamps, flip over again and final sand.
I've never been able to consistently build two cabinets at a time. Lack of room, lack of hands.
My cousin used these square clips on the backside of the frame and dado'd the stiles to accept a deeper partition and end. It worked, but seemed like a lot of screwing around to me.
Small returns and finished ends we'll pocket screw on before setting the frame.
8/22/23 #4: face frame cabinet assembly ...
How long do you wait? PVA sets up enough in about 15 minutes if you gently hand the box and don't twist it. I stopped doing face frame cabinets in the late 80s.
8/23/23 #5: face frame cabinet assembly ...
Pocket screw the face frames on.
If you have an applied end panel that is attached to the face frame, pocket screw the three sides of the frame you have access to, then fasten from inside the box to secure the end panel. If you have line boring you can run a trim screws in those. Add an adhesive to the back side of the panel and box to make it real strong. The end panel also helps with perfect alignment of the box.
8/23/23 #6: face frame cabinet assembly ...
Website: https://www.csaw.com/lamello/
Many of our customers use Lamello P-System connectors to attach their face frames to cabinet boxes. Several benefits:
- It allows them to flat-finish the face frames separately = better finish quality
- No masking off (or unmasking) of pre-finished cabinet box interior
- Functional cabinet hardware can be installed ahead of time as well
- Possible to have a monolithic face frame for a whole run of cabinets, installed on-site if necessary
See link to an application card explaining how it's done. You'll also find numerous customers posting about this process on Instagram.
https://www.csaw.com/wp-content/uploads/2023/03/Face_Frame_edit.pdf
8/23/23 #8: face frame cabinet assembly ...
Chris,
I really like the Lamello Zeta. I think they are perfect for attaching face frames but the cost of fittings is hard to justify. I think they need to bring down prices. I would use them much more if the cost was lower.
8/23/23 #9: face frame cabinet assembly ...
Hi Al,
Understood, Lamello tools and connectors are extremely high quality, and as such have a higher price tag than some expect. But if you read some of the customer testimonials on that face frame card, you'll see that the solution they provide saves time and improves the quality of the finished product. Some customers complete projects hours, even days earlier by using the P-System over their old methods. In those cases, they don't even consider the price of the connectors. Saving hours even on one project at their shop rate of $50-100+/hr starts paying for itself pretty quickly. Then, they save the lost opportunity cost and start on the next project sooner.
But each shop owner has to decide on their own how to spend their time and money.
Since it sounds like you already have a Zeta P2 (thank you if so!), I've put a link to our Lamello Lessons YouTube channel here. Perhaps you'll find some other inspiration in there where you could use the Zeta more and feel like you're getting a better ROI.
https://www.youtube.com/playlist?list=PLZpugdMsywoYvNUe48ArOsX6mT3tlhbws
8/23/23 #10: face frame cabinet assembly ...
Chris that is too slow
8/23/23 #11: face frame cabinet assembly ...
I have used the Lamello for various things including attaching large frames on-site. For this the connectors are well worth the cost. I think the connectors need to come down to a buck a piece, then you would see shops using them much more often.
If I were using them for all face frames I would use 2 or 3 on each stile and 2 or 3 on each rail. Fill in between with regular biscuits. Machine parts before putting frame together. If using 3 on each that�s 9 connectors, 9 x $1.75=$15.75 per cabinet. My cost per connector is based on 80 pairs @$130 plus tax. I just think this is too costly for this application.
8/23/23 #12: face frame cabinet assembly ...
$50 shop rate takes you back to the 80s doesn't it?
8/25/23 #13: face frame cabinet assembly ...
Morning Al,
Thanks again for being a Lamello customer and glad you've gotten some benefit from using the P-System. Anyone would certainly need to choose the right application to use the Zeta/P-System because the connectors do have a healthy cost (compared to wood biscuits, screws, etc). And yes, the Clamex connectors are actually a little more now ($140 for 80 pair), but 90+% of our customers use the Tenso P-14 for face frame installation. Tenso P-14 in the 80 pair boxes are $1.00 per pair and $0.83 per pair in the bulk boxes if that helps you re-evaluate using them more often.
Best,
8/25/23 #14: face frame cabinet assembly ...
Chris,
I stand corrected. I do use the Tenso 14 quite a bit. And these are the ones I attach to face frames in field. I thought they were also $130 for 80 pair. Did they come down in price?
It is a fine tool.
8/28/23 #15: face frame cabinet assembly ...
Morning Al,
You're likely thinking of the Clamex connectors, which are now $140 for a box of 80-pairs. The Tenso P-14 are our most popular connector, and sell for $80 for a box of 80-pairs. With any P-System connector, you pay less per connector if you purchase in larger quantities (300 or 1,000 pair boxes). The Tenso P-14 in 1,000 pairs cost $825, or $0.825 per pair. Hope this helps.
*For face frame applications with Tenso, I do highly recommend using pre-load clips, which sell for $65 for 300 pcs.
8/28/23 #16: face frame cabinet assembly ...
I would never use a Lamello fastener. No matter the cost of the fastener it is painfully slow and adds no value. The corrugated staple I recommended is fast strong and inexpensive.
Good luck!
Bill
8/30/23 #17: face frame cabinet assembly ...
Have you considered using the method used by many of the largest cabinet manufacturers and start with stiles and rails made from molding with a groove for your side panels, bottoms and fixed shelves? Most of these companies make the face frame first and fit the box components to it, rather than the other way around.
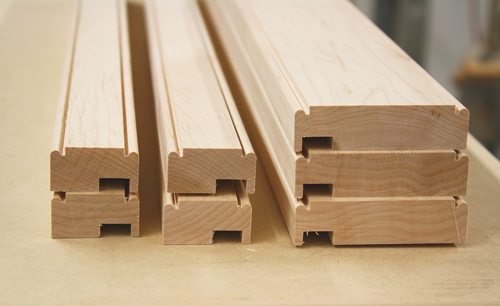
View higher quality, full size image (500 X 306)
Hoffmann USA article on How to Produce Profitable Beaded Face Frames
8/31/23 #18: face frame cabinet assembly ...
Website: http://kdunphy.com
I had to do cabinets for a boat but have the latch flush with the door but could not move meaning rough seas draws fly open . They also fill draws with breakers etc., and weigh a ton.
I did a lap joint, and then the biscuits was fast and didn't need a long clamp time.
I like Scott molding great systems just the joint over time
I'm going to visit the boat and see the seams after 4 years real curios how it held up
8/31/23 #19: face frame cabinet assembly ...
Corrugated nailer. Glue, clamp, shoot, done. No dados/rabbetts, screws, biscuits or waiting. you can still hold your partitions flush to the inside of the opening
|